Factory Acceptance Test (FAT) Checklist Template

A fault found on the vendor’s floor is fixed by the people who built the equipment. The same fault found after it has been crated, shipped and installed waits for an engineer to travel and holds up your start-up.

Last reviewed: October 2026

This free factory acceptance test (FAT) checklist is for project and engineering leads, test and commissioning engineers and quality teams buying a machine, a process skid or a control system. One run is one FAT at the vendor’s works, run by the buyer and the vendor together before the equipment ships. It starts with the specification baseline, the approved drawings and a FAT protocol with acceptance criteria that both sides sign before testing. Preparation covers the schedule, attendees, calibrated instruments, utilities and test materials, and safety on the vendor’s floor. The test itself checks the documents and drawings, inspects the equipment and its panels, proves the safety functions, I/O, alarms and HMI, and runs the functional and performance tests. Deviations go on a punch list with a category and an owner, and a failed test adds a fix-and-retest task. The project lead signs the FAT report and decides the outcome, then the conformity documents, packing and load are checked before release.

FAT, SAT and Commissioning Answer Different Questions

A factory acceptance test (FAT) checks new equipment at the vendor’s works, against the specification in the contract, before it is packed and shipped. Faults found there are fixed by the people who built the equipment, with their tools and spares to hand. The same fault found after installation waits for an engineer to travel and holds up the start-up. For automation systems in the process industry, IEC 62381 (edition 3, 2024) sets out requirements and checklists for the factory acceptance test, the factory integration test, the site acceptance test and the site integration test.

This checklist runs one FAT. It sits between the decision to buy, made in the Capital Expenditure (CapEx) Approval Checklist, and the tests at your own site. Each stage answers a different question.

This checklist

Factory acceptance test (FAT)

Asks: was the equipment built and does it work as specified, before it leaves the vendor?

Where and when: at the vendor’s works, after the vendor’s own tests and before packing.

Output: a signed FAT report, an agreed punch list and the equipment released to ship.

At your site

Site acceptance test (SAT)

Asks: does it still work after transport and installation, connected to your utilities and systems?

Where and when: at your site, after installation, repeating key FAT tests and closing the items left open.

Output: site acceptance, often the trigger for a contract payment.

What the Factory Acceptance Test Checklist Covers

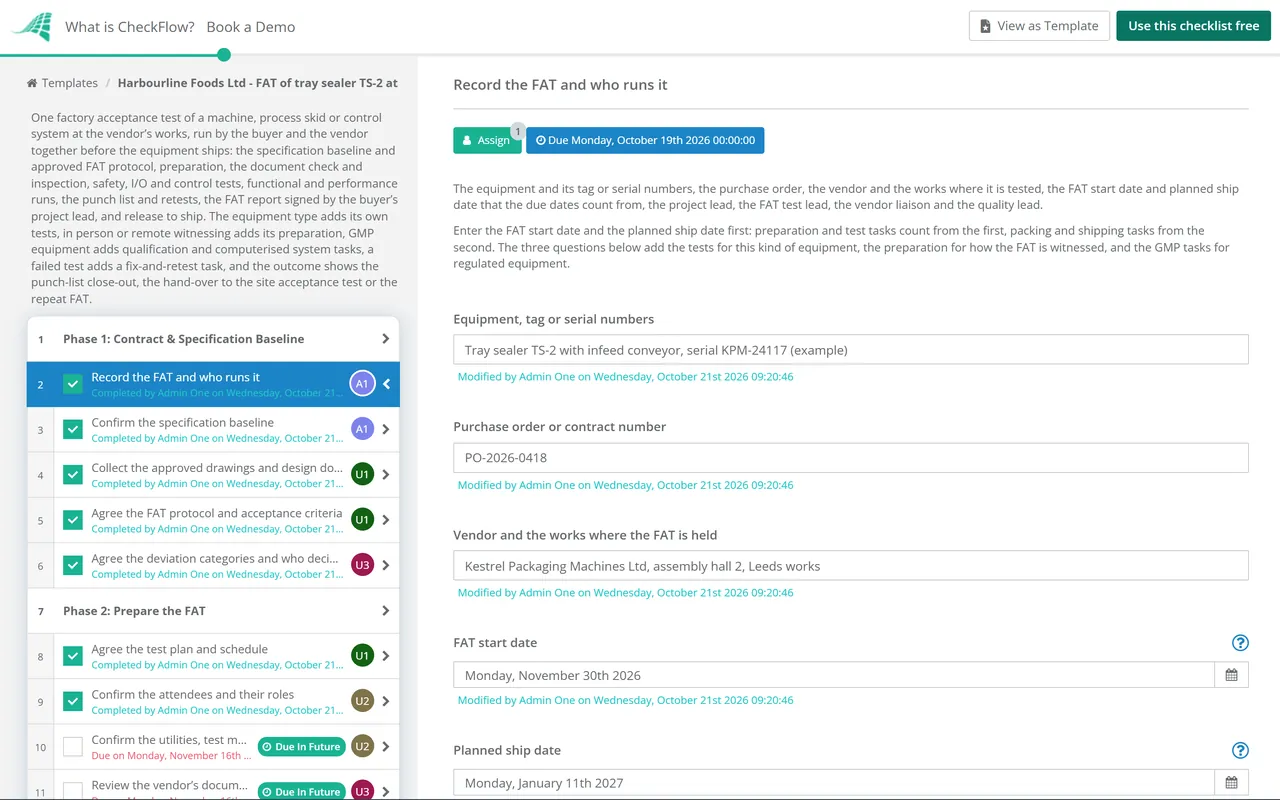
Eight phases follow one FAT from the approved specification to the load leaving the vendor’s works. Due dates count from the FAT start date, and the shipping tasks count back from the planned ship date. A machine, a process skid or a control system adds its own tests, in person or remote witnessing adds its preparation, GMP equipment adds three tasks, and a failed test or a major deviation adds a fix-and-retest task. The project lead signs the FAT report and decides the outcome before anything ships.

  1. Phase 1

    Phase 1: Contract & Specification Baseline

    6 tasks

    A FAT tests the equipment against what was ordered, so the specification, drawings, protocol and acceptance criteria are agreed and approved before anyone travels. Every due date counts back from the FAT start date; the release tasks count back from the planned ship date.

    • Record the FAT and who runs it — the equipment and its tag or serial numbers, the purchase order, the vendor and the works where it is tested, the FAT start date and planned ship date that the due dates count from, the project lead, the FAT test lead, the vendor liaison and the quality lead
    • Confirm the specification baseline — the user requirement specification, the functional specification and any design specification, at the revisions in the contract, with every change since the order agreed in writing; the FAT tests against these and nothing else
    • Collect the approved drawings and design documents — general arrangement, P&IDs, electrical schematics and panel layouts, the I/O list, the bill of materials and data sheets, at the revisions the equipment was built to
    • Agree the FAT protocol and acceptance criteria — every test with its method, the expected result, the acceptance criterion, who witnesses it and where the result is recorded, approved by the buyer and the vendor before the test starts; a criterion that is vague now becomes an argument at the FAT
    • Agree the deviation categories and who decides — how a deviation found at the FAT is graded, for example must be fixed before shipping, can be closed at site, or an observation only, and who on each side can accept a deviation or a concession
    • GMP: agree how the FAT fits the qualification plan — which FAT tests your validation plan will rely on in installation and operational qualification, whether quality approves the protocol, and the documentation rules the vendor’s testers follow, such as signed and dated entries made at the time
  2. Phase 2

    Phase 2: Prepare the FAT

    9 tasks

    Most lost FAT days come from missing materials, instruments out of calibration or equipment that is not finished. Confirm each one before the travel is booked.

    • Agree the test plan and schedule — the order of the tests, day by day, how long each takes, the vendor’s engineers and software staff needed, and what happens to the schedule if a test fails
    • Confirm the attendees and their roles — who attends for the buyer (engineering, operations, maintenance, quality) and for the vendor, any end client or third-party inspector, and who signs each test record
    • Confirm the utilities, test materials and simulation — power, compressed air, water or steam at the test bay, the buyer’s materials, parts or packaging for the runs, and simulators or test rigs for anything the vendor cannot connect
    • Review the vendor’s documents before the FAT — draft manuals, the spares list, material and component certificates, the software description and the risk assessment, reviewed before the visit so the FAT days are spent testing
    • In person: arrange travel, access and the site induction — travel and accommodation, access to the vendor’s works, the site induction and the PPE each visitor needs
    • Confirm the vendor has finished its own tests — the equipment is complete and assembled, and the vendor has run its internal tests and a dry run of the protocol, with the results sent; an unfinished machine is a reason to move the date, not to test what is there
    • Check the test instruments and their calibration — every instrument used to measure a result, such as gauges, meters, scales and data loggers, with a calibration certificate in date for the FAT days
    • Agree the safety arrangements on the vendor’s floor — who operates the equipment during tests (normally the vendor’s staff), isolation and lockout on the test bay, barriers round the test area, the vendor’s emergency arrangements and where visitors may stand
    • Remote: set up the video link and agree how each test is evidenced — cameras on the equipment and on the instruments, screen sharing of the HMI, recordings, a shared folder for results, and which tests need someone on the floor, such as a third-party inspector
  3. Phase 3

    Phase 3: Documents & Inspection

    6 tasks

    Start with the documents and a close look at the equipment while it is still easy to reach. Log every finding in the punch list as you go, with a category.

    • Hold the opening meeting — attendees, the scope, the protocol revision, the schedule, the safety briefing for the test bay, and how deviations will be logged and graded
    • Check the documents and drawings against the equipment — drawing revisions, tag numbers and nameplate data, material and component certificates, instrument data sheets and whether the drawings show the equipment as built
    • Inspect the equipment visually and mechanically — dimensions against the general arrangement, workmanship, welds and fixings, access for operation and maintenance, labels and tags, damage, and completeness against the bill of materials
    • Check the electrical installation and control panels — panel build against the schematics, wire numbering and terminations, earthing and bonding, cable entries, panel labels and ratings, and the vendor’s insulation and continuity test records
    • Skid: check the piping, welds and pressure test records — routing against the P&IDs, material certificates, weld records and any non-destructive testing, the pressure or leak test witnessed or its records reviewed, and instrument hook-ups
    • GMP: check product-contact parts and the cleaning design — materials and surface finish certificates for product-contact parts, drainage, and access for cleaning and maintenance, checked against the specification
  4. Phase 4

    Phase 4: Safety, I/O & Control Tests

    7 tasks

    Prove that every safety function works before the equipment is run hard. Control tests use the I/O list and the functional specification, one point and one sequence at a time.

    • Test the safety functions and guarding — every emergency stop, guard interlock, light curtain and two-hand control, that the equipment cannot restart on a reset alone, and that each one matches the vendor’s risk assessment and the protocol
    • Machine: check the guards cover every danger zone — the point of operation, nip points and rotating parts guarded, fixed guards secured, and fixing points for anchoring a machine designed for a fixed location
    • Test the I/O and control logic — every input and output from the field device or simulator to the controller and the HMI, analogue ranges and scaling, and every interlock and sequence in the functional specification
    • Simulate alarms and faults — each alarm triggered with its text and priority checked, the equipment going to a safe state on a fault, alarm reset, and loss of power, air or communications
    • Check the HMI and record the software versions — screens against the functional specification, user levels and passwords, units and text, and the controller, HMI and drive firmware versions recorded, with a backup copy handed over
    • Control system: test the network, redundancy and power-failure recovery — controller and network redundancy switch-over, communications with other systems (simulated where needed), behaviour on power loss and restart, time synchronisation, user accounts and remote access
    • GMP: check the computerised system controls — user access so that only authorised people change recipes, master records or settings, any audit trail your specification requires, checks on data entered and produced, and backup and restore
  5. Phase 5

    Phase 5: Functional & Performance Runs

    6 tasks

    Run the equipment the way it will be used, with your materials where you can, and record each result against its acceptance criterion rather than “works OK”.

    • Run the equipment without product — dry cycles in every mode (automatic, manual and step), start-up and shutdown sequences, speeds and directions, and unusual noise, vibration or heat
    • Run the functional tests in the protocol — each function in the functional specification run and recorded against its acceptance criterion, signed by the witness from each side
    • Run the performance test against the acceptance criteria — throughput or capacity, accuracy, cycle time and the quality of the output, run for the duration the protocol sets, with the results recorded against each criterion
    • Machine: run your own parts or packaging — your materials, parts or packaging run through the machine, with changeovers between formats, reject systems and the quality of finished output checked
    • Skid: test the process functions with water or a test medium — flows, pressures, temperatures and levels, control loops responding and stable, dosing or mixing accuracy, and no leaks under operating conditions
    • Control system: run the integrated test with a simulated plant — complete sequences, recipes or batches, interfaces to other systems, and reports and historian data, run end to end against the functional specification
  6. Phase 6

    Phase 6: Punch List & Retest

    4 tasks

    Every deviation gets a category, an owner and a date. A failed test or a major deviation adds a fix-and-retest task, so the report never records a pass that was not witnessed.

    • Log every deviation in the punch list — each deviation from the specification or protocol with its category, the owner who fixes it and the date it must close by, and the worst result found in the tests
    • Fix and retest the failed items — the vendor fixes each failed test and major deviation, and the test is repeated and witnessed in full, not just the part that failed; anything not fixed goes into the report as open
    • Agree the punch list with the vendor — both sides agree each item, its category, its owner and its close-by date, and the vendor signs the list
    • Hold the closing meeting — the results test by test, open items, the recommended outcome for the report, and the next steps to shipping
  7. Phase 7

    Phase 7: FAT Report & Sign-Off

    3 tasks

    The report is the record the site acceptance test and any later dispute start from. Nothing after the sign-off can be completed until the project lead records the outcome.

    • Compile the FAT report — the executed protocol with signed test records, instrument certificates, the punch list, photos, software versions and every deviation with its category
    • Review the report for completeness — every test has a result and a signature, every deviation is graded and owned, and the report matches the protocol revision that was approved
    • Sign the FAT report and decide the outcome — the project lead accepts the equipment and releases it to ship, accepts it with punch items to close before shipping or at site, or rejects it and asks for the FAT to be repeated
  8. Phase 8

    Phase 8: Release to Ship

    8 tasks

    The outcome decides what comes next: close the punch items first, hand them to the site acceptance test, or repeat the FAT. Then check the conformity documents, the packing and what leaves the works.

    • Close the punch items before shipping — each item fixed and checked, by a visit, a video call or photos and records as the category allows, and the punch list updated before the equipment is packed
    • Hand the open punch items to the site acceptance test — every open item, its owner and how it will be proved at site, added to the site acceptance test plan
    • Rejected: agree the fixes and a date to repeat the FAT — what the vendor will fix, the evidence wanted before the next visit, and a new FAT date; start a new run of this checklist for the repeat and close this one
    • Check the declaration and marking — the declaration of conformity and the UKCA or CE marking for complete machinery, or the declaration of incorporation and assembly instructions for partly completed machinery, as the contract and the destination require
    • Collect the documents for installation and the site acceptance test — the instructions and manuals, as-built drawings, the spares list, certificates, software backups, the FAT report and the punch list, and the installation and site test requirements
    • Inspect the packing and preservation — packing suited to the journey and storage time, protection for panels and instruments, lifting points marked, transport locks fitted, and loose parts tagged and listed
    • Carry out the shipping inspection and release the load — what leaves the works matches the packing list, photos taken at loading, and the transport and lifting arrangements checked before the load is released
    • Close the FAT record — every task complete or marked not applicable with a reason, open items handed to the site acceptance test, and the record filed with the equipment

What the Rules Say Before Equipment Ships

No single law or free standard sets out how to run a FAT; the protocol you agree with the vendor does that. But the rules on supplying machinery, guarding and GMP equipment decide some of what you check and what must ship with the equipment. Use the table as a starting point; it is not legal advice.

Topic What the source says What it means at the FAT
Testing by the maker (Great Britain)The Supply of Machinery (Safety) Regulations 2008 require the responsible person to carry out, or have carried out, the research and tests on components, fittings or the completed machinery needed to decide whether it can be assembled and put into service safely (regulation 7(3); regulation 8(4) for partly completed machinery).The FAT is your check on the equipment, not the vendor’s conformity assessment. Ask to see the vendor’s own tests and risk assessment before the visit.
Declaration and marking (Great Britain)Before machinery is placed on the market or put into service: the essential health and safety requirements met, a technical file, instructions, a conformity assessment procedure, a declaration of conformity that accompanies the machinery and the UK marking (regulation 7(2)). Regulation 12A accepts the EC declaration and CE marking under the Machinery Directive instead.Check which declaration and marking the contract asks for, and that they will ship with the equipment.
Partly completed machinery (Great Britain)Comes with technical documentation, assembly instructions and a declaration of incorporation, which stay with it until it is built into machinery and then form part of that machinery’s technical file (regulation 8).A module or skid built into a larger line may ship with a declaration of incorporation, not a declaration of conformity. Agree which one you will receive.
EU Machinery RegulationRegulation (EU) 2023/1230 on machinery repeals the Machinery Directive 2006/42/EC. The European Commission says it applies on a mandatory basis from 20 January 2027, and machinery placed on the market before that date must comply with the Directive.For equipment shipping around January 2027, agree which law the declaration will cite.
Great Britain from 20 January 2027An amendment (S.I. 2026/867, in force 20 January 2027) treats machinery that meets the EU Machinery Regulation, with its EU declaration of conformity and CE marking, as meeting the requirements of regulation 7(2).A CE-marked machine under the new EU Regulation will still be accepted in Great Britain on that route.
Machine guarding (US)29 CFR 1910.212 requires one or more methods of guarding to protect the operator and others in the machine area from hazards such as the point of operation, ingoing nip points, rotating parts, flying chips and sparks, and machines designed for a fixed location to be securely anchored.The duty falls on the employer using the machine. Check the guards at the FAT, while the vendor can still change them.
GMP equipment (US)21 CFR 211.63: equipment of appropriate design, adequate size and suitably located for its intended use and for cleaning and maintenance. 21 CFR 211.68: automatic and computerised equipment calibrated, inspected or checked under a written programme, with controls so that only authorised personnel change records, and backups kept.Test product-contact parts, cleanability and computerised system controls at the FAT, and agree which results your qualification will rely on.
Process automation systemsIEC 62381:2024 (edition 3) defines requirements and checklists for the FAT, factory integration test, SAT and site integration test of automation systems in the process industry, so the owner, buyer and vendor can agree the scope of activities and responsibilities.A useful basis for the protocol of a control or automation system. It is a paid standard; buy it from the IEC if you work to it.

Remote FATs. A video link saves travel but makes some checks harder: noise, vibration, heat and the feel of a guard do not come through a camera. Agree before the FAT which tests need a person on the floor, such as a third-party inspector, and how each remote result is evidenced.

Acceptance criteria. Write each criterion so a witness can say pass or fail without discussion: a number with a tolerance, a defined condition or a document that must exist. Everything else becomes a negotiation at the closing meeting.

Why Run Factory Acceptance Tests in CheckFlow?

1

Nothing ships before the report is signed

The project lead, FAT test lead, vendor liaison and quality lead are chosen on the first task, and each step is assigned to the person who owns it. The sign-off is assigned to the project lead alone, and nothing after that approval step can be completed until the outcome is recorded.

2

Only the tests this equipment needs

A machine adds the guarding check and a run with your own parts, a process skid adds the piping, pressure and process tests, and a control system adds the network, redundancy and integrated tests. GMP equipment adds three tasks, a failed test adds a fix-and-retest task, and the outcome shows the close-out, the hand-over to site or the repeat FAT. Rules show and hide each one from the answers given.

3

The evidence travels with the equipment

Due dates count from the FAT start date and back from the ship date, and overdue alerts go to the task’s assignees. The signed test records, instrument certificates, punch list, photos and software versions sit on the tasks that produced them, and the Reports Grid lists every FAT in progress and the task each one has reached.

CheckFlow does not test equipment or write your acceptance criteria. That stays with your engineers, the vendor and your specification. It makes sure every test in the protocol is run, witnessed, recorded and signed off in order, by the right people, with the evidence attached. CheckFlow’s manufacturing checklist software shows how the same approach runs other plant routines.

Approve the purchase with the Capital Expenditure (CapEx) Approval Checklist and run the wider project with the Capital Project Checklist. Keep the test instruments in date with the Calibration Management Checklist. When the equipment arrives, check the delivery with the Goods Receiving & Inspection Checklist, and isolate it for any work with the Lockout/Tagout (LOTO) Procedure Checklist. Once it is in service, it moves to the Equipment Maintenance Workflow Checklist and the Preventive Maintenance Checklist, and its output to the Manufacturing Quality Control Checklist. For software on its own, use the User Acceptance Testing (UAT) Checklist; for a GMP supplier’s quality system, the GMP Audit Checklist.

AI generator

Didn’t find what you need? Describe it.

Describe the process in a sentence and the AI checklist generator drafts the phases and tasks for you.

Frequently Asked Questions

What is a factory acceptance test (FAT)?

A test of new equipment at the vendor’s works, run by the buyer and the vendor together before the equipment ships. It checks the equipment against the specification and drawings in the contract, using a protocol and acceptance criteria both sides approved beforehand. Deviations go on a punch list with a category and an owner, and the buyer’s project or engineering lead signs the FAT report and decides whether the equipment can ship.

What is the difference between a FAT and a SAT?

The FAT happens at the vendor’s works before shipping; the site acceptance test (SAT) happens at your site after installation. The FAT proves the equipment was built and works as specified, with simulators where your plant is not connected. The SAT proves it still works after transport, connected to your utilities and systems, and closes the punch items left open at the FAT. Commissioning then brings it into production.

What should a FAT protocol include?

The specification and drawing revisions it tests against, each test with its method, expected result and acceptance criterion, who witnesses and signs each result, the instruments used and their calibration, how deviations are graded, and what outcome each grade allows. Approve it on both sides before the FAT. This checklist adds the preparation, safety, document and shipping steps around the tests.

Who should attend a factory acceptance test?

From the buyer, the project or engineering lead who signs the report, a test lead who witnesses and records, and usually people from operations, maintenance and quality. From the vendor, the project manager and the engineers who built and programmed the equipment. An end client or a third-party inspector may attend too. Agree who signs each test record before the FAT starts.

Can a FAT be done remotely?

Yes, by video link with cameras on the equipment and the instruments, screen sharing of the HMI and recordings of each test. Some checks are harder remotely, such as noise, vibration, heat and the fit of guards, so agree before the FAT which tests need a person on the floor and how each remote result is evidenced. Choose Remote or Both on the first task to add that preparation.

What happens if equipment fails the FAT?

Each failure goes on the punch list with a category, an owner and a close-by date. A failed test or a major deviation adds a task to fix it and repeat the test in full. At sign-off the project lead accepts the equipment, accepts it with punch items to close before shipping or at site, or rejects it and asks for the FAT to be repeated, which hides the shipping tasks and adds a task to agree the fixes and a new date.

Is there a standard for factory acceptance testing?

Not one that covers every kind of equipment. For automation systems in the process industry, IEC 62381:2024 defines requirements and checklists for the FAT, factory integration test, SAT and site integration test. GMP equipment for drug manufacture must meet rules such as 21 CFR 211.63 and 211.68 in the US. For most machines the protocol you agree with the vendor sets the tests.

Does a FAT replace CE or UKCA marking?

No. In Great Britain the Supply of Machinery (Safety) Regulations 2008 put the duty to test, assess conformity, draw up the declaration and mark the machinery on the responsible person, normally the manufacturer, before it is supplied. The FAT is the buyer’s own check. Use it to confirm that the right declaration and marking will ship with the equipment.

Is CheckFlow free for this template?

14-day free trial, no card required. The Business plan is $10 per user per month after the trial. Full details at checkflow.io/pricing.

Accept Equipment Before It Leaves the Vendor

Free trial — no credit card required.

14-day free trial, no credit cardFull refund in your first 30 daysUS hosting, EU on request