New Laboratory Setup Checklist Template

The keys to the new lab arrive on Friday. The fume cupboards have not been commissioned, the waste has no route out of the building, and nobody has asked the safety office what it needs to see before the first experiment.

Last reviewed: October 2026

Printed from checkflow.io/templates/research-development/new-laboratory-setup-checklist

This free new laboratory setup checklist is for lab managers, principal investigators and research facilities teams taking one research lab from an empty room to its first experiments, or moving a research group into a new lab space. One run is one lab start-up. It plans the work and the layout, confirms the space and its services (ventilation, fume cupboards, gases, water, power and waste routes), writes the risk assessments and gets them accepted by your institution’s safety office, installs and qualifies the equipment, orders and stores chemicals, checks the emergency equipment, trains everyone and keeps the records, and ends with the lab approved as ready for work. Tasks for biological agents, radioactive materials or X-ray equipment, and lasers appear only where the work needs them, a move phase appears when a group is moving in from an existing lab, and short notes for Great Britain and the United States sit on the tasks they affect.

A Lab Start-Up Gets the Room Ready Before Anyone Is Onboarded Into It

A lab start-up is the work between getting the keys to an empty room and running the first experiment in it: services, approvals, equipment, chemicals, waste, emergency equipment and training. It happens once for each new lab, or once for each move, and it sits between facilities, the safety office, suppliers and the research group, so it is easy for a step to fall between them. This checklist gives each of them their tasks, with due dates counted back from the go-live date.

The national rules behind it are short; the detail is local. In Great Britain, COSHH (the Control of Substances Hazardous to Health Regulations 2002) says work that is liable to expose employees to a substance hazardous to health must not be carried out until a suitable and sufficient risk assessment has been made and its steps implemented. In the US, the OSHA Laboratory Standard (29 CFR 1910.1450) requires a written chemical hygiene plan where hazardous chemicals are used in a laboratory. Federal OSHA covers private employers; staff of a state or local government employer, such as a public university, are covered where the state runs an OSHA-approved State Plan, which must be at least as effective as OSHA. Which assessments, approvals and inspections your institution needs before a new lab opens is for your own safety office to say, and this checklist asks it in the first week.

Once the lab is open, each person who joins it goes through the New Researcher & Lab Onboarding Checklist, each instrument’s later calibrations run through the Calibration Management Checklist, and a full assessment of one task or area runs through the COSHH Assessment Checklist. A study that needs ethics approval goes through the R&D Ethics Compliance Checklist.

This checklist

One new lab

Covers: the space and services, the risk assessments and approvals, equipment, chemicals and waste, emergency equipment, training and records, and a move from an old lab where there is one.

Planned around: the go-live date, with planning starting about fourteen weeks before it.

Output: a lab signed off by the safety office and approved as ready for work, with the records to show how.
Each person

Researcher onboarding

Covers: one person joining a lab that is already running: induction, hazard training, protocols, data rules and instrument sign-offs.

Planned around: their start date.

Output: the principal investigator’s sign-off of independent work, in the New Researcher & Lab Onboarding Checklist. This checklist inducts the first team once; later arrivals go through that one.

Each instrument

Calibration management

Covers: one instrument through one calibration cycle: pulling it from use, calibrating it, reviewing the certificate and returning it.

Planned around: the instrument’s calibration due date.

Output: a calibrated instrument and an updated register, in the Calibration Management Checklist. This checklist qualifies or calibrates each item once, before first use.

What the New Laboratory Setup Checklist Covers

Nine phases take one lab from planning, about fourteen weeks before go-live, to its review after the first month. The biological, radiation and laser approval tasks appear only when the planned work includes them, and Phase 7 appears only when a group is moving in from an existing lab. Nothing after the go-live approval can be completed until the approver records a decision.

  1. Plan

    Phase 1: Plan the Lab

    5 tasks

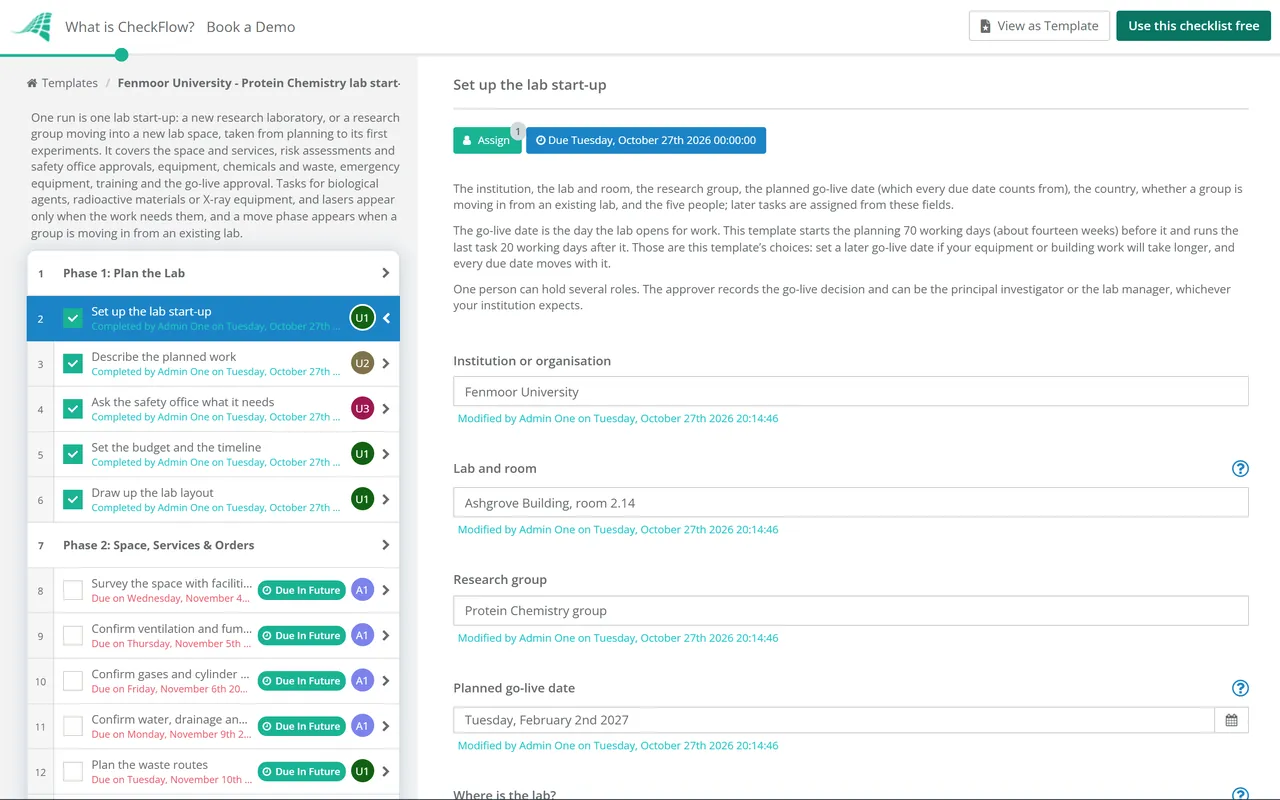
    Start about fourteen weeks before the planned go-live date. The first task names the five people and asks where the lab is and whether a group is moving in from an existing lab; the second asks which specialist hazards the work involves. Each answer adds the tasks or notes it needs, and every due date counts from the go-live date in working days.

    • Set up the lab start-up — the institution, the lab and room, the research group, the planned go-live date (which every due date counts from), the country, whether a group is moving in from an existing lab, and the five people; later tasks are assigned from these fields
    • Describe the planned work — the research, the processes, the chemicals, gases and equipment it needs, any specialist hazards, and how many people will work in the lab
    • Ask the safety office what it needs — who in your institution’s safety office advises on this lab, which risk assessments, approvals and inspections it requires before work starts, and how long each takes
    • Set the budget and the timeline — equipment, furniture, building work, services and consumables, with the items that take longest to arrive or install named first
    • Draw up the lab layout — benches, fume cupboards, safety cabinets, gas points, sinks, storage, emergency equipment and exit routes, checked against the planned work
  2. Space

    Phase 2: Space, Services & Orders

    6 tasks

    Confirm the room can take the planned work before anything is ordered: extraction, gases, water, drainage, power and a route out for every kind of waste.

    • Survey the space with facilities — its condition, floor loading, doors and lifts wide enough for large equipment, security, and any building work needed before fit-out
    • Confirm ventilation and fume cupboards — the general ventilation, the number and position of fume cupboards and other extraction, and who installs and commissions them
    • Confirm gases and cylinder positions — piped gases, where cylinders will stand and how they are restrained, and gas detection or alarms where the risk assessment calls for them
    • Confirm water, drainage and power — sinks and pure water, what may go down the drains, the electrical supply and sockets, backup power for freezers and critical equipment, and network points
    • Plan the waste routes — chemical, biological, sharps, glass and general waste: where each is collected in the lab and how it leaves the building
    • Order the equipment — each item with its supplier, expected delivery, installation needs and whether it needs qualification or calibration before first use
  3. Approvals

    Phase 3: Risk Assessments & Approvals

    7 tasks

    Write the assessments for the work this lab will actually do, and get every approval your safety office named in Phase 1. The biological, radiation and laser tasks appear only when the planned work includes them. Start any approval with a long lead time, such as an HSE consent or a committee that meets monthly, as soon as Phase 1 shows it is needed, and move the go-live date if it will not be in place by its due date.

    • Write the chemical risk assessments — for each hazardous substance and process in the planned work: who could be exposed, how, and the controls
    • Write the lab’s standard operating procedures — for each hazardous procedure: the controls, the personal protective equipment, the waste and what to do if it goes wrong
    • Identify work that needs prior approval — procedures and particularly hazardous substances that your safety office or chemical hygiene plan says need approval or a designated area before work starts
    • Get the biological safety approval — the biological risk assessment and the containment agreed with your biological safety officer or committee, and any notification or registration made before work starts
    • Get the radiation protection approval — the radiation risk assessment agreed with your radiation protection adviser or radiation safety officer, and the lab covered by the right notification, registration, consent or licence before any radioactive material arrives or X-ray equipment is used
    • Get the laser safety approval — the laser risk assessment, the controlled area and the eye protection agreed with your laser safety officer before any laser is switched on
    • Get the assessments accepted by the safety office — reviewed against your institution’s own rules, with every comment answered and the date it accepted them recorded
  4. Equipment

    Phase 4: Equipment Installation & Qualification

    6 tasks

    Nothing is used until it is installed, connected and checked. Equipment moved from an old lab is checked in Phase 7.

    • Receive and check each delivery — against the order, for damage, with the manuals, certificates and warranties filed
    • Install the equipment with its services — power, gas, water, drainage and extraction connected by the supplier or facilities, and heavy or tall items fixed where needed
    • Commission the fume cupboards and safety cabinets — each one tested on installation against its design performance, with the commissioning report kept
    • Qualify or calibrate equipment before first use — installation and operational checks, or calibration against traceable standards, for each item that needs it
    • Add each item to the equipment register — its ID, location, service and calibration due dates, and who may use it
    • Set up alarms for freezers and critical equipment — temperature or failure alarms, who is called out of hours, and where samples go if a unit fails
  5. Stores

    Phase 5: Chemicals, Gases & Waste

    5 tasks

    Order only what the first months of work need, store it by hazard, and have the waste containers and the first collection ready before the first experiment.

    • Order chemicals and consumables — only what the first months of work need, checked against the planned work and the risk assessments
    • Set up chemical storage — flammables cabinets, acids and bases apart, incompatible materials separated, and the quantities kept in the lab low
    • Build the chemical inventory — each container with its location, quantity and hazards, and a safety data sheet for each product where people can reach it
    • Install the gas cylinders — restrained, labelled and fitted with the right regulators, with full and empty cylinders kept apart
    • Set up waste containers and the first collection — a labelled container for each waste stream in the lab, and a collection booked with the waste contractor or your institution’s waste team
  6. Readiness

    Phase 6: Emergency Equipment, Training & Records

    8 tasks

    Check the emergency equipment works, write down what to do when something goes wrong, and train everyone before the lab opens.

    • Check the eyewash stations and safety showers — in place where corrosive materials will be used, flushed and tested, with a routine check set
    • Stock the spill kits and first aid kits — spill kits matched to the chemicals and any biological agents, first aid kits, and a named person who restocks them
    • Check fire safety in the lab — extinguishers suited to the hazards, alarms that can be heard in the lab, and exits and corridors clear
    • Write the lab’s emergency arrangements — spills, exposures, fire, gas leaks and out-of-hours incidents, posted in the lab and shared with emergency responders where your institution requires
    • Set up lab notebooks or the ELN and the lab’s records — the notebook or electronic lab notebook rules, and where training records, inspection records and the equipment register are kept
    • Give everyone the lab safety induction — exits, alarms, eyewash, showers, spill kits, waste routes and the lab’s rules, with a record for each person
    • Train people on the risk assessments and procedures — the hazards, the controls and the procedures each person will use, with the record kept
    • Train people on each instrument — a named trainer for each instrument, and a sign-off before anyone uses it alone
  7. Move

    Phase 7: Moving In from an Existing Lab

    5 tasks

    Applies only when the first task says a research group is moving in from an existing lab. Chemicals, samples and equipment leave the old lab in a planned order, decontaminated and accounted for.

    • Plan the move with both labs — dates, what moves, what is disposed of, who moves hazardous items and samples, and what keeps running in the old lab until the move
    • Reduce the chemicals before the move — out-of-date and unwanted chemicals disposed of through the old lab’s waste route, so less has to move
    • Decontaminate equipment before it is moved — each item cleaned and decontaminated, with a signed record, before anyone moves it
    • Move chemicals, samples and hazardous items — packed by hazard, moved by trained staff or a specialist carrier on the route your safety office agrees, and checked in at the new lab
    • Check moved equipment before use — installed, connected and checked or recalibrated after the move, with any fume cupboard or safety cabinet moved from the old lab tested again once it is installed, and added to the equipment register
  8. Sign-off

    Phase 8: Inspection & Go-Live Approval

    6 tasks

    The approver’s decision halts the checklist: nothing after it can be completed until the lab is approved as ready for work. The safety office’s sign-off comes first.

    • Walk the lab with the safety contact — every area checked against the layout, the assessments and this checklist, with each snag listed
    • Fix the snags — each one closed by its owner, or agreed with the approver as a condition of go-live
    • Record the safety office’s sign-off — the inspection or review your institution requires before a new lab opens, its outcome and any conditions
    • Approve the lab as ready for work — the approver checks the safety office’s sign-off is recorded, the approvals are in place and people are trained, and records the decision before the first experiments
    • Fix what stopped go-live — each gap the approver listed fixed and checked, then a fresh decision from the approver
    • Meet the conditions set at go-live — each condition met by the date the approver set, with the evidence, and the approver told
  9. Go-live

    Phase 9: Go-Live & First Month

    6 tasks

    Open the lab to the trained people, supervise the first runs, set the routine checks, and review the lab after a month. The old lab is decommissioned and handed back only after the new one is open.

    • Open the lab to the trained people — access changed from escorted to the named list of people who have been inducted and trained, and the opening date recorded
    • Run the first experiments under supervision — the first run of each hazardous procedure with the principal investigator or an experienced person present, and any changes written into the procedure
    • Set the routine checks — eyewash flushing, fume cupboard checks, alarm tests, stock and waste checks, each with an owner and a schedule
    • Decommission the old lab — emptied, cleaned and decontaminated, waste removed, and checked by the safety office before it is handed back
    • Hand back the old space — keys and access cards returned, hazard signs removed, and the space released to facilities with the decommissioning record
    • Review the lab after its first month — what worked, near misses and changes to the work, with the risk assessments and procedures updated where needed

The National Rules Behind a Lab Start-Up

This table names the national rules behind the tasks, with the source of each. It is a summary, not legal advice. Your institution’s safety office decides what applies to your lab, and the country notes in the template repeat these points on the tasks they affect.

AreaGreat Britain (not Northern Ireland)United States
Hazardous chemicalsCOSHH regulation 6: a suitable and sufficient risk assessment before the work, with the significant findings recorded where there are 5 or more employees29 CFR 1910.1450(e): a written chemical hygiene plan, readily available to employees and reviewed at least once a year
ControlsCOSHH regulation 7: prevent exposure or, where that is not reasonably practicable, control it adequately; substitution first, personal protective equipment last1910.1450(e)(3)(ii): the criteria the employer uses to choose control measures, including engineering controls, personal protective equipment and hygiene practices
Fume cupboards and extractionCOSHH regulation 9: local exhaust ventilation, which HSE’s guide HSG258 says includes fume cupboards, thoroughly examined and tested at least once every 14 months, with records kept for 5 years1910.1450(e)(3)(iii): the plan requires fume hoods and other protective equipment to function properly, and says how that is ensured
TrainingCOSHH regulation 12: information, instruction and training for anyone liable to be exposed1910.1450(f): training at initial assignment and before new exposure situations; the employer sets the refresher frequency
EmergenciesCOSHH regulation 13: procedures, first-aid facilities, drills tested at regular intervals and warning systems29 CFR 1910.151(c): facilities for quick drenching or flushing of the eyes and body where injurious corrosive materials are used
Biological agentsHSE: notify deliberate work with Hazard Group 2, 3 or 4 agents on form CBA1; GMOs under the Contained Use Regulations; a licence for specified animal pathogens42 CFR 73.7: a certificate of registration to possess, use or transfer select agents and toxins; other work as your institution decides
Radioactive materials and X-ray equipmentIonising Radiations Regulations 2017: notify HSE, register or get consent, depending on the risk; HSE says X-ray devices need a registration unless the practice needs consent10 CFR 30.3: a licence for byproduct material; in an Agreement State, 10 CFR 150.10 exempts most users from NRC licensing and state rules apply. X-ray equipment: ask your radiation safety officer what your state requires
LasersControl of Artificial Optical Radiation at Work Regulations 2010; HSE says eye protection depends on the risk assessmentNo federal rule is cited here: follow your institution’s laser safety programme
Hazardous wasteEngland: the duty of care and classifying waste (gov.uk); Scotland and Wales have their own rules40 CFR part 262; laboratories owned by eligible academic entities may opt into subpart K

Your safety office has the last word. Your institution may add its own rules, such as approval for particular substances, door signs, an inspection before a room is occupied, and who may sign a lab off. This checklist asks the safety office what it needs in Phase 1 and records its sign-off in Phase 8, before the go-live decision. Outside Great Britain and the United States, follow your national rules: the template shows a short reminder in place of the country notes.

Northern Ireland: COSHH 2002 extends to England, Wales and Scotland only, so the Great Britain notes do not apply there as written.

Why Run Your Lab Start-Up in CheckFlow?

1

No experiments until the lab is approved

The go-live decision is assigned to the approver alone, and the checklist halts there: nothing after it, including opening the lab, can be completed until the approver records a decision, after the safety office’s sign-off. Ready with conditions or Not ready adds the next step for the lab manager. See how approvals that halt a checklist work.

2

Only the tasks this lab needs

Biological agents, radioactive materials or X-ray equipment, and lasers each add their own approval task, and a group moving in from an existing lab adds the move phase and the hand-back of the old space. Choosing Great Britain or the United States adds short notes on the national rules to the tasks they affect.

3

Every date counted back from go-live

Enter the go-live date and every task falls due a set number of working days before or after it. Tasks are assigned from the five people named in the first task, and the Tasks Grid shows each of them what is due. If the opening slips, change the date and every due date moves with it.

CheckFlow runs the start-up: who does what and by when, the evidence and the sign-offs. It does not replace your safety office’s judgement or your institution’s own forms. The Reports Grid lists every lab start-up with its answers, so the next one starts from this one.

After go-live, onboard each new member of the lab with the New Researcher & Lab Onboarding Checklist, keep instruments in calibration with the Calibration Management Checklist and the routine checks on schedule with the Preventive Maintenance Checklist. Assess a single task or area in depth with the COSHH Assessment Checklist, and record experiments with the R&D Experiment Tracking Workflow Checklist. The building’s own plan for fires and evacuations belongs in the Emergency Action Plan Checklist. Opening a clinical research site instead? The Clinical Trial Site Initiation Checklist covers it. Running safety checks across several labs? CheckFlow’s compliance checklist software keeps owners, evidence and sign-offs in one place.

AI generator

Didn’t find what you need? Describe it.

Describe the process in a sentence and the AI checklist generator drafts the phases and tasks for you.

Frequently Asked Questions

What should a lab start-up checklist include?

This template covers nine stages: planning the work and the layout, the space and its services, risk assessments and approvals, equipment installation and qualification, chemicals, gases and waste, emergency equipment, training and records, an optional move from an existing lab, and the inspection and go-live approval followed by the first month. It also asks your safety office, in the first week, which assessments, approvals and inspections it needs before the lab opens.

How long does it take to set up a new laboratory?

It depends on equipment lead times, any building work and how long your approvals take. This template starts planning about fourteen weeks (70 working days) before the go-live date and runs the last task 20 working days after it. That is the template’s choice, not a rule: set a later go-live date if your orders or approvals will take longer, and every due date moves with it.

Who approves a new lab before work starts?

Your institution decides. In this template the safety office records its sign-off, or that none is required, and then the approver named in the first task, the principal investigator or the lab manager, approves the lab as ready for work. The checklist halts at that decision, so nothing after it can be completed until it is recorded. A Not ready decision adds a task to fix what stopped go-live.

Does a new lab need a chemical hygiene plan?

In the US, the OSHA Laboratory Standard (29 CFR 1910.1450) requires a written chemical hygiene plan wherever hazardous chemicals are used in a laboratory, for the employers it covers (public universities only in State Plan states), with standard operating procedures, control measures, working fume hoods, prior approval rules and a named Chemical Hygiene Officer. Your safety office will say whether a new lab joins the institution’s existing plan or gets its own procedures. This template’s Phase 3 covers it.

Does a new lab need a COSHH assessment before work starts?

In Great Britain, yes, where the work is liable to expose employees to a substance hazardous to health. COSHH regulation 6 says the work must not be carried out until a suitable and sufficient risk assessment has been made and its steps implemented. This template writes the lab’s chemical assessments in Phase 3. For an in-depth assessment of one task or area, use the COSHH Assessment Checklist.

How often should fume cupboards be tested?

Test each new unit when it is installed, against its design performance. In Great Britain, HSE’s guide to local exhaust ventilation (HSG258) treats a fume cupboard as a partial enclosure, a kind of LEV, so COSHH regulation 9 requires a thorough examination and test at least once every 14 months, with the record kept for 5 years. In the US, the chemical hygiene plan must require fume hoods to function properly and say how that is ensured. Your safety office sets the schedule.

What changes when a research group moves into a new lab?

Answer Yes to the move question and this template adds a phase to plan the move, reduce the chemicals, decontaminate equipment, move chemicals, samples and hazardous items, and check moved equipment before use. Two tasks after go-live decommission the old lab and hand the space back, so it is not released until the new lab is open. For an office move, use the Office Relocation & Office Move Checklist.

Is CheckFlow free for this template?

14-day free trial, no card required. The Business plan is $10 per user per month after the trial. Full details at checkflow.io/pricing.

Get Every New Lab Ready Before the First Experiment

Free trial — no credit card required.

14-day free trial, no credit cardFull refund in your first 30 daysUS hosting, EU on request