3PL Onboarding Checklist Template

Moving to a new 3PL? Agree the SLAs and rate card, send clean SKU data, prove the integration with test orders, move and count the stock, and switch every order only after a soft launch and a go-live decision.

Last reviewed: November 2026

Printed from checkflow.io/templates/procurement-supply-chain/3pl-onboarding-checklist

This free 3PL onboarding checklist is for e-commerce, operations and supply chain teams at brands moving their fulfilment to a new third-party logistics provider, whether from another 3PL or from their own warehouse. One run covers one move, planned back from the go-live date. It records your order profile, agrees the contract, the SLAs and KPIs, and checks the rate card against your own volumes. It exports the SKU master data, checks every barcode, dimension and weight, and agrees packing, kits and returns. It connects your store and order sources, maps shipping options to carrier services and runs test orders end to end. Then it agrees the ASN and labelling rules, plans and counts the inventory move, and reconciles each receipt. A soft launch ships a share of live orders, and the approver records the go-live decision before every order switches. After go-live it checks a sample of stock and the first invoice, and holds the 30, 60 and 90-day reviews. Answers on the first task add tasks for leaving another 3PL or in-house fulfilment, marketplace and B2B orders, and lot or expiry tracked products.

The Brand’s Side of a Move to a New 3PL

This checklist is the brand’s side of moving fulfilment to a new third-party logistics provider (3PL): the shipper that owns the stock and the customers, not the warehouse taking on a new client. One run covers one move, from the contract and the rate card to the 90-day review, whether the orders come from another 3PL or from your own warehouse. Your 3PL may have its own onboarding steps; this run makes sure everything the brand has to supply, check and decide is done, and that nothing switches until someone accountable says go.

Choosing the 3PL comes first, in the Supplier Sourcing & Tender Checklist. Once it is live, each order follows the Order Fulfillment Checklist. Moving your own warehouse to a new building is the Warehouse Relocation Checklist, and qualifying a new supplier of goods is the Supplier Onboarding Checklist. A new online shop, which names its fulfilment partner as one step of many, is the E-commerce Store Launch Checklist.

This checklist

Moving your fulfilment to a new 3PL

Covers: the contract, SLAs and rate card, SKU data and barcodes, integrations and test orders, ASNs and the inventory move, a soft launch, the go-live decision, the first invoice and the 30, 60 and 90-day reviews.

Planned around: the go-live date, the first day the new 3PL ships every order.

Output: a 3PL shipping all your orders against agreed SLAs, a checked first invoice and a 90-day review.

One order

Order fulfilment

Covers: one order from checking it to confirming delivery: allocation, pick, pack, pack check and dispatch.

Planned around: the order and its dispatch time.

Output: a delivered order, in the Order Fulfillment Checklist.

Your own warehouse

Warehouse relocation

Covers: moving a warehouse you run yourself: the new site, racking, safety, the WMS location map, the phased transfer and the final count.

Planned around: the move dates.

Output: your own operation running from the new building, in the Warehouse Relocation Checklist.

What the 3PL Onboarding Checklist Covers

Nine phases take one move from set-up to the 90-day review. The first task records the go-live date, which sets every due date, and three answers that add tasks: where orders are fulfilled from now (another 3PL, in-house, or both), whether marketplace or B2B orders move too, and whether any products need lot or expiry tracking. Failed test orders and receiving differences each add the task to fix them. The approver’s go-live decision is the gate: nothing after it can be completed until it is recorded, and a no-go or a go with conditions adds the task that follows.

  1. Phase 1

    Phase 1: Set Up the Move

    4 tasks

    Owned by the brand’s project lead. Enter the go-live date on the first task: every due date counts back from it in working days, and the checks after go-live count forward. Say where orders are fulfilled from now, which channels move and whether any products need lot or expiry tracking, and the tasks for each answer appear.

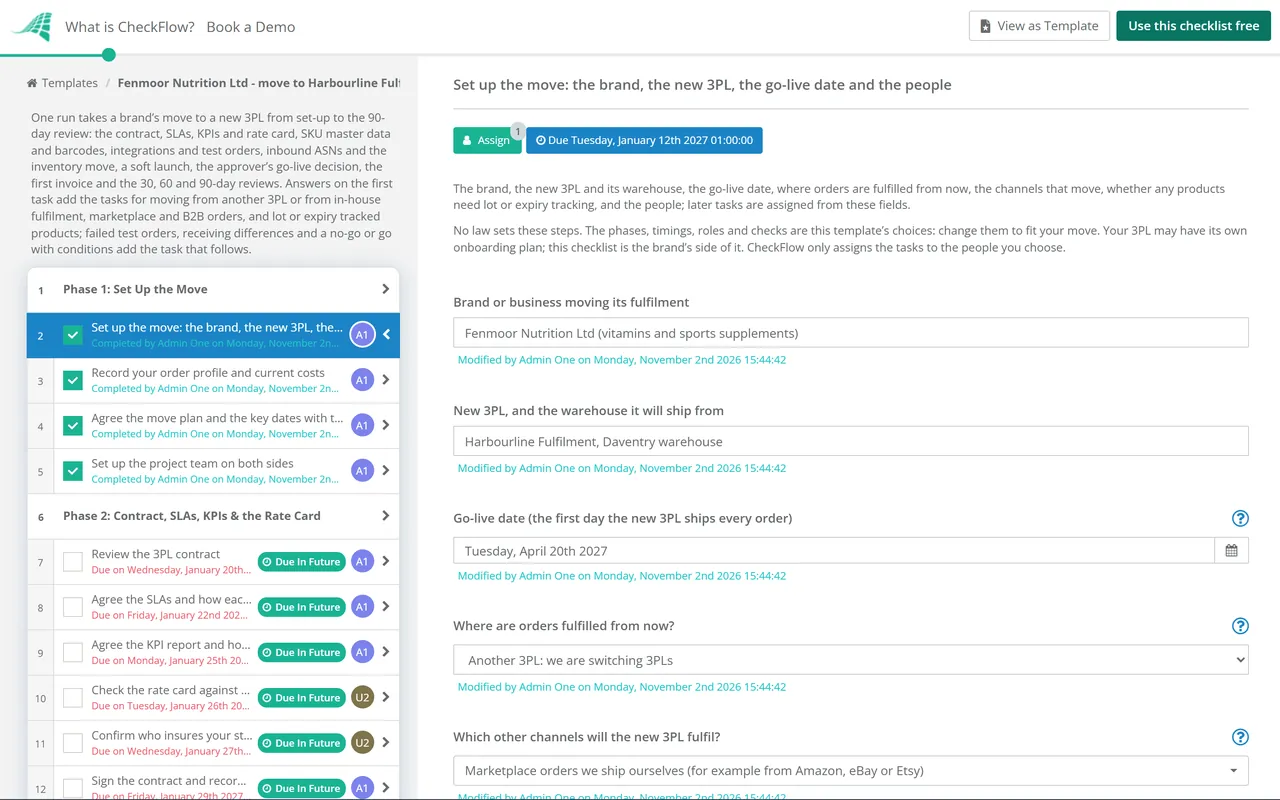
    • Set up the move: the brand, the new 3PL, the go-live date and the people — the brand, the new 3PL and its warehouse, the go-live date, where orders are fulfilled from now, the channels that move, whether any products need lot or expiry tracking, and the people; later tasks are assigned from these fields
    • Record your order profile and current costs — orders and units per month over the last year, the peak weeks, the number of active SKUs, units per order, the split by channel and destination, the returns rate, and what fulfilment costs you now; the rate card and the KPIs are checked against these figures
    • Agree the move plan and the key dates with the 3PL — the dates for the contract, integration testing, the first inbound delivery, the soft launch and go-live, the weeks to avoid (your peak season, a sale or a product launch), and whether channels or SKUs move in stages; if you are leaving another 3PL, read its notice period and minimum term now: the go-live date may have to wait for it, or you may pay both for a while
    • Set up the project team on both sides — the 3PL’s onboarding lead and account manager, who does what on each side, a weekly call, a shared issue log and the escalation route on both sides
  2. Phase 2

    Phase 2: Contract, SLAs, KPIs & the Rate Card

    8 tasks

    Agree in writing what the 3PL will do, how well and for how much, before any stock moves. Check the rate card against your own order profile, settle who insures the stock, and sign. Moving from another 3PL adds the notice to the outgoing one; moving from in-house fulfilment adds the plan for ending it.

    • Review the 3PL contract — the term and notice period, minimum charges, liability for lost or damaged stock, what happens at the end (stock and data returned, the last invoice), who owns your data, and the services the price covers, reviewed by whoever checks your contracts
    • Agree the SLAs and how each is measured — the order cut-off time for same-day dispatch, order accuracy, dock-to-stock time for inbound deliveries, inventory accuracy, returns processing time and response times to your questions, with how each figure is measured and what happens when one is missed
    • Agree the KPI report and how often you get it — the figures the 3PL reports, how often, from which system, and who on your side reads them; the 30, 60 and 90-day reviews in Phase 9 use this report
    • Check the rate card against your own order profile — every fee: receiving, storage (by pallet, shelf, bin or volume), pick and pack, packaging, kitting, carrier rates and surcharges, returns, account management, set-up and minimum charges; then model one ordinary month and one peak month from your order profile
    • Confirm who insures your stock and the 3PL’s liability — who insures your stock while the 3PL holds it and in transit, the limit of the 3PL’s liability for loss or damage under the contract, and whether your own cover needs to change
    • Sign the contract and record the key dates — the signed contract filed, with the start date, the notice period, the renewal date and the date by which a decision to renew or leave must be made
    • Give notice to the outgoing 3PL — moving from another 3PL only: the notice period in your current contract, the notice given in writing, the last day it ships your orders, the fees still due (storage, outbound handling, the final invoice) and how your stock and data are handed back; if the notice runs past the go-live date, decide now whether to pay both 3PLs for a while or move the date
    • Plan the end of in-house fulfilment — moving from in-house fulfilment only: the staff affected and what happens to their roles (take HR advice before anyone is told), the equipment, packaging stock and space you will no longer need, and the carrier accounts and contracts to end or keep
  3. Phase 3

    Phase 3: SKU Master Data, Barcodes & Packing Rules

    6 tasks

    The 3PL’s warehouse system knows your products only from the data you send. Check every SKU’s barcode, dimensions and weights before the first delivery, agree how orders are packed, and check what the 3PL loaded against your own list. Lot or expiry tracked products add the rules for them.

    • Export the SKU master data for the 3PL — for every SKU: the code and description, the barcode (GTIN), the dimensions and weight of one unit, a case and a pallet, units per case and per pallet, the value, and for shipping abroad the commodity code and country of origin, plus any dangerous goods such as batteries or aerosols
    • Check the barcode on every product and case — each SKU’s barcode scans and matches the master data, case labels carry the right barcode, and products without a barcode are listed with who labels them and the fee
    • Agree the packing rules and packaging — box and mailer sizes by order type, void fill, inserts and gift notes, branded packaging and who supplies it, fragile and high-value items, and what a finished parcel must look like
    • Set up kits, bundles and special handling — each kit or bundle with its parts, whether it is built ahead or at the pick, serial numbers to record, and items that need special handling
    • Agree the lot and expiry rules — lot or expiry tracked products only: which SKUs, how the lot and expiry date are recorded when stock is received, the picking rule (first expired, first out), the shortest remaining shelf life you will ship, and what happens to short-dated and expired stock
    • Check the SKU data the 3PL loaded — the 3PL’s item list compared with your export: every SKU present, barcodes, units per case, dimensions and weights, kits and handling flags, with differences corrected
  4. Phase 4

    Phase 4: Integrations, Shipping, Returns & Test Orders

    8 tasks

    Connect your store and order sources to the 3PL, map every shipping option to a carrier service, set up returns, and prove it all with test orders before a customer’s order goes through. Ticked channels add their own task, and failed test orders add the task to fix and test again.

    • Connect the store and order sources to the 3PL — how orders reach the 3PL (a platform connector, an API or files), how stock levels and tracking come back, which system holds the true stock figure, and how edited and cancelled orders are handled
    • Map shipping options to carrier services — each delivery option on your store mapped to a carrier service, the daily cut-off times, delivery promises shown to customers, international services, and the customs data and documents for shipments abroad
    • Set up marketplace orders — marketplace orders only: each marketplace connected to the 3PL, the dispatch time and tracking rules in that marketplace’s seller terms, the carriers it accepts, and packing slips without your store’s branding where needed
    • Set up B2B and retailer orders — B2B orders only: each retailer’s routing guide or supplier manual, carton and pallet labels (for example GS1 logistic labels with an SSCC where the retailer asks for them), advance shipping notices to the retailer, delivery booking and the charges for not following the rules
    • Set up returns — the returns address and label, the returns portal or form, how returned items are graded (restock, rework or dispose), how fast the 3PL processes them, and what triggers the customer’s refund
    • Set up your team’s access and the reports — accounts for your team on the 3PL’s client portal, who can create orders, inbound notices and support tickets, and the stock and order reports each person needs
    • Run test orders end to end — one test order for each case that matters: each channel, each shipping option, a multi-line order, a kit, an international order, an edited and a cancelled order, and a return, using a small sample of stock sent ahead or test SKUs; check each reaches the 3PL, ships correctly, sends tracking back and updates stock
    • Fix the issues and run the failed test orders again — failed test orders only: each issue fixed by you or the 3PL, and each failed scenario tested again until it passes
  5. Phase 5

    Phase 5: Inbound Deliveries, ASNs & the Inventory Move

    8 tasks

    Agree how stock is announced and labelled, plan which stock moves when so orders keep shipping, count it before it leaves, and reconcile what the 3PL receives against the advance shipping notice and your count. A mismatch adds the task to resolve it, and lot or expiry tracked products add their check.

    • Agree the inbound process and the ASN — how you send an advance shipping notice (ASN) for each delivery (the portal, a file or EDI) and how far ahead, what each carton and pallet must be labelled with, how deliveries are booked at the dock, and how the 3PL reports what it received
    • Plan the inventory move — which stock moves when (from the old site, or new orders delivered straight from suppliers), how much stays behind to keep shipping until the switch, the transport booked, and the stock you will sell down rather than move
    • Tell your suppliers the new delivery address and inbound rules — suppliers who deliver to the new 3PL told the address, the booking rules, the labels each carton and pallet needs and the ASN you need from them, from a named purchase order onwards
    • Count the stock before it leaves — a count by SKU (and by lot where tracked) of the stock moving, at the old site or as it is packed, so the figures on the ASN are counted rather than taken from the system
    • Send the inbound deliveries with their ASNs — each delivery booked, its ASN sent before it arrives, the cartons and pallets labelled as agreed, and the delivery references recorded
    • Reconcile the receipt against the ASN and your count — what the 3PL received by SKU compared with the ASN and your count, damaged or unlabelled stock, and how long each delivery took to become available to sell against the dock-to-stock SLA
    • Resolve the receiving differences — differences only: each one investigated with the 3PL and the sender (a recount, a missed carton, a mislabelled SKU or damage in transit), the stock figure corrected, and any claim made
    • Check lots and expiry dates on receipt — lot or expiry tracked products only: the lots and expiry dates the 3PL recorded compared with what was sent, stock too short-dated to ship set aside, and the first expired, first out rule working in the 3PL’s system
  6. Phase 6

    Phase 6: Soft Launch

    4 tasks

    Send a limited share of real orders to the new 3PL, for example one channel, one region or a set of SKUs, while the rest ship as before. The go-live approver agrees before the first live order switches. Check the orders every day, log every issue and agree the fix with the 3PL.

    • Check readiness for the first live orders — the stock received and reconciled (any receiving differences resolved), the test orders passed, the shipping map and returns in place, your customer service team briefed, the orders chosen for the soft launch, and the go-live approver’s agreement to start; do not switch any live order until they agree
    • Switch the first live orders to the new 3PL — order routing changed for the soft launch orders, the date and time of the switch, and stock levels on your store checked against the 3PL’s
    • Check the soft launch orders every day — each day: orders received and dispatched by the cut-off, picking errors, tracking sent to customers, delivery problems and customer contacts about the new parcels
    • Log the soft launch issues and agree the fixes — every issue found in the soft launch with its cause, the fix agreed with the 3PL, the owner and the date, and whether it must be fixed before go-live
  7. Phase 7

    Phase 7: Go-Live Decision & the Switch

    6 tasks

    Review the soft launch against the SLAs and the open issues, then the approver records go, go with conditions or no-go. Nothing after the decision can be completed until it is recorded. A no-go or a go with conditions adds the task that follows from it.

    • Review the soft launch against the SLAs — the soft launch results against each SLA, the issues still open, stock levels for the full switch, and a recommendation to the approver
    • Record the go-live decision — go, go with conditions or no-go for switching every order to the new 3PL on the go-live date, with the reasons, recorded by the go-live approver alone
    • Fix the gaps and set a new go-live date — after a no-go only: fix each gap the approver named, keep the soft launch running or pause it, move the go-live date on the first task so every due date moves, review the soft launch again, then ask the approver to change the decision on the go-live task, or to un-complete it and record a new one
    • Meet the conditions before the switch — after a go with conditions only: each condition the approver set, done and recorded, or the approver told in writing that it is not
    • Switch every order to the new 3PL — order routing for every channel moved to the new 3PL, orders stopped at the old site, and stock on your store synced from the new 3PL
    • Update the returns address, delivery promises and support notes — the returns address on your website, packing slips and returns labels, the delivery times and cut-offs shown to customers, and your customer service team’s answers about orders and returns
  8. Phase 8

    Phase 8: First Weeks, Stock Check & the First Invoice

    5 tasks

    Watch the first weeks of full volume closely, check a sample of stock against your records, and check the first invoice line by line against the rate card. Close out with the outgoing 3PL, or close your own fulfilment, depending on where orders came from.

    • Watch the first two weeks at full volume — every day: the order backlog, dispatch by the cut-off, picking errors, late deliveries and customer contacts, with issues raised on the shared log and reviewed on the weekly call
    • Count a sample of stock against your records — a count of your fastest-moving and highest-value SKUs at the 3PL, compared with your own stock records and the 3PL’s system, with differences explained
    • Close out with the outgoing 3PL — moving from another 3PL only: the last orders shipped, any stock left there moved or written off, its final invoice checked against its contract, your access and integrations removed, and your data returned or deleted as the contract says
    • Close in-house fulfilment — moving from in-house fulfilment only: equipment sold, moved or kept, packaging stock used or sent to the 3PL, the space handed back or reused, and the carrier accounts and contracts ended or kept as planned
    • Check the first invoice against the rate card — each line of the 3PL’s first invoice after go-live (and any earlier invoices for receiving, storage or the soft launch) checked against the rate card and your own records of orders, receipts, returns and storage, with any error disputed
  9. Phase 9

    Phase 9: 30, 60 & 90-Day Reviews

    4 tasks

    Review the 3PL with its account manager at 30, 60 and 90 days after go-live, using the KPI report, the issue log and the invoices. In this template they fall 21, 42 and 63 working days after go-live. The 90-day review closes the onboarding and hands the relationship over to your normal supplier reviews.

    • Hold the 30-day review — the first month’s KPIs against the SLAs, open issues, the invoice check and anything customers have noticed, with actions for both sides
    • Hold the 60-day review — the KPIs against the SLAs, progress on the 30-day actions, a second invoice checked, and whether the stock figures still agree
    • Hold the 90-day review — the three months against every SLA, any service credits due under the contract, costs against your rate card model, and whether the move delivered what it was for
    • Close the onboarding and hand over to normal supplier reviews — lessons for the next move recorded, the open actions given owners, and the date of the first regular review of the 3PL set

What to Agree With a New 3PL, and What to Send It

SLAs and KPIs to agree with a new 3PL

Agree each measure, and how it is counted, in Phase 2. The soft launch, the first weeks and the 30, 60 and 90-day reviews then check the 3PL against what was agreed.

Measure What to define with the 3PL Where the figure comes from Where this checklist checks it
Order cut-off and dispatchThe cut-off time for same-day dispatch, and whether it changes at weekends, in peak or by channelOrder and dispatch times in the 3PL’s systemPhase 2 (agreed), Phase 6 (daily checks), Phase 9 (reviews)
Order accuracyWhether it counts orders or lines, and what counts as an error (wrong item, wrong quantity, missing insert)Errors found by the 3PL, customer contacts and returns coded as wrong itemPhases 6, 8 and 9
Dock-to-stock timeWhen the clock starts (arrival or booked slot) and stops (stock available to sell)The 3PL’s receiving records against your ASNsPhase 5 (receipt reconciliation)
Inventory accuracyHow it is measured (counts against the system) and how often the 3PL countsCycle counts, and your own sample countsPhase 8 (stock check), Phase 9
Returns processingThe time from a return arriving to it being graded and the refund triggeredThe 3PL’s returns recordsPhase 4 (set up), Phase 9
Response to your questionsThe response time for your tickets and who answers out of hoursThe 3PL’s ticket system or the shared issue logPhases 6 to 9
Invoice accuracyThat every charge follows the rate card, and how disputes are raisedThe invoice against the rate card and your own recordsPhase 8 (first invoice), Phase 9

The SKU data a new 3PL needs

The 3PL’s warehouse system knows your products only from the data you send. Phase 3 exports it, checks the barcodes and checks what the 3PL loaded.

SKU data Why the 3PL needs it Note
SKU code and descriptionTo match your orders to its stockKeep the same codes as your store and order system
Barcode (GTIN)To receive, pick and pack-check by scanningGS1 says a GTIN can identify all of a company’s trade items
Dimensions and weight of a unit, a case and a palletTo choose locations and boxes, and to work out storage and carrier chargesCheck them before the first delivery; wrong figures can change your bill
Units per case and per palletTo receive cartons without opening them and to plan spaceMatch what your suppliers actually send
Lot number and expiry dateTo pick the oldest stock first and to trace a lotGS1 Application Identifiers 10 (batch or lot) and 17 (expiration date) can carry them in case barcodes
ValueFor insurance, claims and customs paperworkAgree whether it is cost or selling price
Commodity code and country of originFor shipments abroadSo the 3PL and its carriers can prepare the customs paperwork
Dangerous goods (for example batteries or aerosols)To check what it can store and which carriers will take itTell the 3PL before the stock arrives

Where this comes from. No law sets 3PL service levels: they are what you and the 3PL agree in the contract, and this template suggests no targets. The barcode notes come from GS1: the GTIN, the SSCC for cases and pallets, the GS1 Logistic Label Guideline (release 1.3, July 2019), and Application Identifiers 10 and 17. The measures, the SKU fields and where each is checked are this template’s choices.

Why Run Your Move to a New 3PL in CheckFlow?

1

No full switch before someone says go

The go-live decision is assigned to the approver alone, and the checklist halts there: the full switch, the close-out with the old provider and the reviews cannot be completed until a decision is recorded. The soft launch before it starts only once the approver agrees on the readiness check. A no-go adds the task to fix the gaps and set a new date; a go with conditions adds the task to meet them. See how approvals that halt a checklist work.

2

Only the tasks this move needs

Switching from another 3PL adds the notice and the close-out; leaving in-house fulfilment adds the plan for your staff, space and equipment. Marketplace and B2B orders each add their own set-up task, lot or expiry tracked products add their rules and receipt check, and failed test orders or receiving differences add the task to fix them.

3

Every check has an owner and a date

Name the project lead, finance, the integration lead, the data lead and the approver on the first task, and every task is assigned from those fields. Due dates count from the go-live date, so moving it moves the whole plan. The rate card, SLA, test order and receipt tables stay on the tasks they came from, and the Reports Grid lists every run with its answers, while Analytics shows where tasks are waiting.

CheckFlow does not connect your store to the 3PL, hold your stock figures or check invoices for you: those stay in your store, the 3PL’s system and your accounts. CheckFlow makes sure every move gets the same steps in the same order, with an owner and a due date for each, a decision before the switch, and a record of who did what and when. See how a checklist runs.

Choose the 3PL with the Supplier Sourcing & Tender Checklist and review its contract with the Contract Review & Approval Checklist. Leave the old provider with the Vendor Offboarding Checklist, count stock with the Inventory Audit Process Checklist, follow shipments with the Shipment Tracking Workflow Checklist, and score the 3PL in the years after with the Supplier Performance Evaluation Checklist.

AI generator

Didn’t find what you need? Describe it.

Describe the process in a sentence and the AI checklist generator drafts the phases and tasks for you.

Frequently Asked Questions

What should a 3PL onboarding checklist include?

For a brand moving to a new 3PL: the contract, SLAs, KPIs and rate card checked against your own order profile; SKU master data with barcodes, dimensions and weights; packing rules and returns; store and marketplace integrations; test orders for every case that matters; ASNs and the inventory move; a count and a reconciled receipt; a soft launch; a go-live decision; the first invoice checked; and reviews at 30, 60 and 90 days.

How long does it take to move to a new 3PL?

It depends on your SKU count, your channels, the integrations and how much stock moves, so agree the plan with the 3PL in Phase 1. This template plans the move over 70 working days, from set-up to go-live, with the soft launch about three weeks before go-live and the last review about three months after it. Those timings are its own choice: change the go-live date and every due date moves.

How do you switch 3PLs without disrupting orders?

Check the notice period in your current contract and give notice once the new contract is signed. Keep enough stock at the old 3PL to ship until the switch, move the rest in planned deliveries with ASNs, and reconcile each receipt. Then send a share of real orders to the new 3PL in a soft launch, and switch everything only after the go-live decision. This template adds the notice and close-out tasks when you choose another 3PL on the first task.

What product data does a new 3PL need from a brand?

For every SKU: the code and description, the barcode (GTIN), the dimensions and weight of a unit, a case and a pallet, units per case and per pallet, the value, the commodity code and country of origin for shipments abroad, any dangerous goods, and lot or expiry tracking where it applies. Phase 3 of this template exports it, checks every barcode and compares what the 3PL loaded with what you sent.

What is an ASN, and why does a 3PL ask for one?

An advance shipping notice (ASN) tells the warehouse what is arriving before it arrives: the delivery, its cartons or pallets, and the SKUs and quantities in each. The 3PL uses it to book the delivery and check what it receives. This template agrees the ASN method and labels in Phase 5, then reconciles each receipt against the ASN and your own count before any live order ships.

Which test orders should you run before going live with a new 3PL?

One for each case that matters to your business: every channel and shipping option, a multi-line order, a kit or bundle, an international order, an edited and a cancelled order, and a return. Check that each one reaches the 3PL, ships correctly, sends tracking back and changes the stock figure. This template records them in a table and adds a task to fix and test again if any fail.

How do you check a 3PL invoice against the rate card?

Take each line of the invoice (receiving, storage, pick and pack, packaging, carrier charges, returns and any minimum charge) and check the rate against the rate card and the quantity against your own records of orders, deliveries and returns. Dispute anything that does not match. This template models a month’s cost from your order profile in Phase 2, so the first invoice can be compared with it in Phase 8.

What should you review 30, 60 and 90 days after moving to a new 3PL?

At each review, the KPIs against the SLAs you agreed, the issues still open, the invoices and whether stock figures agree. At 30 days the focus is early problems; at 60, whether the fixes held; at 90, the whole period, any service credits due under the contract, and costs against your model. The 90-day review in this template closes the onboarding and sets the first regular supplier review.

What changes when you move from in-house fulfilment to a 3PL?

The 3PL now picks, packs and ships, so your team’s work moves to sending accurate SKU data and ASNs, watching the KPIs and checking invoices. You also decide what happens to the staff, space, equipment and carrier accounts you used. This template adds a task to plan that in Phase 2, with a pointer to take HR advice before anyone is told, and a task to close it after go-live.

Is CheckFlow free for this template?

14-day free trial, no card required. The Business plan is $10 per user per month after the trial. Full details at checkflow.io/pricing.

Move to Your New 3PL Without Losing an Order

Free trial — no credit card required.

14-day free trial, no credit cardFull refund in your first 30 daysUS hosting, EU on request