3PL Client Onboarding Checklist Template

Take on every new warehouse client the same way: the agreement and rate card, item data, the order connection and carriers, the first delivery, test orders, a go-live decision, hypercare and the first invoice.

Last reviewed: November 2026

Printed from checkflow.io/templates/transport-logistics/3pl-client-onboarding-checklist

Brands moving their fulfilment to a new 3PL should use the 3PL Onboarding Checklist; this free 3PL client onboarding checklist is the warehouse’s side of the same project.

It is for third-party logistics (3PL) warehouses and the onboarding, account, systems, warehouse and billing people who take on a new client. One run is one client, planned back from the go-live date. It takes the handover from sales, holds the kick-off and builds the client profile. It agrees the warehousing agreement, the service levels and the data processing terms for the client’s customers’ data, and loads the rate card into billing. It creates the client in your WMS, loads and checks its item data, connects its orders and maps its carriers, and writes its work instructions. The first delivery is received against its ASN, test orders run from the client’s store to the carrier label, and the go-live approver records the decision. Hypercare, a checked first invoice and a 30-day review with the client follow.

The Warehouse’s Side of Taking On a New Client

A 3PL client onboarding is the project a third-party logistics warehouse runs to take on a new client: agreeing what it will do and charge, setting the client up in its systems, receiving the first stock, and proving the job works before live orders arrive. This checklist runs one new client through that project, from the sales handover to the 30-day review, from the warehouse’s side.

A brand moving its own fulfilment to a new 3PL runs the other side of the same project with the 3PL Onboarding Checklist. One customer order through pick, pack and despatch is the Order Fulfillment Checklist, each delivery from a supplier is checked with the Goods Receiving & Inspection Checklist, and new warehouse staff start with the Warehouse Employee Onboarding Checklist. A software company setting up a new customer uses the Enterprise Customer Implementation Checklist.

This checklist

A warehouse taking on a new client

Who runs it: the 3PL’s onboarding lead, with the account manager, systems, warehouse operations and billing.

Covers: discovery, the agreement and service levels, data processing terms, billing set-up, item data, the order connection and carriers, work instructions, the first delivery, test orders, the go-live decision, hypercare and the first invoice.

Output: a client live in your warehouse, billed as agreed, and reviewed after 30 days.

The brand’s side

Moving to a new 3PL

Who runs it: the brand’s e-commerce or operations team.

Covers: choosing and contracting the 3PL, sending its data, moving its stock and switching its orders.

Output: the brand’s orders shipping from the new 3PL, in the 3PL Onboarding Checklist.

One order

Order fulfilment

Who runs it: the warehouse team, for each order.

Covers: picking, packing, labelling and despatching one order.

Output: an order out of the door, in the Order Fulfillment Checklist.

What the 3PL Client Onboarding Checklist Covers

Nine phases take one new client from the sales handover to the 30-day review. The first task records the planned go-live date, which sets every due date: this template allows seven working weeks before it, with the agreement in the first three and the build in the last four, then ten working days of hypercare. It also asks which orders you will fulfil, where the first stock comes from, what special handling the products need and how orders will reach your WMS. Orders to retailers, a stock transfer, lot and expiry tracking, kits, dangerous goods, EDI, your API and failed test orders each add the task that deals with them. The go-live approver’s decision is the gate: nothing after it can be completed until the approver completes it with Go or Go with conditions, Go with conditions adds the task to meet them, and Not yet hides the go-live and shows the task to put things right.

  1. Phase 1

    Phase 1: Client Handover & Discovery

    5 tasks

    Owned by the onboarding lead. Enter the planned go-live date, the day the first live orders reach your warehouse: every due date counts from it in working days. This template allows seven working weeks from the sales handover to go-live, with the agreement in the first three and the build in the last four; for a bigger client, enter a later go-live date. Answer the questions about orders, stock, special handling and the order connection from the sales handover: they add the tasks this client needs.

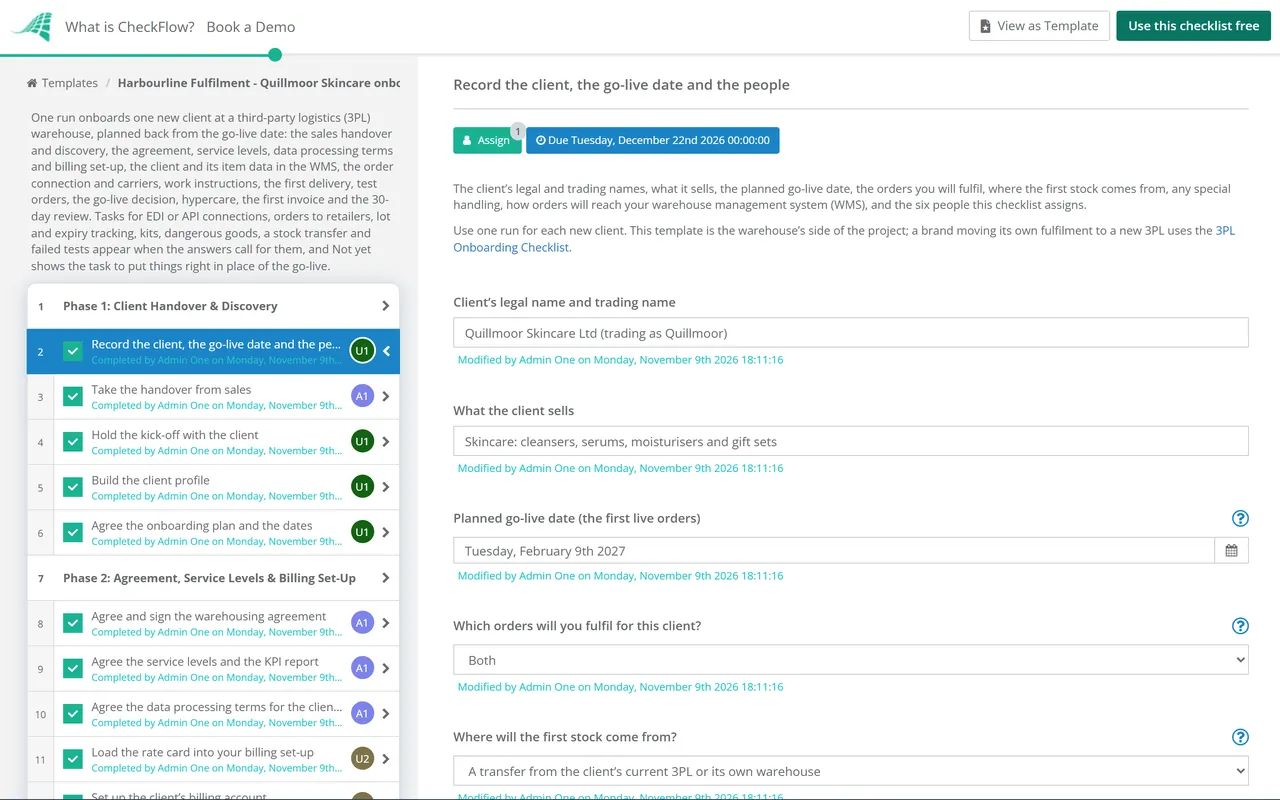
    • Record the client, the go-live date and the people — the client’s legal and trading names, what it sells, the planned go-live date, the orders you will fulfil, where the first stock comes from, any special handling, how orders will reach your warehouse management system (WMS), and the six people this checklist assigns
    • Take the handover from sales — the proposal and quote, the volumes and services the client was promised, any special terms, the decision-makers on the client’s side, and anything sold that your site has not done before
    • Hold the kick-off with the client — introductions on both sides, the plan to go-live, what you need from the client and by when, how you will keep in touch, and who to call with a problem
    • Build the client profile — the SKU count and product sizes, orders per day now and at peak, items per order, the share of orders by channel and country, the delivery options it offers, its returns, and how its stock will be stored: pallets, shelving or bins
    • Agree the onboarding plan and the dates — the dates for the agreement, the item data, the order connection, the first delivery, the test orders and the go-live decision, and what the client must send for each and by when, shared with the client
  2. Phase 2

    Phase 2: Agreement, Service Levels & Billing Set-Up

    5 tasks

    The account manager agrees the commercial terms and the billing lead sets them up, so the first invoice charges what was agreed. The data processing terms are signed here, before any real customer order reaches you.

    • Agree and sign the warehousing agreement — the services, the term and notice period, minimum charges, payment terms, your liability for loss of or damage to the client’s stock and its limit, who insures the stock and for what value, and the signatures of both sides
    • Agree the service levels and the KPI report — the order cut-off for same-day dispatch, the time to receive and put away a delivery, pick accuracy, stock accuracy, the time to process a return, how each is measured, and the report the client gets and how often
    • Agree the data processing terms for the client’s customer data — the client’s customers’ names, addresses and order details that your systems will hold, whether you act as the client’s processor, and the contract terms that cover it, signed before real orders reach you
    • Load the rate card into your billing set-up — every charge in the agreement set up with the unit it is counted in: set-up fees, receiving, storage, pick and pack, packaging, carriage, returns, extra services and any minimum charge, checked against the signed agreement by a second person
    • Set up the client’s billing account — the legal entity to invoice, the billing contact, how often you invoice, payment terms, currency and tax details, and any credit check or deposit your own policy asks for
  3. Phase 3

    Phase 3: Client Account, Space & Item Data

    5 tasks

    The systems lead creates the client in your WMS and loads its item data; the warehouse operations lead allocates the space. Item data that is wrong here shows up later as stock that cannot be received, picked or charged correctly.

    • Send the client the item data template — the fields you need for every SKU: code, description, barcode, unit size and weight, case quantity, case size and weight, pallet configuration, whether lot or expiry is tracked, value, and for international parcels the country of origin and commodity code, with the date it is due back
    • Create the client in your WMS — the client account, its address and contacts, the stock statuses it uses (such as available, quarantine and damaged), its units of measure and reference formats, and the user roles for your team
    • Allocate the space and locations — the storage type for each product group, pick locations sized to the fastest-moving SKUs, room for the first delivery and for peak, and the locations set up in the WMS
    • Check and load the item data — every row complete, barcodes unique and scanning, sizes and weights plausible, duplicates removed, the data loaded into the WMS, and errors sent back to the client to correct
    • Agree the barcode and labelling rules — who labels products that arrive without a scannable barcode and at what charge, the case and pallet labels the client’s suppliers must use, and the label format your WMS prints
  4. Phase 4

    Phase 4: Order Connection, Carriers & Integration Tests

    6 tasks

    The systems lead connects the client’s orders to your WMS and sets up the carriers. EDI and your API each add their own set-up task. The flows are tested with test data before the first delivery arrives, so the test orders in Phase 7 test the whole job, not only the connection.

    • Connect the client’s order source to your WMS — the route chosen in the first task set up: orders arriving with the delivery address, shipping method and items, order status and tracking sent back, and stock levels sent to the client’s store
    • Map and test the EDI messages — the messages each way agreed with the client and its EDI provider (orders in; shipment confirmations, receipt confirmations and stock reports out), the identifiers and the connection set up, and each message tested with sample data
    • Give the client’s developers API access and test their calls — test credentials and your API documentation, the calls they will use for orders, stock and shipment status, and each call tested before live credentials are issued
    • Set up the carriers and map the shipping methods — whose carrier accounts are used, yours or the client’s, each delivery option on the client’s store mapped to a carrier service, labels printing, collection times, and customs documents for international parcels
    • Test the order, stock and tracking flows — a test order in through the connection, a cancellation and an address change, stock levels back to the store, and tracking numbers back to the order, with each result recorded
    • Set up the client’s portal access and reports — accounts for the client’s team, what each can see (stock, orders, receipts and returns), and the daily reports and the KPI report agreed in Phase 2
  5. Phase 5

    Phase 5: Work Instructions & Special Handling

    8 tasks

    The warehouse operations lead writes down how this client’s stock is handled and briefs the team before the first delivery. Lot and expiry tracking, kits, dangerous goods and orders to retailers each add their own task when the first task says the client needs them.

    • Agree the packing specification — boxes and mailers by order type, void fill, inserts and samples, gift notes, the client’s branded packaging and who reorders it, and how fragile items are packed
    • Agree how returns are handled — the returns address and how customers get a label, how returned items are checked and graded (back to stock, quarantine or disposal), what the client is told and when, and the service level for returns
    • Set up lot and expiry tracking — the SKUs tracked, how lot and expiry are recorded at receipt, the picking rule (such as first expiry, first out), the shortest remaining life the client accepts on a shipped item, and what happens to short-dated or expired stock
    • Set up the kits and bundles — each kit or bundle with its parts in the WMS, whether it is built ahead or packed to order, how the client’s store sends it, and how kit stock shows to the client
    • Check the dangerous goods products before they arrive — each product the client classes as dangerous goods, with its safety data sheet and the UN number and class the client gives for transport, whether your site may store it and where, and whether your carriers and services accept it
    • Set up the retailer orders and their compliance rules — each retailer’s routing guide: how deliveries are booked, the pallet build, carton and pallet labels, the advance shipping notice the retailer expects, delivery appointments, and the charges it makes when they are wrong
    • Write the client’s work instructions — receiving, put-away, picking, packing to the specification, special handling, returns, the cut-off, and who to call at the client with a problem, kept where the team works
    • Brief the warehouse team — the shift leads and the receiving, picking and packing team briefed on the work instructions, the packing specification and any special handling, before the first delivery arrives
  6. Phase 6

    Phase 6: First Delivery, Receipt & Put-Away

    7 tasks

    The first delivery tests the item data, the labels and the receiving instructions together. Receive it against the advance shipping notice (ASN), check the item data against the products, and tell the client what arrived. A stock transfer from another site adds the tasks to plan it and reconcile it.

    • Agree the stock transfer with the client and its current site — the stock list by SKU (and lot) from the current site, how the stock will be packed and labelled, the delivery dates, and which orders the current site still ships until go-live (the client gives its current 3PL notice under its own contract)
    • Get the ASN for the first delivery and book it in — the SKUs, quantities, lots, cartons and pallets, the carrier and the date, and a delivery slot booked
    • Receive the first delivery against the ASN — counted by SKU (and lot), condition checked, barcodes scanned, labels checked against the rules, and every difference recorded with photos
    • Check the item data against the products received — a sample of SKUs measured and weighed, barcodes scanned, the item data corrected in the WMS, and the client told of each change
    • Put the stock away and make it available — the stock in its planned locations, available in the WMS, and stock levels showing on the client’s store and portal
    • Send the client the receipt report — what arrived by SKU, the differences and damaged items, and what happens to each, confirmed by the client
    • Reconcile the transfer against the current site’s stock list — what arrived by SKU (and lot) compared with the list sent before the transfer, each difference investigated with the client and the current site, and the agreed stock figure recorded
  7. Phase 7

    Phase 7: Test Orders & the Go-Live Decision

    6 tasks

    Test orders go through the whole job, from the client’s store to a carrier label, using the real stock. The client confirms the results, the onboarding lead reviews readiness, and the go-live approver alone records Go, Go with conditions or Not yet. Nothing after the decision can be completed until the approver completes it with Go or Go with conditions. Not yet hides the go-live and shows the task to put things right.

    • Process test orders from the client’s store to the carrier label — one test order for each case that matters: each delivery option, an order with several items, an international order, a kit where the client has them, a cancelled order and a return, each picked, packed to the specification and labelled, with the result recorded
    • Correct each failure and repeat its test — failed tests only: the cause of each failure found and fixed (item data, the connection, carrier mapping or packing), and the test repeated until it passes
    • Get the client’s confirmation of the test results — the client checks the test orders (packing, labels, and tracking on its store) and confirms in writing that it is ready
    • Review readiness for go-live — the agreement and data processing terms signed, the rate card loaded, stock received and available, the order connection and carriers tested, the work instructions and briefing done, the client’s confirmation, and the hypercare plan and contacts, with a recommendation to the approver
    • Put right what held up the go-live and agree a new date — Not yet only: each gap the approver named fixed and checked, a new go-live date agreed with the client and entered on the first task, and the decision recorded again
    • Decide whether the client goes live — Go, Go with conditions or Not yet, with the conditions or the reasons, recorded by the go-live approver alone
  8. Phase 8

    Phase 8: Go-Live & Hypercare

    5 tasks

    Applies only when the go-live decision is Go or Go with conditions. Hypercare is the period of closer checks straight after go-live; this template runs it for ten working days, with a check each working day, then hands the client to account management.

    • Meet the approver’s conditions before the first live orders — Go with conditions only: each condition the approver set met and recorded before the first live orders
    • Switch on live orders — the order connection set to live on the go-live date, the client’s store sending live orders to your warehouse, and the first orders picked, packed and despatched by the cut-off
    • Check the first day’s orders with the client — every order received and despatched, tracking showing on the client’s store, and any issue logged with an owner
    • Run the daily hypercare checks — each working day: orders received and despatched by the cut-off, picking and packing errors, stock differences, connection errors and the client’s questions, with each issue logged, owned and closed
    • End hypercare and hand the client to account management — open issues with owners and dates, the dates of the regular reviews and the KPI report, and the client told who its contacts are from now on
  9. Phase 9

    Phase 9: First Invoice & 30-Day Review

    4 tasks

    Applies only when the go-live decision is Go or Go with conditions. Check the first invoice before it goes out, count a sample of the client’s stock, and review the first 30 days with the client. In this template the first invoice falls 15 working days after go-live and the review 22 working days after it; match them to your billing cycle.

    • Check the first invoice before it goes out — the set-up fees and the first period’s receiving, storage, pick and pack, packaging, carriage and returns, drawn from the WMS activity, checked against the rate card, and sent with the activity report
    • Cycle count the client’s locations — the client’s fastest-moving and highest-value SKUs counted against the WMS, each difference investigated and corrected, and the result shared with the client
    • Review the first 30 days with the client — each KPI against its service level, the issues found and their causes, any invoice queries, the client’s forecast for the coming months and its next peak, and the actions agreed with owners and dates
    • Record the lessons and close the onboarding — what went well and what to change for the next client, the onboarding plan and work instructions updated, and the record filed

What a New Client Must Send, and the Data Processing Terms

What to get from a new client, and when

The inputs the onboarding depends on, and the phase in this template that asks for each. Chase anything late early: each one holds up the work after it.

What you need What it covers When, in this template
The sales handoverThe proposal and quote, the volumes and services promised, any special termsPhase 1
The client profile and forecastSKU count, product sizes, orders per day now and at peak, channels, delivery options and returnsPhase 1
The signed warehousing agreementServices, term and notice, minimum charges, liability and its limit, who insures the stockPhase 2
The service level scheduleThe order cut-off, receiving time, pick and stock accuracy, returns time, and the KPI reportPhase 2
The data processing termsThe client’s customers’ personal data that your systems hold, and the Article 28(3) termsPhase 2
The item dataCode, description, barcode, sizes and weights, case and pallet quantities, lot and expiry flagsPhase 3
Order connection and carrier detailsStore, EDI or API access, the delivery options, and whose carrier accounts are usedPhase 4
The packing specification and materialsBoxes and mailers, inserts, branded packaging and who reorders itPhase 5
The ASN for the first deliverySKUs, quantities, lots, cartons and pallets, the carrier and the datePhase 6
The client’s confirmation of the test resultsWritten confirmation that the test orders were right and it is readyPhase 7

The contract terms for the client’s customer data (UK GDPR)

Where you act as the client’s processor for its customers’ names, addresses and order details, Article 28(3) of the UK GDPR says the processing must be governed by a contract (or other legal act). The ICO lists what it must include; Phase 2 agrees it before any real order reaches you.

Term What the ICO says the contract must cover
Details of the processingThe subject matter and duration, the nature and purpose, the type of personal data and categories of data subject, and the controller’s obligations and rights
Documented instructionsThe processor may only process the personal data in line with the controller’s documented instructions, unless UK law requires otherwise
Duty of confidenceAnyone the processor allows to process the data commits to confidentiality, unless already under a statutory duty
SecurityThe processor takes all the security measures Article 32 requires
Sub-processorsNo other processor without the controller’s prior specific or general written authorisation, notice of intended changes with a chance to object under a general authorisation, the same obligations passed on to any sub-processor, and the processor liable for its compliance
Data subjects’ rightsThe processor helps the controller respond to requests from individuals exercising their rights
Assisting the controllerHelp with keeping the data secure, notifying breaches to the ICO and to data subjects, and data protection impact assessments and any consultation with the ICO
End of the contractAt the controller’s choice, the data deleted or returned, and existing copies deleted unless UK law requires them to be stored
Audits and inspectionsThe information needed to show Article 28 is met, and audits and inspections by the controller or its auditor allowed for and contributed to

Where this comes from. UK GDPR Article 28 on legislation.gov.uk, and the ICO’s guidance What are controllers and processors? and What needs to be included in the contract?, all read on 9 November 2026. The ICO says this guidance is under review after the Data (Use and Access) Act and may change. Since 30 September 2026 the Information Commission has taken over the Information Commissioner’s functions (S.I. 2026/1015); it still publishes as the ICO. Whether you are a processor or a controller depends on who decides the purposes and means of the processing. In the US, privacy law varies by state. The first table, the phases and the timetable are this template’s choices. This is a starting point, not legal advice.

Why Onboard Your Warehouse Clients in CheckFlow?

1

No live orders before someone decides

The go-live decision is assigned to the go-live approver alone, and the checklist halts there: switching on live orders, hypercare and the first invoice cannot be completed until the approver completes it with Go or Go with conditions. Go with conditions adds the task to meet them before the first live orders, and Not yet shows the task to put things right and set a new date. See how approvals that halt a checklist work.

2

Only the set-up this client needs

Orders to retailers add the routing guides and labels, a stock transfer adds the plan and the reconciliation, and lot and expiry tracking, kits and dangerous goods each add their own set-up task. EDI or your API add the connection work, and a failed test order adds the task to fix it and test again.

3

One record from handover to the first invoice

Name the onboarding lead, the account manager, the systems lead, the warehouse operations lead, the billing lead and the go-live approver on the first task, and every step is assigned from those fields and dated from the go-live date. The signed agreement, the receipt report and the test results stay on the tasks they came from, and the Reports Grid lists every client in onboarding with its progress.

CheckFlow does not connect stores to your WMS, print labels or count stock: those stay with your WMS, your integrations and your team. CheckFlow makes sure every new client gets the same set-up in the same order, with an owner and a due date for each step, a decision before the first live orders, and a record of what was agreed and checked. See how a checklist runs.

Check each supplier delivery with the Goods Receiving & Inspection Checklist, count the client’s stock in full with the Inventory Audit Process Checklist, ship its dangerous goods with the Dangerous Goods Shipment Checklist, and follow problem shipments with the Shipment Tracking Workflow Checklist.

AI generator

Didn’t find what you need? Describe it.

Describe the process in a sentence and the AI checklist generator drafts the phases and tasks for you.

Frequently Asked Questions

What does a 3PL warehouse set up when it onboards a new client?

The sales handover and a client profile, the warehousing agreement, service levels and the KPI report, data processing terms for the client’s customer data, the rate card loaded into billing, the client and its item data in your WMS, the order connection and carriers tested, work instructions and a team briefing, the first delivery received against its ASN, test orders the client confirms, a recorded go-live decision, hypercare, a checked first invoice and a 30-day review. This template covers each, in that order.

What should a 3PL ask a new client during discovery?

Ask what it sells and how many SKUs it has, the product sizes and weights, orders per day now and at peak, items per order, its sales channels and countries, the delivery options it offers, its returns, where its stock will come from, any lot, expiry, kit or dangerous goods needs, how its orders will reach you, and what it was promised in the sale. This template records the answers in Phase 1 and uses them to add the tasks the client needs.

How long does it take to onboard a new client at a 3PL warehouse?

It depends on the number of SKUs, the order connection, the special handling and when the first stock arrives. This template plans seven working weeks from the sales handover to go-live, with the agreement in the first three and the build in the last four, then ten working days of hypercare and a review 22 working days after go-live. Enter the planned go-live date and every due date moves with it; for a bigger client, choose a later date.

Is a 3PL a data processor for its client’s customer data?

Under the UK GDPR, a controller decides the purposes and means of processing personal data, and a processor processes it on the controller’s behalf. A 3PL that handles the client’s customers’ names and addresses only to fulfil the client’s orders, on its instructions, is acting as a processor under those definitions; the ICO says a processor that decides the purpose and means itself is a controller for that processing. Article 28(3) requires a contract (or other legal act) between them, which Phase 2 agrees.

How do you set up billing for a new 3PL customer?

Load every charge in the signed agreement into your WMS or billing system with the unit it is counted in: set-up fees, receiving, storage, pick and pack, packaging, carriage, returns, extra services and any minimum charge. Have a second person check the loaded rates against the agreement, set up the client’s billing account and terms, and check the first invoice against the WMS activity before it goes out. This template sets billing up in Phase 2 and checks the first invoice in Phase 9.

Who decides when a new 3PL client is ready to go live?

This template leaves it to one named go-live approver, for example the site or operations manager, once the client has confirmed the test orders and the onboarding lead has reviewed readiness. The approver alone records Go, Go with conditions or Not yet, and nothing after the decision can be completed until the approver completes it with Go or Go with conditions. Go with conditions adds a task to meet them before the first live orders; Not yet shows a task to put things right and set a new date.

What is hypercare after a new 3PL client goes live?

Hypercare is the period of closer checks straight after go-live, before the client moves to normal account management. In this template it runs for ten working days: the first day’s orders are checked with the client, then each working day the onboarding lead checks orders despatched by the cut-off, picking and packing errors, stock differences and connection errors, and logs each issue with an owner. It ends with the hand-over to the account manager.

What should the 30-day review with a new 3PL customer cover?

Each KPI against the service level in the agreement, the issues found since go-live and their causes, any queries on the first invoice, a cycle count of the client’s fastest-moving and highest-value SKUs, the client’s forecast for the coming months and its next peak, and the actions agreed with owners and dates. This template holds the review 22 working days after go-live, then records the lessons for the next client.

Is CheckFlow free for this template?

14-day free trial, no card required. The Business plan is $10 per user per month after the trial. Full details at checkflow.io/pricing.

Take On Every New Client the Same Way

Free trial — no credit card required.

14-day free trial, no credit cardFull refund in your first 30 daysUS hosting, EU on request