Privileged Access Management (PAM) Implementation Checklist Template

Roll out a password vault or just-in-time admin roles such as Microsoft Entra PIM in planned waves, with break-glass accounts tested before go-live and the old standing admin access removed at the end.

Last reviewed: November 2026

Printed from checkflow.io/templates/cybersecurity/privileged-access-management-implementation-checklist

This free PAM implementation checklist is for IT, identity and security teams putting privileged access management in place, whether the tool is a password vault with session management, just-in-time role activation such as Microsoft Entra Privileged Identity Management (PIM), or both. One run is one rollout, counted from the go-live date of the first production wave. It records the sponsor, the platforms and the people, finds every person, service, machine and supplier account with admin rights, groups them into tiers, and sets the approval, MFA and time limits for each tier. It builds and protects the tool, sets up and tests at least two break-glass accounts, pilots with test accounts and a small group, and asks the sponsor for a go-live decision before any account moves. Accounts then move in three waves, standing admin access is removed and counted against the baseline, and the result is handed over to the periodic privileged access review. Used with Entra ID alone, it is a PIM implementation checklist: the vault tasks stay hidden.

Putting the Controls In, Then Reviewing Them

This checklist is the one-off project that puts privileged access management in place. Once it is live, the Privileged Access Review Checklist checks on a schedule that the controls still hold: who has standing access, how admin and service accounts are protected, whether break-glass works and what the vault and session evidence shows. This checklist ends by handing over to it. The User Access Review Checklist certifies every account on in-scope systems, not only admins.

Two neighbours cover related work. The MFA Rollout Checklist brings MFA to every user; this checklist adds MFA at each elevation for admins. The Microsoft 365 Security Baseline Review Checklist reviews a whole tenant each quarter, admin roles included.

This checklist

Putting PAM in place

Who: the IT, identity and security team running the rollout, with a sponsor who approves the go-live.

When: once, from about fourteen weeks before the first production wave to about nine weeks after it.

Output: every admin account found and tiered, a tool built and tested, break-glass accounts that work, standing admin access removed and a handover.
After rollout

Reviewing privileged access

Who: the access review owner, with security or GRC.

When: on a schedule, in the Privileged Access Review Checklist.

Output: admin access certified, what is not needed removed with evidence, and management approval.

Every user

Rolling out MFA

Who: the IT and identity team.

When: before or alongside this rollout, in the MFA Rollout Checklist.

Output: every account protected by MFA, enforced in stages.

What the PAM Implementation Checklist Covers

Nine phases take one rollout from scoping, about fourteen weeks before the first production wave, to the handover about nine weeks after it. Every due date counts in working days from the go-live date. Tasks appear for just-in-time roles, a password vault or both, session recording, service account credentials, supplier access, a failed break-glass test and the sponsor’s decision. The sponsor approves the go-live before any account moves.

  1. Phase 1

    Phase 1: Scope, Sponsor & Tool

    5 tasks

    Start about fourteen weeks before the go-live date. The first task records the rollout, the go-live date that every due date counts from, the five people and the kind of tool, which adds the build tasks for just-in-time roles, a password vault or both.

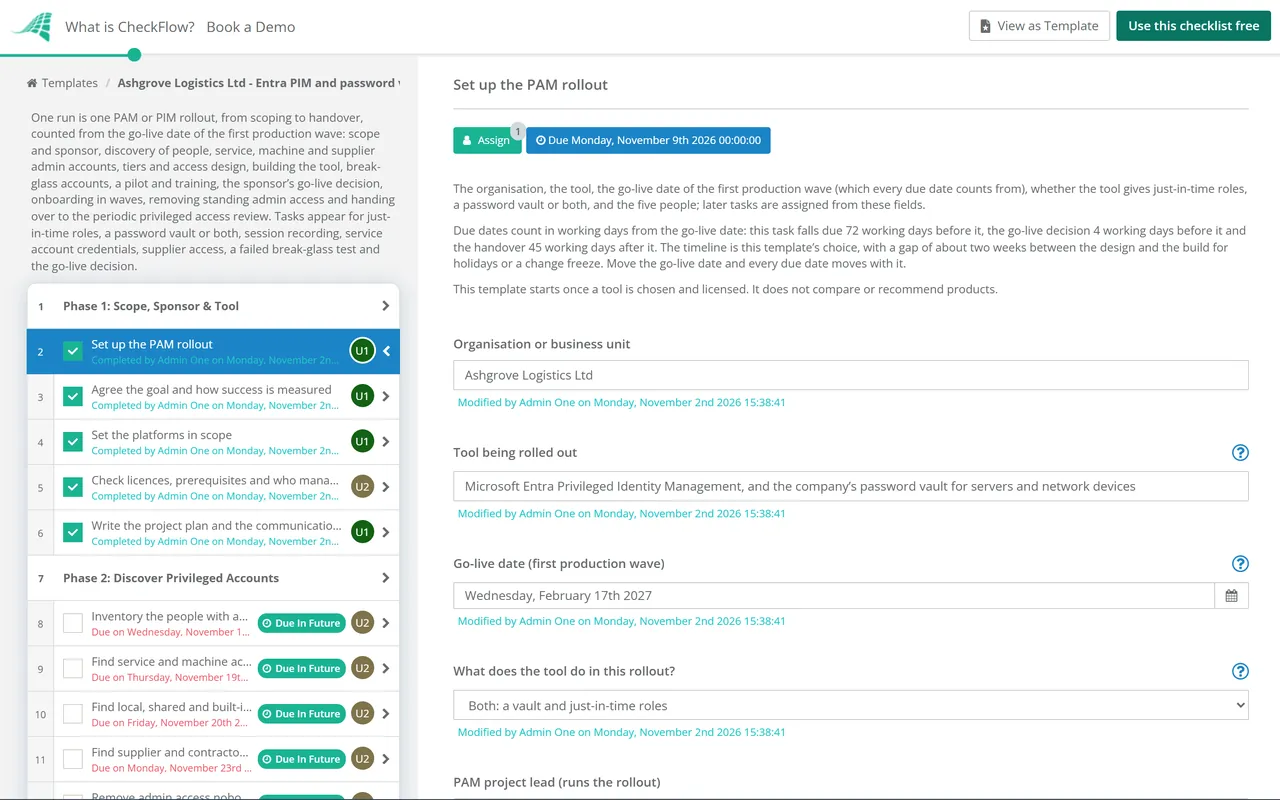
    • Set up the PAM rollout — the organisation, the tool, the go-live date of the first production wave (which every due date counts from), whether the tool gives just-in-time roles, a password vault or both, and the five people; later tasks are assigned from these fields
    • Agree the goal and how success is measured — why the rollout is happening (an audit finding, a customer’s security questionnaire, an incident, a policy), what it will measure at the end, such as the number of standing admin assignments, and what is out of scope
    • Set the platforms in scope — the directory and identity platform, cloud subscriptions, servers, databases, network devices and SaaS admin roles this rollout covers, and the owner of each
    • Check licences, prerequisites and who manages the tool — the licences the tool needs for everyone who will be eligible for a role or approve requests, the prerequisites, and the few people who will administer the tool itself
    • Write the project plan and the communications plan — the phases and dates in this checklist, the change windows, who needs to hear what and when, and how admins get help during the rollout
  2. Phase 2

    Phase 2: Discover Privileged Accounts

    6 tasks

    You cannot protect accounts you have not found. List every account that can change systems, manage other accounts or switch security controls off, on every platform in scope, and remove what nobody needs before anything moves into the tool.

    • Inventory the people with admin rights on each platform — every person who holds an admin role, an admin group membership or root-level access, on which platform, through which account, and whether it is their everyday account or a separate admin account
    • Find service and machine accounts with elevated rights — accounts that run applications, scheduled tasks, scripts and integrations, with an owner for each, what depends on it and where its password or key is kept
    • Find local, shared and built-in admin accounts — local administrator accounts on servers and workstations, shared team logins, root and built-in accounts, and default accounts on network devices and appliances
    • Find supplier and contractor admin access — accounts that suppliers, managed service providers and contractors use to administer your systems, and the contract or ticket that allows each one
    • Remove admin access nobody needs before onboarding — accounts of people who have left or changed role, dormant admin accounts and duplicate assignments, removed with the platform owner’s agreement
    • Record the baseline count of standing admin access — the number of standing (always-on) admin assignments on each platform after the clean-up, so the end of the project can show the change
  3. Phase 3

    Phase 3: Tiers & Access Design

    9 tasks

    Not all admin access carries the same risk. Group it into tiers, decide which roles become just-in-time and which accounts stay standing, and set the approval, MFA and time limits for each tier. Write the rollback plan before anything changes.

    • Group admin access into tiers — the root of trust first (directory and identity administrators, the cloud tenant’s top roles and the PAM tool itself), then critical systems, then single applications and limited support functions, and fill in the tier column of the Phase 2 inventory
    • Decide which roles become just-in-time and which stay standing — for each role, eligible (requested when needed) or standing, with a reason and an owner for every standing exception
    • Give each admin job the least privileged role that does it — list what each admin actually does and give them the narrowest role for it, so fewer people hold the top roles
    • Set the approval, MFA and time limits for each tier — who approves an elevation or a password check-out, whether MFA is required each time, the longest an elevation or check-out lasts, and whether a reason or ticket number is required
    • Decide where admins may work from — the trusted devices or privileged access workstations admins use for tier 0 and tier 1 work, and whether admin sign-in is blocked from other devices
    • Decide what is logged, alerted and recorded — the events that raise an alert (an elevation, an approval, a password check-out, a break-glass sign-in, a new admin, a role granted outside the tool), where the logs go, and whether admin sessions will be recorded
    • Check session recording with your data protection lead — recordings capture what admins see, including personal data on screen; agree the purpose, who may watch them, how long they are kept and whether a data protection impact assessment is needed
    • Plan the onboarding waves — which roles and accounts move in each wave and when; this template puts tier 0 in wave 1, tier 1 in wave 2 and the rest in wave 3
    • Write the rollback plan — how to give standing access back if the tool fails or blocks urgent work, who decides, and how long it may last
  4. Phase 4

    Phase 4: Build & Configure the Tool

    7 tasks

    Build what the design says, after a gap of about two weeks that leaves room for holidays or a change freeze. The first task’s answer decides which tasks appear: role settings and approvers for just-in-time roles, or safes, rotation and connections for a vault. The PAM tool becomes part of tier 0, so protect it like the directory.

    • Configure each just-in-time role and its approvers — activation duration, MFA at activation, a required reason or ticket number, approval and notifications by tier, two or more approvers where approval is required, and eligible (not active) assignments for the pilot admins
    • Set up the vault’s safes and who can see each one — group accounts into safes or folders by tier and team, and give each team access only to its own
    • Set password rotation and check-out rules — how often each kind of password changes, whether it changes after every check-out, how long a check-out lasts and who must approve it
    • Connect the vault to the target systems — the connections the vault uses to change passwords and open sessions on servers, databases and devices, tested on one target of each type
    • Turn on session recording and set who can watch recordings — which sessions are recorded, where recordings are kept and for how long, and the few people who may watch them, as agreed with the data protection lead
    • Protect the PAM tool and plan for it being unavailable — limit who can administer it, keep it patched, require strong sign-in, send its own logs to monitoring, use high availability where the tool offers it, and use the break-glass process in Phase 5 as the way in when it is down
    • Send the tool’s logs to security monitoring and set the alerts — the alerts agreed in Phase 3, sent to the people who will act on them, each tested once; the break-glass sign-in alert is added in Phase 5, once the accounts exist
  5. Phase 5

    Phase 5: Break-Glass Accounts

    6 tasks

    If the PAM tool, the identity provider or MFA fails, someone still needs a way in. Set up at least two emergency access accounts, keep them out of everyday use and test them before the go-live decision. A failed test adds a task to fix them.

    • Create or confirm the emergency access accounts — at least two, not tied to any person, used only when normal admin access cannot be
    • Give them strong sign-in and store the credentials safely — a phishing-resistant method such as a FIDO2 security key, different from the method everyday admin accounts use, with the credentials kept in separate secure places known only to the people authorised to use them
    • Keep them out of lock-out policies and alert on every sign-in — exclude them from sign-in policies that block or restrict access, record the exception and who approved it, and add each account to an alert on every sign-in, sent to security operations
    • Write the break-glass procedure — who may use the accounts, when, how they reach the credentials, who they tell, and the review after every use
    • Test each emergency access account — sign in with each account, do one admin task, confirm the alert reached security operations, and record the result
    • Fix the emergency access and test it again — fix what failed and test again, then change the result on the test task to Passed (un-complete that task first if it is completed)
  6. Phase 6

    Phase 6: Pilot & Training

    5 tasks

    Test with test accounts and a small pilot group before real admins depend on the tool. Brief the help desk first, then the pilot admins, then everyone who will move in the waves.

    • Tell admins their sessions will be recorded — what is recorded, why, who may watch the recordings and how long they are kept, before the pilot starts
    • Brief the help desk and train the pilot admins — how to request a role or check out a password, how approvers approve, what the reason or ticket field is for, the common problems and the break-glass process
    • Run the pilot with test accounts and the pilot group — test accounts first, then a small group of real admins, checking each setting against the test plan: MFA, approval, expiry, alerts and notifications
    • Fix what the pilot found — change settings, test again, and list any issue that stays open for the go-live decision
    • Tell and train the admins in each wave — the date of their wave, what they will do differently, a short training session or recorded walk-through, where to get help, and a record of who has been trained
  7. Phase 7

    Phase 7: Go-Live Approval

    4 tasks

    The sponsor decides whether the first production wave goes ahead. Nothing after the decision can be completed until it is recorded. No-go adds a rework task; Go with conditions adds a task to meet them first.

    • Prepare the go-live pack — the pilot results, open issues, the break-glass test result, the rollback plan, the alerts tested, training completed and the wave plan
    • Approve the go-live — the sponsor records Go, Go with conditions or No-go and the reasons; nothing after this task can be completed until it is done
    • Fix the blockers and return for a go-live decision — fix what the sponsor raised, move the go-live date on the first task if needed (every due date moves with it), then ask the sponsor to change the decision and complete the approval again
    • Meet the go-live conditions before wave 1 — do what the sponsor asked and record it before the first production wave starts
  8. Phase 8

    Phase 8: Onboard Accounts in Waves

    6 tasks

    Move accounts into the tool one wave at a time, check each wave before starting the next, and keep the rollback plan to hand. Service account and supplier tasks appear from the answers in Phase 2.

    • Run wave 1: tier 0 roles and accounts — move the tier 0 admins to eligible or vaulted access, confirm each person can elevate or check out, and confirm the alerts fire
    • Run wave 2: tier 1 roles and accounts — the same steps for servers, databases, cloud subscriptions and the other critical systems, once wave 1 is stable
    • Run wave 3: the remaining roles and accounts — tier 2 and tier 3 roles, SaaS admin roles and anything left from the inventory
    • Onboard service account credentials and rotate them — one application at a time with its owner, in a change window: store the credential in the tool, change it, and update where the application reads it
    • Check each application still runs after rotation — scheduled tasks, integrations and services run with the new credential, and nothing still uses the old one
    • Move supplier and contractor admin access into the tool — a named account for each supplier engineer, time-bound access approved for each job, and the old routes in closed
  9. Phase 9

    Phase 9: Remove Standing Access & Hand Over

    7 tasks

    The rollout is not finished until the standing access it replaced is gone and someone owns the controls. Compare the result with the baseline, then hand over to the periodic privileged access review.

    • Remove the standing admin assignments that were replaced — every permanent admin assignment that now has an eligible or vaulted replacement, keeping only the break-glass accounts and the documented exceptions
    • Compare standing admin access with the baseline — count the standing admin assignments again and record the change against the Phase 2 baseline
    • Check for admin rights granted outside the tool — role assignments, group memberships or local admin rights added directly since go-live rather than through the tool, and whether an alert caught each one
    • Set the routine for reading the tool’s audit log — who reads elevations, approvals and check-outs, how often, and where exports are kept
    • Update the admin access policy and procedures — how admin access is requested, approved and removed, the tier rules, the break-glass procedure, and joiners, movers and leavers for admin roles
    • Record lessons learned and close the project — what worked, what slowed the waves down, open items and their owners, and the measures from Phase 1 against the result
    • Hand over to the periodic privileged access review — the inventory, tiers, standing exceptions, break-glass test record and the date of the first review, which then runs on a schedule

Tiers, Example Rules and the Terms You Will Meet

The first table shows the four tiers in the NCSC’s secure system administration guidance, with example rules for each. The rules are this template’s examples, not requirements: set your own in Phase 3. The second table explains the terms the tasks use, from Microsoft Learn and the NCSC, read on 2 November 2026.

Tiers and example rules

Tier What it covers (NCSC examples) Example approval Example longest elevation
Tier 0The root of trust: root domain administrators, the root account of a cloud service, and a PAM tool designated as tier 0Another named admin approves each request1 hour
Tier 1Highly privileged functions on critical systems, such as the administrators of a critical database that several systems rely onApproval, or a ticket number checked by a rule2 hours
Tier 2Privileged functions over a small number of components, such as admin access on an important business support applicationA reason or ticket number, no approval4 hours
Tier 3A constrained set of functions, such as first line support staff issuing a password resetA reason only8 hours

Terms the tasks use

Term What it means Source
PAM and PIMPAM (privileged access management) is the wider practice; the NCSC calls it “an additional security measure that you can place in front of your system administration interfaces”. PIM here means Microsoft Entra Privileged Identity Management, which provides “time-based and approval-based role activation”.NCSC; Microsoft Learn
Eligible and active assignmentAn eligible user activates a role when they need it; an active user holds it all the time. Microsoft says there is no difference in the access given, only that some people do not need that access all the time.Microsoft Learn, What is Microsoft Entra Privileged Identity Management?
Just-in-time administrationThe admin’s credential is used to request access. If the request is approved, a temporary credential is issued, which only works for a short period.NCSC, Use privileged access management
Just enough administrationAnother way of describing least privilege: just enough permission for the job in hand, so full system-wide access is the exception.NCSC, Use privileged access management
Emergency access (break-glass) accountA highly privileged account not assigned to a person, kept for when normal accounts cannot be used or every other admin is locked out.Microsoft Learn, PIM deployment plan
Tier 0“The root of trust that all other administration relies upon.” Microsoft’s enterprise access model calls this layer the control plane.NCSC; Microsoft Learn

No law sets these steps. Frameworks name the outcomes. NIST SP 800-53 Rev. 5 has controls for least privilege (AC-6), privileged accounts (AC-6(5)), logging the use of privileged functions (AC-6(9)) and privileged user accounts (AC-2(7)). If your auditors test against PCI DSS, ISO/IEC 27001 or SOC 2, record what they expect on the first phase’s goal task.

Microsoft’s example settings. The PIM deployment plan gives the Global Administrator role MFA, approval by another Global Administrator and a one-hour activation, Exchange Admin two hours and Helpdesk Admin eight hours, as examples. Its page was last updated on 23 April 2026.

Why Run Your PAM Rollout in CheckFlow?

1

Every admin account found before anything moves

Discovery comes before design. People, service, machine, local and supplier accounts are listed with an owner and a tier, dormant access is removed, and the standing count is recorded so the end of the project can show what changed.

2

Break-glass tested before the go-live decision

Two or more emergency access accounts are set up, kept out of policies that could lock them out and tested before the sponsor decides. A failed test adds a task to fix them, so nobody goes live without a way back in.

3

Nothing moves until the sponsor says Go

The go-live approval holds every wave until the sponsor records Go, Go with conditions or No-go. Each wave, the removal of standing access and the handover are then tracked with an owner and a due date in the Reports Grid.

CheckFlow does not grant, remove or vault anyone’s access, and it does not compare PAM products. Your team does the work in the tool it chose. CheckFlow makes sure each step has an owner and a due date, the decisions are on record and nothing is skipped. Compliance checklist software shows how repeated work like this is tracked.

Clear stale accounts first with the Active Directory & Entra ID Account Cleanup Checklist, rotate the credentials the vault does not manage with the Encryption Key & Secrets Rotation Checklist, and keep reading admin activity with the Security Log Review Checklist.

AI generator

Didn’t find what you need? Describe it.

Describe the process in a sentence and the AI checklist generator drafts the phases and tasks for you.

Frequently Asked Questions

What does a PAM implementation involve?

A PAM implementation finds every account with admin rights, groups them into tiers by risk, and moves them into a tool that controls how admin access is used: a password vault, just-in-time role activation, or both. This template runs it in nine phases: scope, discovery, tiers and design, the build, break-glass accounts, a pilot and training, a go-live approval, onboarding in waves, and removing standing access before handing over to the periodic review.

What is the difference between PAM and PIM?

PAM, privileged access management, is the wider practice of controlling who can use admin access, when and how. The NCSC describes it as a security measure placed in front of system administration interfaces. PIM, in this template, means Microsoft Entra Privileged Identity Management: Microsoft’s service for time-based and approval-based role activation in Entra ID, Azure and other Microsoft online services. A PIM rollout is one kind of PAM rollout, and this template covers either, or both together.

How do you implement Microsoft Entra PIM?

Microsoft’s deployment plan starts by listing who holds privileged roles and removing what is not needed, then brings the roles with the most permissions under PIM first, starting with Global Administrator and Security Administrator. Configure each role’s settings (MFA, approval, activation duration), give eligible rather than active assignments, test with test users and a pilot group, and keep two cloud-only emergency access accounts permanently assigned. Choose just-in-time roles on the first task and this template follows those steps.

Which accounts should move into a PAM tool first?

This template moves the most privileged accounts first: tier 0, the root of trust, such as directory and identity administrators and the cloud tenant’s top roles, then critical systems, then everything else. Microsoft’s PIM deployment plan notes that organisations often test and roll out Global Administrators first. If you would rather learn the tool on lower-risk roles, change the wave plan in Phase 3; the pilot with test accounts and a small group comes before any wave either way.

How do you find privileged accounts before a PAM rollout?

Export the admin roles, admin group memberships and root-level access on each platform in scope, then look for what the exports miss: service and machine accounts that run applications and scripts, local administrator accounts, shared and built-in logins, default accounts on devices, and the accounts suppliers use. Give every account an owner, remove what nobody needs, and count what is left as the baseline. Phase 2 of this template does this before any design work starts.

Do you still need break-glass accounts with PIM or a vault?

Yes. If the tool, the identity provider or MFA fails, someone still needs a way in. Microsoft says to create two or more emergency access accounts, cloud-only in Microsoft Entra ID, excluded from Conditional Access policies that block or restrict sign-in, with every sign-in alerted and the accounts validated at least every 90 days. The NCSC says to make sure the break-glass process is carefully protected. Phase 5 sets them up and tests them before go-live.

Should service accounts go into the PAM tool?

They can, but carefully. An application reads a service account’s password or key, so changing it can stop the application. This template asks in Phase 2 whether service and machine account credentials move in this rollout. If they do, they move after go-live, one application at a time with its owner in a change window, and each application is checked after rotation. If not, they stay on the inventory for the periodic review.

What licence does Microsoft Entra PIM need?

Microsoft Learn says you need either Microsoft Entra ID Governance licences or Microsoft Entra ID P2 licences to use PIM and all of its settings. The users who need one include those with eligible or time-bound assignments and those who approve or reject activation requests. Check Microsoft’s current licensing page before you buy. Phase 1 has a task to confirm licences and prerequisites.

What happens after the PAM rollout is finished?

The controls need checking on a schedule. Phase 9 removes the standing admin access that was replaced, compares the count with the baseline, sets the routine for reading the tool’s audit log and hands the inventory, tiers, exceptions and break-glass test record to the person who runs the Privileged Access Review Checklist, with the date of the first review.

Is CheckFlow free for this template?

14-day free trial, no card required. The Business plan is $10 per user per month after the trial. Full details at checkflow.io/pricing.

Roll Out Privileged Access Management Without Locking Anyone Out

Free trial — no credit card required.

14-day free trial, no credit cardFull refund in your first 30 daysUS hosting, EU on request