Construction Punch List Checklist Template

Most punch lists don’t fail on the walk. They fail afterwards, when items with no location, photo or owner sit in a spreadsheet, the trades come back to fix the ones they remember, and the client finds the rest on the day they move in.

Last reviewed: October 2026

This free construction punch list checklist, or snagging list template, is for main contractors, site and project managers, architects and client representatives finishing a building, a floor or a fit-out. One run is one punch list cycle for one project or phase before handover. It plans the walk and who attends, prepares the drawings, the specification and the contractor’s own pre-inspection, walks the area room by room, and logs each item with its location, trade, description, photo and priority. The agreed list goes to the trades with deadlines, the contractor checks each fix, and the client or architect re-inspects before signing the list off, with any exceptions carried over. Lessons for the next project close it. Choose UK, US or other rules for the matching steps. A change request step appears for items outside the contract scope, an access step for an occupied building and escalation steps when too many items stay open.

Punch List, Snagging List or Defects List?

A punch list, called a snagging list in the UK, is the list of work that is incomplete, damaged or not built to the contract documents as a project, or one part of it, nears handover. It is walked, logged, fixed, checked and signed off in a short cycle, usually a few weeks, and it ends when the client or architect accepts the list, with any remaining items carried over to agreed dates. This checklist runs one of those cycles for one project, floor or phase.

It sits between two other lists. Quality inspections during construction check work before it is covered up. Faults that appear once the building is in use are dealt with in the defects, rectification or warranty period the contract sets. The punch list is the last look before handover, and what it misses usually comes back as a defect. For the handover of the whole project, with documents, suppliers and the final account, use the Project Closeout Checklist. Client requests the contract does not cover go through the Scope Change Request Checklist, and trades returning to site to fix items go through the Construction Site Induction Checklist if they are new to it. Landlords recording a tenancy want the Move-In / Move-Out Inspection Checklist, which walks a property room by room for a different purpose.

During construction

Quality inspections

Covers: work checked as it is built, before it is closed in or covered up.

Run by: the contractor and each trade, often with the designer at agreed hold points.

Output: work accepted stage by stage, so fewer items reach the punch list.

Before handover

The punch list (snagging)

Covers: the walk, the logged items, the trades’ fixes, the contractor’s checks, the re-inspection and the sign-off.

Run by: the contractor, with the client or architect inspecting and accepting.

Output: a signed-off list, with any exceptions carried over to agreed dates.

After handover

Defects in the defects period

Covers: faults that appear once the building is in use, reported during the period the contract sets.

Run by: the client reports them; the contractor returns to fix them under the contract.

Output: defects closed at the end of the period.

What the Construction Punch List Checklist Covers

Eight phases take one punch list from planning the walk to the lessons for the next project. Choose the rules that apply on the first task and the matching safety notes appear, with a health and safety file step on UK projects. A change request step appears when items fall outside the contract scope, an access step when the building is occupied, and two escalation steps when too many items are still open at re-inspection. Nothing after the client’s or architect’s sign-off can be completed until it is given.

  1. Phase 1

    Phase 1: Plan the Punch List Walk

    5 tasks

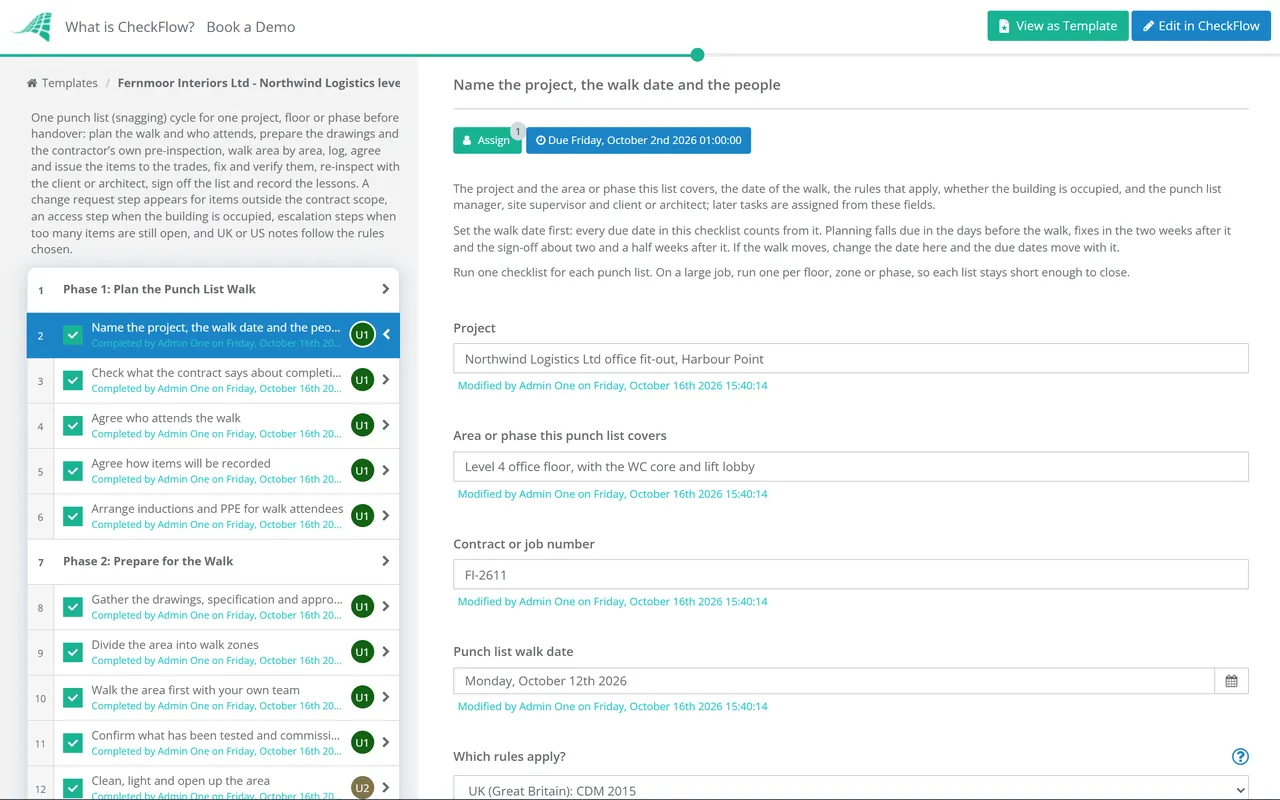
    One run is one punch list for one project, floor or phase. Set the walk date first, because every due date counts from it, and name the three roles so later tasks are assigned.

    • Name the project, the walk date and the people — the project and the area or phase this list covers, the date of the walk, the rules that apply, whether the building is occupied, and the punch list manager, site supervisor and client or architect; later tasks are assigned from these fields
    • Check what the contract says about completion — how completion is defined, who decides it has been reached, whether minor items may be outstanding at handover, and any payment or retention linked to it
    • Agree who attends the walk — the contractor, the client or owner, the architect or contract administrator, the services engineers and the trades with the most work in the area
    • Agree how items will be recorded — one numbering system, room or grid references, trade names, the priority categories and the photo rules, so every attendee’s items fit one list
    • Arrange inductions and PPE for walk attendees — visitors sign in, are inducted or escorted, wear the site’s PPE and keep out of areas still being worked on
  2. Phase 2

    Phase 2: Prepare for the Walk

    5 tasks

    A walk is only as good as what it is judged against. Bring the current drawings and specification, and walk the area with your own team first.

    • Gather the drawings, specification and approved changes — the current revision of each drawing, the specification and every approved change, so items are judged against what was agreed rather than the first design
    • Divide the area into walk zones — room by room or area by area, marked on a plan with a reference for each zone and the order they will be walked
    • Walk the area first with your own team — the contractor’s own pre-inspection, done far enough ahead to fix what it finds, so the formal list holds only what is left
    • Confirm what has been tested and commissioned — which systems are working and can be operated on the walk, and which are still being commissioned and will be checked later
    • Clean, light and open up the area — clean enough to see the finishes, lighting on, protection lifted where finishes must be seen, every room open and access clear
  3. Phase 3

    Phase 3: Walk Through Area by Area

    7 tasks

    Walk every zone in the agreed order with the whole group. Record each item where it is found, against its zone, never from memory afterwards.

    • Walk each zone in the agreed order — all attendees together, one person recording, and each zone marked as walked before moving on
    • Check finishes and surfaces — walls, ceilings, floors and skirtings for damage, marks, gaps, patchy paint, poor joints and anything left dirty
    • Check doors, windows and ironmongery — each door and window opens, closes and locks as it should, with handles, closers, seals, stops and signs fitted
    • Check fixtures, fittings and joinery — kitchens, washrooms, built-in furniture, blinds and signage are installed to the specification, undamaged and working
    • Check the building services in each room — lights, switches, sockets, data points, heating and cooling outlets, controls and access panels are fitted, labelled and working
    • Check fire safety and access features — fire doors close and latch, fire stopping around services is complete, and signs, emergency lighting and accessible features are in place
    • Check common parts and external areas — corridors, stairs, lift lobbies, the facade, roofs you can see safely, landscaping and parking that fall within the contract
  4. Phase 4

    Phase 4: Log, Agree & Issue the List

    7 tasks

    Each item needs enough detail for a trade to find it, fix it and know when it is finished, without phoning anyone. Items outside the contract scope go to a change request instead.

    • Log each item with its location and trade — a unique number, the zone and room, the trade responsible and a description of what is wrong and what fixed looks like
    • Photograph each item — with the item number and location in the photo or its file name, so the trade can find it and the re-inspection can compare
    • Set a priority for each item — safety or use first, then function, then finish and missing items, with a fix-by date for each category
    • Flag items outside the contract scope — requests for work the contract does not include are not punch list items; they go through a change request before anyone does them
    • Raise a change request for out-of-scope items — each one logged, priced and approved under the change process before it is done, and taken off the punch list
    • Agree the list with the client and architect — one consolidated list, duplicates removed, and any item the contractor disputes marked with the reason
    • Issue each trade its items with a deadline — the trade’s own extract of the list, with the photos and fix-by dates, sent to a named person at each trade
  5. Phase 5

    Phase 5: Fix & Verify the Items

    7 tasks

    Fixes are construction work. Returning trades follow the current site rules, and in an occupied building the work is planned around the people using it. The contractor checks every fix before the client sees it.

    • Agree access, working hours and protection with the occupier — when trades can work, noisy or dusty work out of hours, protection of occupied areas and finished floors, and escorts in secure areas
    • Brief returning trades on the current site rules — anyone new to the site gets a site induction, and everyone is told what has changed since they were last there
    • Trades fix their items — each trade fixes its items by the fix-by date and marks each one ready, with a photo of the finished work
    • Track progress by trade — items issued, fixed and still open for each trade, reviewed at least weekly, with late trades chased the same day
    • Record items that cannot be fixed as listed — a long lead time, a design question or an access problem, with the alternative or new date agreed with the client
    • Verify each fix before re-inspection — the contractor checks every item a trade marks as done against its description and photo, and sends back any that are not right
    • Clean up after the fixes — remove debris, repair any damage the fixes caused and put protection back on finished areas
  6. Phase 6

    Phase 6: Re-Inspect with the Client

    6 tasks

    Re-inspect against the same list, item by item. An item is closed only when the client or architect accepts it. Two escalation steps appear when too many items are still open.

    • Agree the re-inspection date and the items offered — only items the contractor has verified, sent to the client or architect beforehand with photos of the fixes
    • Re-inspect each item with the client or architect — walking the same zones in the same order, checking each item against its description and photo
    • Record the outcome of each item — accepted, not accepted with the reason, or carried over to an agreed date
    • Count the items still open — and decide whether they can be carried over with dates or the list needs escalating
    • Escalate late trades to their management — a meeting with each trade’s manager, the items they have missed and a firm date, with extra labour where it is needed
    • Book a second re-inspection — for the items still open once the recovery plan is in place, and tell the client how the handover date is affected
  7. Phase 7

    Phase 7: Close Out & Sign Off the List

    7 tasks

    The client’s or architect’s sign-off is the gate: nothing after it can be completed until they record a decision. On UK projects a step to send health and safety file information appears.

    • Close each accepted item on the register — with the date it was accepted and who accepted it, so the register shows the history of every item
    • List the items carried over past handover — each with an owner and an agreed date, attached to the sign-off as the list of exceptions
    • Update the as-built record for fixes that changed the work — a moved socket, a substituted product or a changed detail goes on the as-built drawings and into the operation and maintenance information
    • Send the principal designer information for the health and safety file — fixes that change the building, its services or how it is maintained, for the file the client receives
    • Client or architect signs off the punch list — accepted, or accepted with the listed exceptions carried over; nothing after this can be completed until they decide
    • Record what the sign-off leads to under the contract — a completion certificate or notice, the start of the defects or warranty period, and any retention or payment due
    • Send the signed-off list to everyone who needs it — the client, the architect, each trade with items carried over, and whoever runs the project closeout
  8. Phase 8

    Phase 8: Lessons for the Next Project

    5 tasks

    The items on this list show where work went wrong. Sorting them by trade and cause tells the next project what to check earlier.

    • Analyse the items by trade and type — how many items each trade had, how many repeated the same fault and which types came up most
    • Find the causes of repeated items — unclear design, workmanship, damage by later trades, late changes, or work covered up before it was inspected
    • Hold a lessons learned session with the trades — what to do differently on the next job, agreed with the trades and the site team while the job is fresh
    • Update your inspection plans and pre-inspection checks — add the repeated faults to the quality checks during construction and to the contractor’s own pre-inspection list
    • Archive the punch list record — the register, photos, re-inspection results and sign-off, kept for as long as your records policy and the contract require

Punch List Priorities: An Example Scheme

Every item needs a priority, because it decides the order the trades work in and what can be carried over past handover. Agree the categories before the walk so that everyone on it uses the same ones. The scheme below is an example only: some contracts and clients set their own, and the fix-by times should follow your programme.

Priority What it covers Examples Example fix-by At handover
A: Safety or useAnything that makes an area unsafe or stops it being used for its purposeA fire door that does not close and latch, missing fire stopping around a service, a dead emergency light, exposed wiringWithin a few days, and before anyone occupies the areaClosed before the area is accepted
B: FunctionWork that is installed but does not work as specifiedA door closer that slams, a blind that will not lower, a cold radiator, a socket with no powerBy the re-inspectionClosed before handover unless the client agrees otherwise
C: FinishCosmetic faults in work that otherwise worksPaint runs and missed patches, scuffed skirtings, gaps in sealant, a scratched worktopBy the re-inspection, or an agreed dateMay be carried over as a listed exception
D: Missing or incompleteItems not yet installed or finishedMissing signs, a ceiling tile left out, a door stop not fitted, an unlabelled distribution boardWhen the material or trade is availableCarried over only with an owner and a date
Out of scopeRequests the contract does not includeAn extra socket, a different paint colour, a new shelfNot on the punch listGoes to a change request

Practical or substantial completion. UK building contracts usually call the stage this list leads to practical completion, and US contracts usually call it substantial completion. In general terms both mean the work is complete enough for the client to occupy or use it for its intended purpose, apart from minor items. The test, who decides it and what happens to the items still open differ from contract to contract, so read the definition in yours. Many contracts also link a payment, often part of the retention, and the start of a defects or warranty period to that date.

Writing an item a trade can close. Give the location precisely enough to find without the person who recorded it, say what is wrong and what fixed looks like, and add a photo. “Door D4.12: closer does not latch from fully open; adjust so the door closes and latches” can be checked at re-inspection. “Door faulty” cannot.

Why Run Punch Lists in CheckFlow?

1

The list cannot be signed off by accident

The client or architect is named on the first task, and the sign-off is assigned to them alone. Until they record Accepted, Accepted with listed exceptions or Not accepted, the checklist halts, so the completion record and the lessons cannot be ticked off early. The decision and the exceptions are kept with the approval.

2

Every item has its photo, its trade and its date

The register, the photos, each trade’s deadline and the re-inspection outcome sit on the tasks they belong to, with names and dates in the history. The site team sees progress update as the trades mark items fixed, and the Reports Grid shows every open punch list across your projects.

3

Only the steps this list needs

Answers on the checklist add the change request step for out-of-scope items, the access step for an occupied building, the escalation steps when too many items stay open and the UK health and safety file step. Change the priorities, roles and due dates to fit your contracts in the template designer.

CheckFlow is not a drawing markup or BIM tool, and it does not pin items to a plan. It runs the steps around your own drawings and register, so every punch list goes through the same walk, fixes, checks, re-inspection and sign-off, with a record of who did what. See how CheckFlow’s workflow software handles handoffs between teams.

This template runs one punch list. Hand over the whole project with the Project Closeout Checklist, price and approve extra work with the Scope Change Request Checklist, induct trades returning to site with the Construction Site Induction Checklist and plan larger builds with the Capital Project Checklist.

AI generator

Didn’t find what you need? Describe it.

Describe the process in a sentence and the AI checklist generator drafts the phases and tasks for you.

Frequently Asked Questions

What is a punch list in construction?

A punch list is the list of work that is incomplete, damaged or not built to the contract documents when a project, or one part of it, is close to handover. The contractor, the client or owner and usually the architect walk the building together, record each item with its location, the trade responsible and a description, and the trades fix them. The client or architect then re-inspects the items and signs off the list. Faults found after handover are normally dealt with as defects under the contract instead.

What is the difference between a punch list and a snagging list?

There is none in substance. Punch list is the usual term in the US, and snagging list or snag list in the UK, where each item is a snag. Both record the work that remains before handover, both are walked room by room or area by area, and both end with the client or contract administrator accepting the list. The words around them change with the contract: UK contracts usually talk about practical completion and US contracts about substantial completion.

When should a punch list be done?

When the work in an area is finished apart from minor items, close enough to handover that nothing major will disturb it, but early enough to fix the items before the planned completion date. Many contractors walk the area with their own team a week or two before the formal walk and fix what they find first. On large projects, punch lists are often run floor by floor or zone by zone as each one finishes, rather than once for the whole building.

Who is responsible for the punch list?

The contractor usually runs it: it arranges the walk, keeps the list, issues the items to the trades and checks each fix before offering it back. Each trade fixes its own items. The client or owner, or the architect or contract administrator acting for them, inspects the work and decides whether to accept it, and the contract says who has the final word on completion. On projects with a construction manager or a client-side project manager, that role may run the list instead.

What should a punch list include?

For each item: a unique number, a location precise enough to find it, the trade responsible, a description of what is wrong and what fixed looks like, a photo, a priority, a fix-by date and its status. For the list as a whole: the project and area, the date of the walk, who attended, the drawings it was judged against, the re-inspection results and the sign-off, with any items carried over past handover listed with an owner and a date.

Can a building be handed over with items still on the punch list?

Often, if the contract allows it. Many contracts let completion be confirmed with minor items outstanding, as long as they do not stop the client using the building, and the items are then listed with dates to fix them. Whether an item is minor is decided under the contract, usually by the architect, contract administrator or owner. Items that affect safety or the use of an area, such as fire doors and emergency lighting, should be closed before that area is occupied.

What is the difference between a punch list and a defects list?

Timing. The punch list is made before handover, from an inspection of work that is finished or nearly finished. A defects list covers faults that appear after handover, during the defects, rectification or warranty period the contract sets, often once the building is in use and its services have run through a season. The contractor usually returns to fix them under the contract, and an inspection at the end of the period closes them.

Is CheckFlow free for this template?

14-day free trial, no card required. The Business plan is $10 per user per month after the trial. Full details at checkflow.io/pricing.

Walk, Fix and Sign Off Every Punch List the Same Way

Free trial — no credit card required.

14-day free trial, no credit cardFull refund in your first 30 daysUS or EU hosting