FMEA Checklist Template

Most FMEAs are filled in once to satisfy a customer and never opened again. The scores are guessed, the actions have no owner, and the failure that reaches the customer was on the worksheet all along.

Last reviewed: October 2026

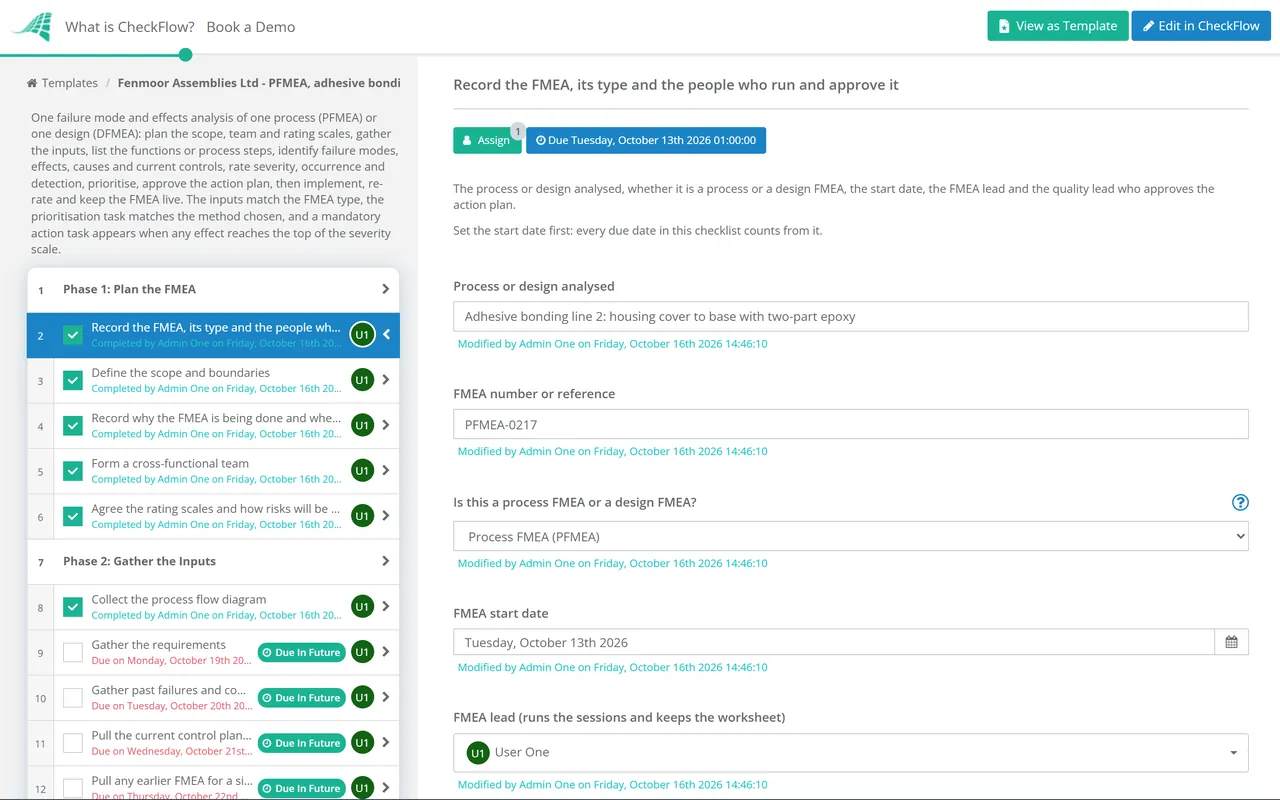
This free FMEA checklist is for quality, design and manufacturing engineers who run a failure mode and effects analysis on a new or changed process or design, and then have to show the actions were done. One run is one FMEA: a process FMEA (PFMEA) for one line or operation, or a design FMEA (DFMEA) for one product or system. It plans the scope, the team and the rating scales, gathers the inputs, and lists the functions or process steps. Then it identifies failure modes, effects, causes and current controls, rates severity, occurrence and detection, and prioritises the risks by RPN or an action priority table. The quality lead approves the action plan before work starts. The last phase implements the actions, re-rates the lines and keeps the FMEA live. The inputs match the FMEA type, and a mandatory action task appears when any effect reaches the top of the severity scale.

FMEA Finds Failures Before They Happen

A failure mode and effects analysis (FMEA) is a team method for finding how a process or a product could fail before it does. For each process step or design element the team asks how it could fail, what the effect would be, why it would happen and what already prevents or catches it, then rates the risk and acts on the worst. The Institute for Healthcare Improvement describes it as a systematic, proactive method, particularly useful for a new process before it starts and for a proposed change to an existing one. IEC 60812, the general international standard, covers how an FMEA is planned, performed, documented and maintained, and the AIAG & VDA FMEA Handbook is the automotive industry’s reference manual for design and process FMEAs. This checklist follows the common steps without reproducing either: use the rating scales your procedure or your customer sets.

An FMEA looks forward. A root cause analysis (8D) looks back at a failure that has already happened, and its fix should end with an updated FMEA. A CAPA is the formal loop that records a nonconformity and proves the action worked. When a change to a released design or process is proposed, the manufacturing change order asks for the FMEA to be reviewed, and the manufacturing quality control checklist runs the inspection points the FMEA and control plan decide on.

Design FMEA

Could the design fail to do its job?

Analyses: a system, subsystem or part, and its interfaces with the user and its surroundings.

Inputs: a block or boundary diagram, requirements, the design verification plan and past field failures.

Typical actions: a design change, a different material or tolerance, or a new verification test.
Process FMEA

Could the process fail to make it right?

Analyses: each operation from receiving material to despatch, including handling, rework and inspection.

Inputs: a process flow diagram, product requirements and special characteristics, the control plan and past scrap and complaints.

Typical actions: mistake-proofing, a better prevention control, then a better detection control.

After a failure

Root cause analysis is the other half

Asks: why did this failure happen, and why was it not caught?

When: after a complaint, a repeat defect or a failure that escaped.

Feeds back: the new failure mode and revised ratings go into the FMEA, so the next design or process starts with them.

What the FMEA Checklist Covers

Eight phases take one FMEA from scope to review. Phase 2 shows the inputs for a process or a design FMEA, Phase 6 shows the RPN or the action priority task to match the method you choose, and a mandatory action task appears when any effect reaches the top of the severity scale. The quality lead approves the action plan before any action starts.

  1. Phase 1

    Phase 1: Plan the FMEA

    5 tasks

    An FMEA with a vague scope turns into a list of everything that could ever go wrong. Fix the boundaries, the team and the rating scales before the first session, so every line is rated the same way.

    • Record the FMEA, its type and the people who run and approve it — the process or design analysed, whether it is a process or a design FMEA, the start date, the FMEA lead and the quality lead who approves the action plan
    • Define the scope and boundaries — for a process, the first and last operation and what is left out; for a design, the system, its parts and the interfaces you will and will not analyse
    • Record why the FMEA is being done and when the result is needed — a new product or process, a change, a new use or location, or a problem seen in the field, and the milestone the actions must be ready for
    • Form a cross-functional team — people who know the design, the process, quality, maintenance and the shop floor, with a facilitator who keeps the sessions to the method
    • Agree the rating scales and how risks will be prioritised — the severity, occurrence and detection scales with your own definitions for each number, RPN or an action priority table, and the rule that says which lines need action
  2. Phase 2

    Phase 2: Gather the Inputs

    7 tasks

    Shows the process flow diagram and the control plan for a process FMEA, or the block diagram and the design verification plan for a design FMEA. Past failures are the best evidence the team has: bring them to the first session.

    • Collect the process flow diagram — for a process FMEA, every operation from receiving material to despatch, including inspection, rework, storage and handling
    • Collect the block or boundary diagram — for a design FMEA, the system and its parts, and the interfaces with neighbouring systems, the user and the environment
    • Gather the requirements — customer, legal and internal requirements, drawings and specifications, and the characteristics marked as special or critical
    • Gather past failures and complaints — warranty returns, customer complaints, internal scrap and rework, earlier 8D and CAPA records, and lessons learned from similar products or processes
    • Pull the current control plan and work instructions — for a process FMEA, so the existing controls are rated as they are actually run, not as the procedure says
    • Pull the design verification plan and test results — for a design FMEA, the tests, analyses and simulations planned or already run, which become the design’s detection controls
    • Pull any earlier FMEA for a similar design or process — as a starting point: review every line with the team rather than copying it across
  3. Phase 3

    Phase 3: List the Functions or Process Steps

    5 tasks

    A failure mode is a way a function fails, so the functions come first. Write each one as a verb and a noun with a measurable requirement, and the failure modes almost write themselves.

    • Break the scope into process steps or design elements — one line for each operation on the flow diagram or each part on the block diagram, numbered the same way
    • Write the function of each step or element — what it must do, as a verb and a noun, for example “apply the adhesive bead” or “hold the cover closed”
    • Attach a measurable requirement to each function — the specification, tolerance or condition that says whether the function was met, such as bead width, cure time or pull-off force
    • Mark the special or critical characteristics — the ones that affect safety, legal compliance, fit or function, as your customer or your own procedure defines them
    • Check the list against the diagram with the team — nothing missing: handling, storage, rework loops, changeovers and the interfaces at each boundary
  4. Phase 4

    Phase 4: Identify Failure Modes, Effects & Causes

    6 tasks

    Work one function at a time: how can it fail, what happens if it does, and why would it fail. Then record what already prevents the cause and what would catch it.

    • List the ways each function can fail — not at all, partly, intermittently, too much or too little, at the wrong time, or doing something it should not
    • Describe the effect of each failure mode — on the next operation, the customer’s plant, the end user, safety and legal compliance, in the words the person affected would use
    • Find the causes of each failure mode — the conditions that would produce it, specific enough to act on: never just “operator error”
    • Record the current prevention controls — what stops the cause happening or makes it less likely today, such as mistake-proofing, preventive maintenance, set-up checks or design rules
    • Record the current detection controls — what would find the cause or the failure mode before the product reaches the customer, such as gauging, testing, inspection or design verification
    • Test the list against past failures — every complaint, scrap reason and field failure gathered in Phase 2 should appear as a failure mode or a cause; add any that do not
  5. Phase 5

    Phase 5: Rate Severity, Occurrence & Detection

    4 tasks

    Rate on the scales agreed in Phase 1, as a team, with evidence beside each number. A rating nobody can explain will not survive the first review.

    • Rate the severity of each effect — how serious the worst effect of the failure mode is; only a change to the design or process that changes the effect can lower it
    • Rate the occurrence of each cause — how likely the cause is with today’s prevention controls, using scrap, test or field data where you have it
    • Rate the detection of each cause or failure mode — how likely today’s detection controls are to catch it before it leaves; on most scales the higher number means the control is less likely to catch it
    • Check the ratings for consistency — compare similar lines and earlier FMEAs, and challenge any rating that has no evidence behind it
  6. Phase 6

    Phase 6: Prioritise the Risks

    5 tasks

    Shows the RPN or the action priority task to match the method agreed in Phase 1, and a mandatory action task when any effect reaches the top of the severity scale. Severity comes first: a low score elsewhere does not make a safety effect acceptable.

    • Calculate the risk priority number for each line — severity × occurrence × detection, shown only when the team prioritises by RPN
    • Look up the action priority for each line — high, medium or low from the table your procedure or customer sets, shown only when the team prioritises by action priority
    • Flag every top-severity failure mode for action — shown when any effect reaches the top of the severity scale; each one needs an action in Phase 7 or a recorded justification, whatever its other ratings
    • Rank the lines and choose which need action — apply the rule agreed in Phase 1, severity first, rather than one cut-off number
    • Record why the remaining lines need no action now — so a reviewer can see the decision was made, not missed
  7. Phase 7

    Phase 7: Plan & Approve the Actions

    4 tasks

    The best actions lower severity or occurrence by changing the design or the process. Extra inspection lowers only the detection rating, so it is the last resort. The quality lead approves the plan before any action starts.

    • Define a recommended action for each prioritised line — a design change, mistake-proofing or a better prevention control first, a better detection control only when nothing else is possible
    • Give each action an owner and a target date — one named person per action, never a department, with dates that meet the milestone set in Phase 1
    • Check each action for side effects — a change that fixes one failure mode can create another; add any new failure mode to the worksheet and rate it
    • Quality lead approves the action plan — the prioritised lines, the actions, owners and dates, and the reasons for lines left without action
  8. Phase 8

    Phase 8: Implement, Re-rate & Keep the FMEA Live

    7 tasks

    An FMEA is finished only when the actions are in place and the lines are re-rated on evidence. After that it stays open as a living document, reviewed whenever the design or process changes.

    • Implement each action through change control — drawings, programs, work instructions and equipment changed and released together, with the change record referenced
    • Record the evidence that each action is complete — test reports, capability results, photos of the mistake-proofing and the revised documents
    • Re-rate the lines after the actions — new occurrence and detection ratings, and severity only if the effect changed, based on production or test data rather than expectation
    • Update the control plan or design verification plan — new checks, frequencies, reaction plans and tests, issued where the work is done
    • Quality lead signs off the FMEA — actions complete, lines re-rated and the remaining risk accepted, recorded with any conditions
    • Set the review triggers and the next review date — a design or process change, a new material, supplier or location, a complaint or field failure, and a periodic review
    • Store the FMEA where the next team will find it — as the starting point for similar designs and processes, with the lessons learned written down

Severity, Occurrence and Detection: What Each Rating Asks

Every FMEA line carries three ratings, and the team turns them into a priority. The scales themselves belong to your procedure or your customer: write a definition for each number before the first session, and keep them for the whole FMEA. The table sets out what each rating asks, so the team rates the same thing in the same way.

Rating or method The question it answers Rated for What lowers it Common mistake
SeverityHow serious is the worst effect if this failure mode happens?Each failure mode, using its most serious effectOnly a change to the design or process that removes or reduces the effectLowering severity because a new inspection was added
OccurrenceHow likely is this cause, with today’s prevention controls?Each causeRemoving the cause, mistake-proofing, or a better prevention controlRating from memory when scrap, test or field data exists
DetectionHow likely are today’s controls to catch the cause or the failure mode before it leaves?Each cause or failure mode, with its detection controlsA better test, gauge or inspection, or detection moved closer to the causeCounting a control that is in the procedure but not done on the shift
Risk priority number (RPN)Which lines should we work on first?Each line: severity × occurrence × detectionLowering any of the three ratingsUsing one RPN cut-off and missing a high severity with a low score
Action priorityDoes this line need action: high, medium or low?Each line, from a lookup table that weighs severity first, then occurrence, then detectionThe same actions, judged in that orderUsing a table nobody agreed, or changing it after the ratings are in

Why severity comes first. On three 1 to 10 scales the RPN runs from 1 to 1,000, and very different risks can share a number: a severity of 9 with an occurrence of 2 and a detection of 5 gives 90, and so does a severity of 2 with an occurrence of 9. That is why it is worth adding a severity rule, such as an action for every effect at the top of the scale whatever its other ratings, and why action priority tables weigh severity before the other two.

Which actions count most. A design or process change that removes the cause lowers occurrence for good. Mistake-proofing stops the cause or catches it at once. Extra inspection lowers only the detection rating and costs money on every part, so put it last. Re-rate only on evidence that the action works.

Why Run FMEAs in CheckFlow?

1

One template for process and design FMEAs

The first task asks which kind of FMEA this is. A process FMEA shows the flow diagram and control plan tasks, a design FMEA shows the block diagram and design verification plan. The method chosen in Phase 1 shows the RPN or the action priority task, set up in the template designer with no extra templates to keep in step.

2

The action plan is approved before work starts

The quality lead is chosen on the first task. The plan approval is assigned to them alone, and nothing after the approval step can be completed until they record a decision. When an effect reaches the top of the severity scale, the approval also asks whether every one of those lines has an action.

3

A living document with a review date

The last tasks record the review triggers and the next review date. A recurring schedule can start the periodic review for each line or product, and the Reports Grid shows every FMEA in progress and which tasks are overdue. The worksheet, the evidence and each decision sit on the task that produced them.

CheckFlow does not hold the FMEA worksheet or score it for you. Keep the worksheet in your FMEA software or spreadsheet and attach it to the tasks. CheckFlow runs the work around it: who does each step, by when, with what evidence, and who approved the plan. CheckFlow for manufacturing shows how plants run their other quality and production checks the same way.

When a failure does happen, investigate it with the Root Cause Analysis (8D) Checklist and log it in the CAPA Checklist, then bring the new failure mode back into this FMEA. A design change goes through the Manufacturing Change Order Process Checklist, and a software feature reaches customers through the Feature Release Process Checklist, which can carry a design FMEA’s actions to release.

AI generator

Didn’t find what you need? Describe it.

Describe the process in a sentence and the AI checklist generator drafts the phases and tasks for you.

Frequently Asked Questions

What is FMEA?

Failure mode and effects analysis is a structured team review of a process or a product, done before failures happen. For each process step or design element the team lists the ways it could fail, the effect of each failure, its causes and the controls already in place. It rates severity, occurrence and detection, decides which risks need action, then checks the actions worked. The Institute for Healthcare Improvement calls it proactive: it corrects a process before an adverse event rather than after one.

What is the difference between a DFMEA and a PFMEA?

A design FMEA (DFMEA) asks whether the design could fail to do its job: the parts, materials, tolerances and interfaces. A process FMEA (PFMEA) asks whether the manufacturing or service process could fail to deliver a design that is right, operation by operation. The method is the same. The inputs differ: a block diagram and a design verification plan for a DFMEA, a process flow diagram and a control plan for a PFMEA. The first task of this checklist asks which one you are running and shows the matching inputs.

How do you calculate an RPN in FMEA?

Multiply the three ratings: severity × occurrence × detection. On 1 to 10 scales the result runs from 1 to 1,000, and the team works on the highest numbers first. Use it with care. Very different risks can share a number, so a severe effect with a low occurrence can rank below a trivial one that happens often. So add a severity rule as well, such as an action for every effect at the top of the scale whatever its RPN.

What is action priority in FMEA?

Action priority is a way to rank FMEA lines without multiplying the ratings. The team looks each line up in a table that weighs severity first, then occurrence, then detection, and gets a high, medium or low priority. A high severity with a weak prevention control comes out high even if detection is good. Use the table your procedure or your customer sets. This checklist supports either method, or both, and shows the matching task in Phase 6.

When should an FMEA be updated?

Treat the FMEA as a living document. Review it when the design or process changes, when a new material, supplier, machine or location is introduced, when the product is put to a new use, and when a complaint, field failure or repeat defect shows a failure mode the FMEA missed or rated too low. Set a periodic review date as well, so it is looked at even when nothing seems to have changed. The last phase of this checklist records the triggers and the next review date.

Who should be on an FMEA team?

People who know the design, the process and its problems: design and process engineers, quality, production, maintenance and at least one operator who does the work. For a design FMEA add test and service people, and for a process FMEA someone from the next operation or the customer’s plant if you can. Four to eight people with a facilitator who keeps to the method is a workable size. One person filling in a worksheet alone misses the failures nobody has written down.

What is the difference between FMEA and root cause analysis?

FMEA looks forward: it asks how a process or product could fail and reduces the risk before it reaches a customer. Root cause analysis looks back at a failure that has already happened and finds why it occurred and why it was not caught. The two feed each other. A closed 8D investigation should add its failure mode and revised ratings to the FMEA, and an FMEA review should use past 8D and CAPA records as evidence.

Is CheckFlow free for this template?

14-day free trial, no card required. The Business plan is $10 per user per month after the trial. Full details at checkflow.io/pricing.

Find Every Failure Mode Before Your Customer Does

Free trial — no credit card required.

14-day free trial, no credit cardFull refund in your first 30 daysUS or EU hosting