Job Hazard Analysis (JHA) Checklist Template

Most JHA forms are filled in at a desk from memory. The steps miss what workers really do, the controls stop at “wear gloves”, and nobody looks at the analysis again until someone is hurt doing that job.

Last reviewed: October 2026

A job hazard analysis, also called a job safety analysis or JSA, takes one job and asks what can go wrong at each step before anyone gets hurt. This free JHA checklist is for supervisors, EHS managers and safety coordinators at US workplaces who analyze jobs the way OSHA’s booklet Job Hazard Analysis (OSHA 3071) describes. One run is one job or task. It chooses and prioritizes the job, brings in the workers who do it and reviews its injury history, breaks the job into steps, and identifies the hazards at each step: what can go wrong, the consequences, how it could arise and how likely it is. It then works down the hierarchy of controls, takes the draft back to workers, records the supervisor’s approval, and trains everyone on the new procedure before setting the next review. A specialist review phase appears for jobs that could kill or disable someone or have caused a recordable injury, and a task to link work permits appears when a step needs one.

A JHA Looks at One Job, One Step at a Time

OSHA’s booklet Job Hazard Analysis (OSHA 3071) describes a JHA as a technique that focuses on job tasks as a way to identify hazards before they occur. It looks at the relationship between the worker, the task, the tools and the work environment. You watch the job, list its steps, ask what can go wrong at each one, and then eliminate or reduce each uncontrolled hazard to an acceptable level. The booklet calls the JHA one component of a wider safety and health management system, and it is also called a job safety analysis (JSA).

That makes it narrower and deeper than the documents around it. A workplace risk assessment covers a whole site or activity, and a safety audit or a manufacturing safety inspection checks that controls are in place across an area. A JHA takes one job, such as loading a trailer or changing a die, and turns it into a safe, written way of doing that job. Where a step needs energy isolated, the lockout/tagout checklist applies the machine’s procedure on the day.

Job hazard analysis

One job, step by step

Asks: what can go wrong at each step of this job, how bad, how likely, and which controls stop it?

When: for high-risk, new or changed jobs first, then again after an injury, a close call or a change.

Output: the step list, the hazards and controls, an approved job procedure and trained workers.
Workplace risk assessment

A whole site or activity

Asks: what could harm people anywhere in this workplace, who might be harmed, and what more should be done?

When: for a new workplace or activity, after a significant change, and at the review date.

Output: significant findings and an action plan, which may name jobs that need a JHA.

Inspection or audit

Checks controls are in place today

Asks: are the guards fitted, the aisles marked, the PPE worn and the records current?

When: daily to yearly, area by area.

Output: defects and corrective actions; a job that keeps producing findings is a candidate for a JHA.

What the Job Hazard Analysis (JHA) Checklist Covers

Eight phases take one job from selection to a trained crew, in the order OSHA’s booklet sets out. Phase 6 appears only when the job could cause death or a disabling injury, or has caused a recordable injury or illness, and a task to link work permits appears when a step needs one.

  1. Phase 1

    Phase 1: Choose & Prioritize the Job

    5 tasks

    OSHA’s booklet gives priority to the jobs most likely to hurt someone and the jobs that could hurt someone worst. One run analyzes one job, defined tightly enough that you can watch a worker do it from start to finish.

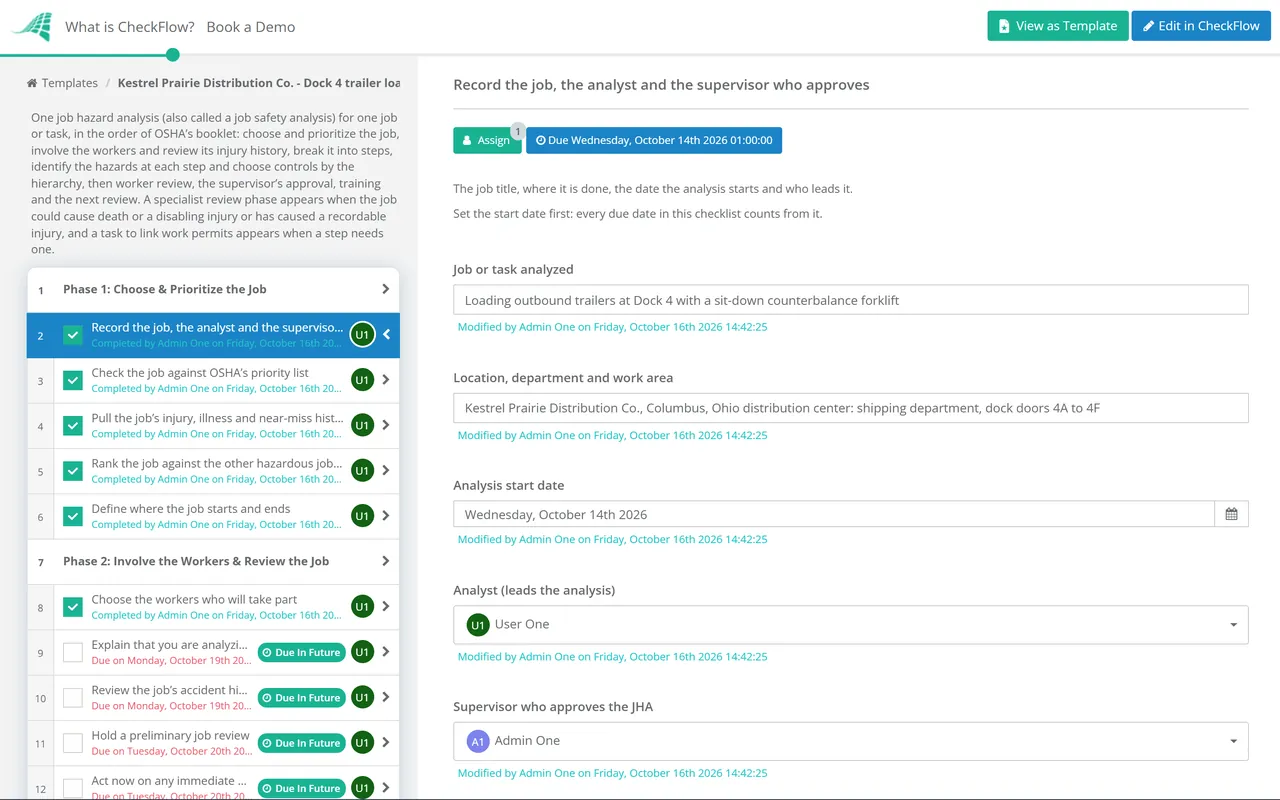
    • Record the job, the analyst and the supervisor who approves — the job title, where it is done, the date the analysis starts and who leads it
    • Check the job against OSHA’s priority list — high injury or illness rates, the potential for severe or disabling injury even with no history, a simple human error that could cause a severe injury, a new or changed job, and a job complex enough to need written instructions
    • Pull the job’s injury, illness and near-miss history — the OSHA 300 log entries, first-aid cases, near misses and damage reports linked to this job
    • Rank the job against the other hazardous jobs on your list — the jobs with unacceptable risks, most likely to occur and with the most severe consequences, are analyzed first
    • Define where the job starts and ends — the first and last action, the equipment, materials and work area, and the shifts and variations the analysis covers
  2. Phase 2

    Phase 2: Involve the Workers & Review the Job

    6 tasks

    OSHA lists involving employees as the first step. The people who do the job know where it goes wrong, and they are more likely to use controls they helped choose.

    • Choose the workers who will take part — at least one person who does the job now, and others who have done it on other shifts or crews
    • Explain that you are analyzing the job, not the worker — so people describe how the work is really done, including shortcuts and workarounds
    • Review the job’s accident history with the workers — which incidents and near misses show that the existing controls are not enough
    • Hold a preliminary job review — discuss the hazards workers already know about and brainstorm ways to eliminate or control them
    • Act now on any immediate danger — protect the worker straight away from a hazard that threatens life or health, and fix easy problems without waiting for the analysis to finish
    • Gather the job’s written materials — the current procedure, manufacturer’s instructions, safety data sheets and the OSHA standards that apply to the work
  3. Phase 3

    Phase 3: Break the Job into Steps

    6 tasks

    Watch the job being done and list each step as the worker takes it. OSHA warns against a breakdown so detailed that it becomes unnecessarily long, or so broad that it leaves out basic steps.

    • Watch the worker do the job — on a normal shift, in the real work area, with the usual tools, loads and pace
    • List each step in the order it is done — start each step with an action word and record enough to describe the action without needless detail
    • Photograph or video the job — a reference for the detailed analysis, taken with the worker’s agreement
    • Check the step list with other workers who do the job — other shifts and crews often do some steps differently
    • Review the steps with the worker you observed — confirm nothing is missing and the order is right
    • Mark steps that need a permit or a written procedure — entry into a permit-required confined space, hot work, lockout of hazardous energy, and any other step your site controls in writing
  4. Phase 4

    Phase 4: Identify the Hazards at Each Step

    6 tasks

    OSHA calls this detective work. For each step, ask what can go wrong, what the consequences would be, how it could arise, what else contributes and how likely it is, and record the answers in the same way every time.

    • Ask what can go wrong at each step — where it happens, who or what is exposed, and the harm: a hand caught in a moving part, a fall, a strain, a struck-by
    • Describe how each hazard could arise — the trigger that sets it off and the contributing factors, such as speed, poor visibility, weather or time pressure
    • Record the consequences of each hazard — the injury or illness that would result and how severe it could be
    • Judge how likely each hazard is — higher where there have been near misses or actual cases, or where the hazard is exposed and easy to reach
    • Check the job against OSHA’s common hazard types — chemical, electrical, ergonomic, falls, fire and heat, mechanical, noise, radiation, struck-by, temperature extremes, visibility and weather
    • Rank the hazards, most serious first — by severity and likelihood together; a hazard likely to cause death or serious physical harm is controlled at once
  5. Phase 5

    Phase 5: Choose Controls by the Hierarchy

    8 tasks

    Work down the hierarchy of controls for each hazard, from elimination to personal protective equipment, and choose the highest control that is feasible. Several controls together are often needed.

    • Ask whether each hazard can be eliminated — change the job so the hazard no longer exists: a different method, work done at ground level, or a step removed
    • Consider substitution — a less hazardous material, a process that uses less force, speed, temperature or electrical current, or different equipment
    • Choose engineering controls — guards, interlocks, enclosures, ventilation, barriers, guardrails or lift equipment that keep the hazard away from the worker
    • Add administrative controls — written procedures, permits, warnings and signs, limits on exposure time, a buddy system and training
    • Select PPE for the hazards that remain — when higher controls are not feasible or do not fully remove the hazard, while they are being put in place, or in an emergency
    • Check that no control creates a new hazard — for example, hearing protection that makes it hard to hear backup alarms, or a barrier that sends people through another hazardous area
    • Write the control plan for each hazard — the controls, who puts each one in place and by when, with interim controls until the permanent ones are in
    • Link each permit to the steps that need it — shown only when a step needs a work permit; the JHA does not replace the permit, so record which permit applies and where its procedure is kept
  6. Phase 6 — If needed

    Phase 6: Specialist Review

    5 tasks

    Shown only when the job could cause death or a disabling injury, or has caused a recordable injury or illness. A specialist checks the hazards and controls before the supervisor approves the analysis.

    • Name the specialist who reviews the analysis — a safety professional, industrial hygienist or engineer; OSHA lists your insurance company, the local fire department, private consultants and OSHA’s consultation service as sources of help
    • Send the specialist the steps, hazards and proposed controls — with the injury history, photos and the standards that apply
    • Specialist reviews the controls for each severe hazard — whether each control is reliable, how easily it could be bypassed, and whether a higher control is feasible
    • Update the control plan with the specialist’s changes — record what changed and why, and any recommendation not taken, with the reason
    • Keep interim protection in place until the permanent controls are in — extra supervision, an exclusion zone, a temporary barrier or PPE, recorded with the date each permanent control is due
  7. Phase 7

    Phase 7: Worker Review & Supervisor Approval

    4 tasks

    OSHA’s booklet says to discuss the recommendations with all employees who perform the job and consider their responses carefully. Nobody is trained on the new procedure until the supervisor approves it.

    • Review the draft JHA with everyone who does the job — the steps, hazards and controls, and make sure each person understands what they will be required to do and why
    • Revise the analysis from their comments — record each change made and the reason for any suggestion not taken
    • Write the new or changed job procedure — the safe way to do each step, in the order it is done, with the controls and PPE built in
    • Supervisor approves the JHA and the new procedure — the decision and any conditions recorded before training starts
  8. Phase 8

    Phase 8: Train, Put in Place & Review

    5 tasks

    Any time you revise a job hazard analysis, OSHA’s booklet says to train all employees affected by the changes in the new methods, procedures or protective measures.

    • Train every worker who does the job on the new procedure — the reasons for each change as well as the steps, including how to use any new equipment and PPE
    • Confirm each control in the plan is in place — installed and tested by its due date, or the interim control kept until it is
    • Keep the JHA where workers and supervisors can use it — at the job, in the procedure file and with the training records, so new workers learn the job from it
    • Watch the job being done the new way — a few weeks after the change: are the controls used correctly and consistently, and do they work
    • Set the review date and the triggers for an earlier review — after an injury, illness or close call on the job, after a change to the job, equipment, materials or process, and periodically even when nothing has changed

The Hierarchy of Controls, Worked Through a Warehouse Hazard

OSHA’s worksheet Identifying Hazard Control Options: The Hierarchy of Controls, from its Recommended Practices for Safety and Health Programs, ranks controls from most to least effective using the NIOSH hierarchy. Its worked example is a warehouse hazard: a fork truck that struck a pedestrian, where there had been incidents and near misses before. The table below summarizes it. The last column is the part most JHAs leave out: every control can bring a new hazard with it, which Phase 5 checks for.

Level What it means Example from OSHA’s worksheet New hazard it could create
EliminationThe hazard no longer exists.Design storage at intersections to remove blind spots; let people into the warehouse only when they are needed and fork trucks are not running; move materials by conveyor or automatic guided vehicle.People may have to pass through other hazardous areas to take inventory.
SubstitutionA material or process is changed out for one that is less hazardous.Replace fork trucks with powered walk-beside forklifts or hand trucks.More strain on workers’ muscles.
Engineering controlsPhysical changes that keep the hazard from coming into contact with workers while they still do the job.Pedestrian aisles, barriers and crossings; mirrors and motion detector alarms at blind corners; fewer access points; a speed limit on fork trucks.Ladder work to clean the mirrors; pressure to keep up with quotas on slower equipment.
Administrative controls: warningsSignals that tell people a hazard is near.Warning lights and backup alarms on fork trucks; sensors on trucks or pedestrians.More noise and alarm fatigue; warnings that do not reach workers with impaired hearing or sight.
Administrative controls: procedures and trainingChanges to the way the work is done, and training in them.Forklift training with refreshers; a safe distance around fork trucks; no truck movement 15 minutes before a shift starts, a lunch break or a shift ends; headlights on at all times; blind-spot training for pedestrians and operators.Distance that makes communication harder; drivers rushing because they have less time to move loads.
Personal protective equipmentClothing and devices that protect the worker. They need constant effort and attention from workers, including proper use and training.High-visibility vests for workers and visitors.Loose vests caught by machinery.

Choose the highest control that is feasible. The worksheet says to choose, with workers, the control that falls highest on the hierarchy, and to use lower ones as interim controls until the permanent solution is in place. Often a combination works best, such as an engineering control backed by training and inspection. OSHA 3071 makes the same point in its Appendix 1: information from a job hazard analysis is useless unless the recommended controls are built into the tasks, and PPE is acceptable when engineering controls are not feasible or do not fully remove the hazard, while they are being developed, when safe work practices do not give enough extra protection, and in emergencies.

Check the standards behind the example. The worksheet is guidance, and its forklift refresher is an example. The powered industrial truck standard, 29 CFR 1910.178(l)(4), requires refresher training when an operator is seen driving unsafely, has an accident or near miss, gets a poor evaluation, is assigned a different type of truck or faces a changed workplace condition, and an evaluation of each operator at least every three years. At a dock, 1910.178(k)(1) requires the brakes of highway trucks to be set and wheel chocks placed under the rear wheels while they are boarded with powered industrial trucks.

Why Run Job Hazard Analyses in CheckFlow?

1

Nobody is trained on an unapproved procedure

The supervisor is chosen on the first task. The approval is assigned to them alone, and nothing in the training phase can be completed until they record a decision on the approval step, with any conditions they set.

2

Severe jobs get a second pair of eyes

Answer that the job could kill or disable someone, or has caused a recordable injury, and a specialist review phase appears before the approval. A step that needs a work permit adds a task to link the permit. The template designer lets you change either rule to fit your site.

3

Every analysis has a next review

The last task sets the review date and the triggers for an earlier one. A recurring schedule starts each job’s review on time, an injury on the job starts a fresh run the same day, and the Reports Grid shows every analysis in progress and the tasks that are overdue.

CheckFlow does not identify hazards or decide which control is good enough. Those judgements are yours and your workers’, recorded in the tables on each task. It runs the analysis around them: who does each step, by when, with what evidence, and who approved the result. CheckFlow’s manufacturing checklist software shows the same approach for safety work on the shop floor.

Assess a whole workplace with the Health & Safety Risk Assessment Checklist, and check controls stay in place with the Safety Audit Checklist or the manufacturing safety inspection. Apply a machine’s energy control procedure with the Lockout/Tagout Checklist, plan what people do when something goes wrong with the Emergency Action Plan Checklist, and record the injuries that start a review with the OSHA Recordkeeping Checklist.

AI generator

Didn’t find what you need? Describe it.

Describe the process in a sentence and the AI checklist generator drafts the phases and tasks for you.

Frequently Asked Questions

What is a job hazard analysis (JHA)?

OSHA’s booklet Job Hazard Analysis (OSHA 3071) describes it as a technique that focuses on job tasks as a way to identify hazards before they occur, looking at the relationship between the worker, the task, the tools and the work environment. You break one job into its steps, identify what can go wrong at each step, and choose controls that eliminate the hazards or reduce them to an acceptable level. The result is a safer way of doing the job, which the booklet says is also useful for training new employees.

What is the difference between a JHA and a JSA?

In practice there is none: job hazard analysis and job safety analysis are two names for the same method. OSHA’s booklet uses both terms, and OSHA’s Recommended Practices for Safety and Health Programs mention job hazard analyses and job safety analyses together when they advise reviewing them with workers before nonroutine tasks. Whichever name you use, the method is the same: list the steps, find the hazards at each one, choose the controls and train the workers.

Does OSHA require a job hazard analysis?

OSHA 3071 presents the JHA as a technique and as one part of a safety and health management system, not as a requirement of its own. Some standards do require related written work. For example, 29 CFR 1910.132(d) requires an assessment of hazards that call for PPE, verified by a written certification, and 29 CFR 1910.146(c)(1) requires employers to evaluate the workplace for permit-required confined spaces. The booklet says to check the standards for your industry, because compliance with them is mandatory. State Plan states may have their own rules.

Which jobs should you analyze first?

OSHA’s booklet gives priority to jobs with the highest injury or illness rates; jobs with the potential to cause severe or disabling injuries or illness, even with no history of accidents; jobs where one simple human error could lead to a severe accident or injury; jobs that are new or have changed; and jobs complex enough to need written instructions. It then says to rank them, starting with those most likely to occur and with the most severe consequences.

What are the steps of a job hazard analysis?

OSHA’s booklet starts with involving employees, reviewing the accident history, a preliminary job review, and listing and ranking the hazardous jobs. Then you outline the steps by watching the job, identify the hazards at each step, and choose controls. You discuss the recommendations with everyone who does the job, train them in any new procedure, and review the analysis periodically and after an injury or illness. This checklist follows that order and adds the supervisor’s approval before training.

What is the hierarchy of controls?

A way of ranking controls from most to least effective. OSHA’s hierarchy of controls worksheet, which follows NIOSH, lists elimination, substitution, engineering controls, administrative controls and personal protective equipment. OSHA 3071 gives the same order in three levels: engineering controls, which include eliminating or substituting the hazard, then administrative controls, then PPE. Choose the highest feasible control, use lower ones as interim protection, and expect to combine several.

How often should a JHA be reviewed?

OSHA’s booklet sets no fixed interval. It says to review the analysis periodically, because a review can find hazards that the first analysis missed even when the job has not changed, and that a review is particularly important after an illness or injury on that job. Whenever you revise it, train every employee affected by the changes. OSHA’s Recommended Practices suggest verifying that controls remain effective at least once a year and when conditions, processes or equipment change.

Is CheckFlow free for this template?

14-day free trial, no card required. The Business plan is $10 per user per month after the trial. Full details at checkflow.io/pricing.

Analyze Each Job Step by Step, Then Train the Safer Way

Free trial — no credit card required.

14-day free trial, no credit cardFull refund in your first 30 daysUS or EU hosting