
Permit to Work Checklist Template

A permit is only as good as the steps around it. Most failures happen in the gaps: a job not checked against the work next to it, a suspended permit with its isolations still live, a shift handover that missed the job, or plant handed back before anyone looked at it.

Last reviewed: October 2026

A permit to work is the formal, recorded process a site uses to control a job it has identified as potentially hazardous. This free permit to work checklist is for maintenance planners, engineers, EHS leads and contractors’ supervisors who issue or work under permits. One run is one permit, from the request to the hand-back. It follows the HSE’s guidance on permit-to-work systems: request the work and name the issuer, acceptor and area authority, assess the risks and write the method statement, make and prove the isolations, put the precautions in place, then issue, brief and accept the permit before work starts. The permit type you choose adds its own precautions: hot work, work at height, electrical work, confined space entry, breaking containment or excavation. Gas tests appear when the job needs them, a handover, suspension and extension phase appears when the work runs past one shift, and audit tasks appear when the permit is sampled for the periodic audit.

A Permit Authorises One Job, in One Place, for a Set Time

A permit-to-work system is the formal, recorded process a site uses to control work it has identified as potentially hazardous. The permit itself names who may do which job, where and when, and sets out the main precautions. It is also how site management, plant supervisors, operators and the people doing the job talk to each other about that job. The HSE’s guidance, HSG250, says permits suit non-production work such as maintenance, repair, cleaning and modification, non-routine operations, and jobs where two or more groups have to co-ordinate or hand work between them. It also warns against using them for everything: they are not normally needed for routine maintenance in non-hazardous areas, and overuse weakens them.

A permit does not replace the risk assessment or the isolation procedure; it brings them together for one job. Isolations follow your lockout/tagout procedure, hazards across the whole site are found by a safety inspection, and the job itself usually starts as a work order in the equipment maintenance workflow. HSG250 suggests common titles for the roles in a permit system. The originator requests the job, the isolating authority makes the isolations, and a site checker such as an authorised gas tester carries out the checks the permit lists. On a small site one person may hold several roles, but nobody issues a permit to themselves. Three roles sign the permit most often:

Issuing authority

Checks the site and issues the permit

Who: the person authorised and trained to issue permits for this plant, such as a shift engineer or permit co-ordinator.

Does: confirms the hazards are assessed and the isolations and precautions are in place, visits the site during the job and inspects it at the end.

Signs: the issue, any handover or extension, and the cancellation.

Performing authority

Accepts the permit for the work party

Who: the person in charge of the work, such as the lead fitter or the contractor’s supervisor.

Does: briefs everyone working under the permit, keeps the work inside its terms, and tells the issuer when the job is finished, suspended or changed.

Signs: the acceptance and the hand-back.

Area authority

Controls the plant where the work happens

Who: the person in control of the area or plant, such as the production or shift manager.

Does: knows what work is under way in their area, especially when containment is broken or work is handed over or suspended.

Signs: that the plant is back under their control after the job.

What the Permit to Work Checklist Covers

Eight phases take one permit from the request to the hand-back, in the order of the HSE’s guidance. Phase 4 shows only the precautions for the permit type you choose, gas tests appear only when the job needs them, Phase 7 appears only when the work runs beyond one shift or is suspended, and the monitoring and audit tasks appear when the permit is sampled for the periodic audit. Nothing after the issuer’s authorisation can be completed until it is given.

  1. Phase 1

    Phase 1: Request the Work

    5 tasks

    The originator raises the request and names the people who will run the permit. The issuer and the acceptor must be different people: nobody issues a permit to themselves.

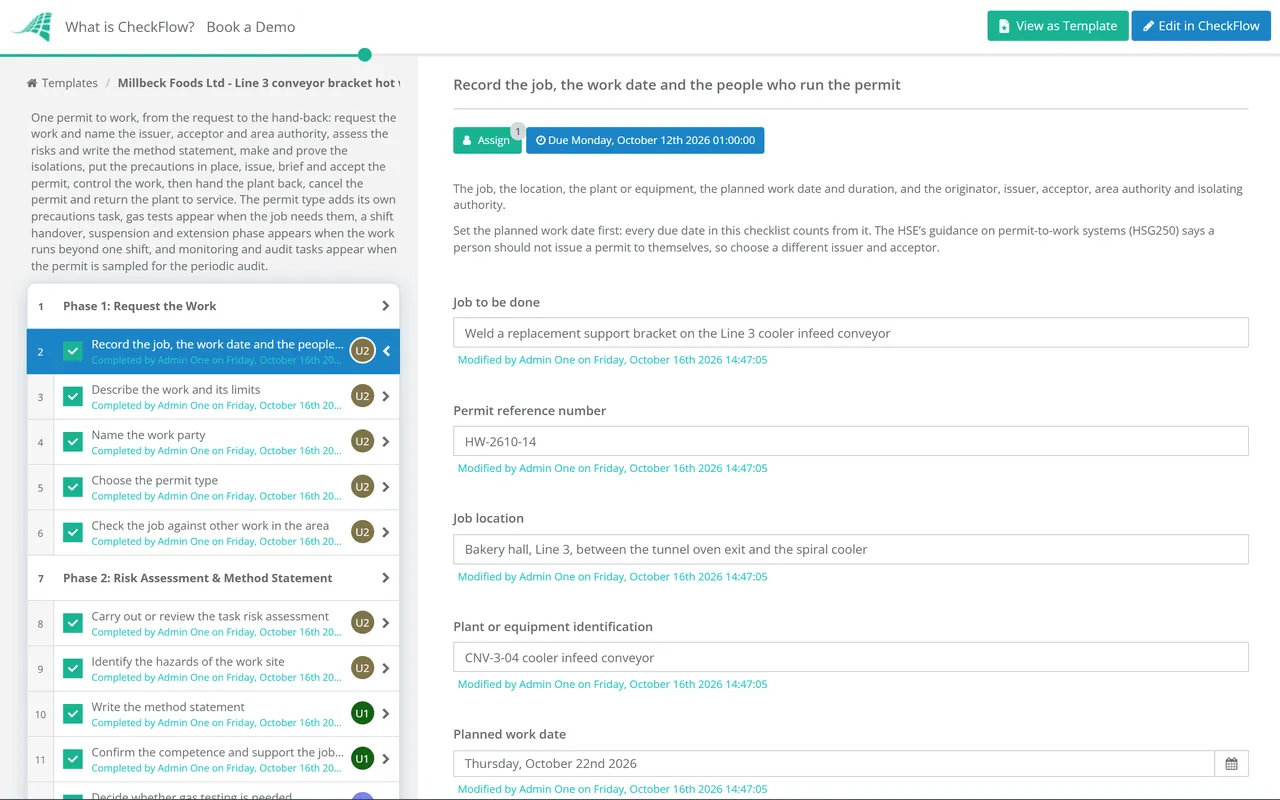
    • Record the job, the work date and the people who run the permit — the job, the location, the plant or equipment, the planned work date and duration, and the originator, issuer, acceptor, area authority and isolating authority
    • Describe the work and its limits — exactly what will be done and what will not, the tools and equipment to be used, the start time and how long it should take
    • Name the work party — who will do the work, who they work for, and the training or competence each role needs
    • Choose the permit type — hot work, work at height, electrical work, confined space entry, breaking containment or excavation, so the permit carries the precautions that type of work needs
    • Check the job against other work in the area — other permits, planned work and shared isolations, so one job does not create danger for another, and tell the area authority what is planned and for how long
  2. Phase 2

    Phase 2: Risk Assessment & Method Statement

    5 tasks

    A permit is not a replacement for a risk assessment. The HSE says it helps bring the assessment to life where the work is done. If the hazards cannot be controlled, the job is rejected or redefined, not permitted.

    • Carry out or review the task risk assessment — the hazards of the job, the residual hazards and the control for each; reuse an earlier assessment only for the same task done the same way
    • Identify the hazards of the work site — flammable, toxic or corrosive substances, hazardous zones, live electricity, moving plant, and what the work itself adds, such as sparks, heat, fumes or noise
    • Write the method statement — the steps in order, the equipment, and the control at each step, attached to the permit
    • Confirm the competence and support the job needs — trained people for each role, and a fire watcher, standby person, gas tester or rescue team where the job needs one
    • Decide whether gas testing is needed — before the work starts, during it or both, and for what: oxygen, flammable gas or toxic gas
  3. Phase 3

    Phase 3: Isolations & Gas Testing

    6 tasks

    Isolations follow your lockout/tagout procedure, and each one is listed on the permit or on an isolation certificate cross-referenced to it. The two gas test tasks appear only when Phase 2 says gas testing is needed.

    • List every isolation the job needs — electrical, mechanical and process isolations, each with its point, method and lock or certificate number
    • Make and lock the isolations — by the isolating authority, following your lockout/tagout procedure, with a lock and tag at each point
    • Drain, vent, purge or flush the plant where needed — so the equipment holds no hazardous substance, pressure or residue before it is opened, entered or heated
    • Prove the isolations — try the start controls, test for dead, check gauges read zero, and sign the isolation record
    • Test the atmosphere before work starts — by an authorised gas tester with a calibrated meter, recording each reading with the time and the tester’s name
    • Set the retest interval and the readings at which work stops — continuous monitoring or a retest interval, and the stop limits, written on the permit
  4. Phase 4

    Phase 4: Precautions & PPE

    8 tasks

    Only the precautions task for the permit type chosen in Phase 1 appears. Your own permit form and procedures set the precautions; the checks in each task are prompts to work through.

    • Put the hot work precautions in place — combustibles moved away or covered, the floor swept, openings covered, ducts and conveyors that could carry sparks protected or stopped, an extinguisher ready and a fire watcher named for during and after the work
    • Put the work at height precautions in place — the access equipment suitable and inspected, edge protection or fall arrest in place, the area below closed off, and a rescue plan agreed
    • Put the electrical precautions in place — the circuit made dead, isolated, locked and proved dead before the permit is issued, with nearby live parts screened; the HSE says an electrical permit should not be issued on equipment that is live
    • Put the confined space entry precautions in place — follow your confined space entry procedure: the entry certificate, ventilation, the standby person, communications and the rescue arrangements ready before anyone goes in
    • Put the breaking containment precautions in place — the line or vessel drained, depressurised and isolated, the break point marked, spades or blanks fitted where the procedure needs them, and drip trays and PPE ready for the line contents
    • Put the excavation precautions in place — drawings of buried services checked, the area scanned for cables and pipes, hand digging near services, the sides supported and the edges barriered
    • Specify the PPE for the job — the protective equipment for the work itself and for anything the plant contained, written on the permit
    • Agree the emergency arrangements — what the work party does on a general alarm, how to raise the alarm, where to muster, and how the work is stopped and made safe
  5. Phase 5

    Phase 5: Issue, Brief & Accept the Permit

    6 tasks

    The issuer authorises the permit only after inspecting the work site, and nothing after the authorisation can be completed until it is given. Where the potential for harm is particularly high, the HSE says a second person, the permit authoriser, should see the permit before it is issued.

    • Issuer inspects the work site — with the acceptor, confirming every isolation and precaution on the permit is in place and will stay effective while the permit is live
    • Set the permit’s validity — the date, the start time and the expiry time, no longer than the job needs
    • Issuer authorises the permit — signed, dated and timed after the site inspection; if the job needs a permit authoriser, they sign too
    • Brief the work party — the job and its limits, the hazards, the precautions, the PPE and what to do in an emergency, with each person recorded
    • Acceptor accepts the permit — signing to confirm they understand the work, the hazards and the precautions, and that everyone in the work party has been briefed
    • Display the permit at the work site — with a copy in the control room or on the permit board, so anyone can see which equipment is under work
  6. Phase 6

    Phase 6: Control the Work

    5 tasks

    Work stays inside the permit’s scope, place and time. The issuer visits the site while the work is under way, and anyone stops the work, makes the area safe and asks for advice if conditions change.

    • Do the work within the permit’s terms — only the job, the place and the time on the permit; a change of scope needs a new assessment and a revised or new permit
    • Issuer checks the site while work is under way — how often depends on the hazard, complexity and duration of the job, and each visit is recorded
    • Retest the atmosphere at the set interval — and stop the work if a reading passes a limit on the permit
    • Stop the work if conditions change — a general alarm, a gas alarm, a new hazard or a precaution no longer in place: stop, make the area safe and tell the issuer
    • Site management monitors the permit in use — against the HSE’s monitoring questions: scope clear, hazards and precautions listed, isolations correct, permit displayed, users briefed, work done as the permit says
  7. Phase 7 — If Needed

    Phase 7: Shift Handover, Suspension & Extension

    5 tasks

    Applies only when the job runs beyond one shift or is suspended. A suspended permit stays live until it is cancelled, so its isolations may still be in place.

    • Leave the work in a safe, known state — at the end of the shift or when work stops, in a condition the next shift can understand from the permit
    • Hand over the permit to the incoming shift — outgoing and incoming issuers and acceptors go through the permit, the job and the plant status, and the incoming issuer signs to continue it
    • Suspend the permit if the work stops — record the condition the plant is left in, the isolations still live and the effect on other work, and keep the permit on the permit record
    • Revalidate the permit before work restarts — the issuer examines the site and revalidates the permit or issues a new one; if the suspension is indefinite, cancel it instead
    • Extend the permit if the job overruns — check the plant is still safe to work on, give a new expiry time, and record the issuer’s and acceptor’s signatures
  8. Phase 8

    Phase 8: Hand-Back, Cancellation & Return to Service

    8 tasks

    The hand-back answers three questions: is the work complete, is the plant back in a safe condition with the isolations removed, and has the person in control of the plant taken it back? The two audit tasks appear only when this permit is selected for the periodic audit.

    • Acceptor signs the permit back — confirming the work is complete, the work party is clear, and tools, materials and waste have been removed
    • Issuer inspects the finished job — the plant and the area are safe, guards and covers are back on, and after hot work nothing is left smouldering
    • Remove the isolations — by the isolating authority, following your lockout/tagout procedure, unless an isolation is shared with another live permit
    • Test and recommission the plant — run it under the area authority’s control and check for leaks, faults and normal operation
    • Area authority accepts the plant back into service — acknowledging on the permit that the plant is back under the control of the people who run it
    • Issuer cancels and files the permit — certifying the work is tested and the plant recommissioned, and keeping the permit and its certificates at site for at least 30 days before archiving
    • Audit the closed permit and the system it ran under — against the HSE’s assessment checklist: who may issue, how permits are obtained, display, handover, hand-back, training records and the monitoring record
    • Record each non-conformance and track it to closure — with an owner and a date, telling management at once about anything that cannot be resolved straight away

The 13 Essential Elements of a Permit to Work

HSG250 sets out the essential elements of a permit-to-work form, and says a form that misses any of them is unlikely to be doing its job. Signatures on the form should be dated and timed. Use the table to check your own permit form, and to see where each element is recorded in this checklist.

Element What it records Where in this checklist
1. Permit titleThe type of permit.Phase 1: Choose the permit type
2. Permit reference numberWith references to any other relevant permits or isolation certificates.Phase 1: the first task and the cross-references
3. Job locationWhere the work will be done.Phase 1: the first task
4. Plant identificationThe plant or equipment being worked on.Phase 1: the first task
5. Description of the work and its limitationsWhat will be done, and what the permit does not cover.Phase 1: Describe the work and its limits
6. Hazard identificationIncluding residual hazards and the hazards the work itself creates.Phase 2
7. Precautions and actions in an emergencyThe people who carried out precautions, such as the isolating authority, sign that they have been taken.Phases 3 and 4
8. Protective equipmentIncluding PPE.Phase 4: Specify the PPE for the job
9. IssueThe issuer signs that isolations are made and precautions taken, except those that can only be taken during the work, with the date and the permit’s duration. High-hazard work needs a second signature from the permit authoriser.Phase 5: Set the permit’s validity, Issuer authorises the permit
10. AcceptanceA signature confirming the work, the hazards and the precautions are understood, and that the permit has been explained to everyone working under it.Phase 5: Brief the work party, Acceptor accepts the permit
11. Extension and shift handoverSignatures confirming the plant is still safe to work on and that new people have been made aware of the hazards and precautions, with a new expiry time.Phase 7
12. Hand-backThe acceptor certifies the work is complete. The issuer certifies it is complete and the plant is ready for testing and recommissioning.Phase 8: Acceptor signs the permit back, Issuer inspects the finished job
13. CancellationCertifies the work has been tested and the plant recommissioned.Phase 8: Issuer cancels and files the permit

Separate forms for different hazards. HSG250 says separate permit forms may be needed for tasks such as hot work and confined space entry, so each gives enough weight to its own hazards. It suggests colours to tell them apart: red or red-edged for hot work, blue or blue-edged for cold work, green or green-edged for confined space entry certificates, black-edged for breaking containment, and yellow or yellow-edged for high voltage electrical isolation certificates.

Keeping the record. Permits, certificates and risk assessments should stay at site with the issuing authority for at least 30 days after the work is complete, then be archived for a set period so that permits can be monitored and audited. For permit-required confined spaces in the US, 29 CFR 1910.146(e)(6) requires each cancelled entry permit to be kept for at least one year.

Why Run Permits to Work in CheckFlow?

1

No work before the permit is issued

The issuer, the acceptor and the area authority are chosen on the first task, and each step is assigned to the person who owns it. The authorisation is assigned to the issuer alone, and nothing after the authorisation step can be completed until a decision is recorded, so the briefing, the acceptance and the work wait for it.

2

Only the precautions this permit needs

Choose hot work and the hot work checks appear; choose confined space entry and the entry checks appear instead. Gas tests are added when the job needs them, and the handover, suspension and extension steps appear when the work runs past a shift. Rules show and hide each one from the answers given.

3

Every live permit on one screen

The Reports Grid lists every permit in progress and the task each one has reached, and it updates in real time as steps are completed. Photos of locks, gas readings and the signed permit sit on the tasks that produced them, with names and times.

CheckFlow is not an electronic permit-to-work system, and it does not replace your site’s permit form, which stays the signed document displayed at the work site. It runs the steps around the permit, so each one happens in order, by the right person, with the evidence attached. If you plan to move the permits themselves onto software, HSG250 lists what has to be in place first, including controlled electronic signatures, no remote issue without a site visit, paper copies for display at the job and a back-up if the system fails. CheckFlow’s manufacturing checklist software shows how the same approach handles maintenance and safety routines on the shop floor.

Isolations follow the Lockout/Tagout (LOTO) Procedure Checklist, and the job usually starts as a work order in the Equipment Maintenance Workflow. The hazards of the workplace as a whole are assessed with the Health & Safety Risk Assessment Checklist and checked with the Safety Inspection Process for a Manufacturing Facility.

AI generator

Didn’t find what you need? Describe it.

Describe the process in a sentence and the AI checklist generator drafts the phases and tasks for you.

Frequently Asked Questions

What is a permit to work?

A permit to work is a formal, recorded process for controlling work that a site has identified as potentially hazardous. The permit itself, on paper or on screen, names the job, the place, the time and the people authorised to do it, and sets out the main precautions. The HSE stresses that issuing a permit does not by itself make a job safe: that depends on the people who prepare, supervise and carry out the work. The permit is how they communicate, from its issue to its cancellation.

When is a permit to work required?

Consider one whenever work could harm people, plant or the environment. HSG250 says permits suit non-production work such as maintenance, repair, inspection, cleaning and modification, non-routine operations, and jobs where two or more groups must co-ordinate or hand work over. It lists jobs where extra permits or certificates should be considered, including hot work, work that breaks containment, work on electrical equipment, entry into confined spaces and work at height. Permits are not normally needed for general visitors or routine maintenance in non-hazardous areas, and using them for everything weakens them.

What should a permit to work include?

HSG250 sets out 13 essential elements: the permit title, a reference number with cross-references to related permits and certificates, the job location, the plant identification, a description of the work and its limits, the hazards, the precautions and emergency actions, the protective equipment, the issue, the acceptance, extension and shift handover, the hand-back and the cancellation. Signatures should be dated and timed. The table above shows where each element is recorded in this checklist.

Who issues and who accepts a permit to work?

The issuing authority issues it: a person authorised and trained to do so, who knows the hazards of the plant, inspects the site and confirms the isolations and precautions are in place. The performing authority accepts it for the people doing the work, signing that they understand the job, the hazards and the precautions. HSG250 says nobody should issue a permit to themselves, and that where the potential for harm is particularly high a second person, the permit authoriser, should see the permit before it is issued.

What happens to a permit at a shift change or when work stops?

If work carries over to another shift, a handover tells the incoming shift which permit jobs are outstanding, what state they are in and the state of the plant, and HSG250 recommends that the incoming issuer signs to continue the permit. A suspended permit stays live until it is cancelled, so its isolations may still be in place. Work restarts only after the issuer has checked it is safe and revalidated the permit or issued a new one. If the suspension is indefinite, cancelling the permit may be the better option.

What is a hot work permit?

A hot work permit controls work that brings heat or a source of ignition, such as welding, flame cutting, grinding or tools that can spark, into an area where there may be a risk of fire or explosion. HSG250 suggests a red or red-edged form. In the US, 29 CFR 1910.252 requires the person who authorises cutting and welding to inspect the area first and set the precautions, preferably in a written permit, and requires a fire watch in higher-risk locations for at least half an hour after the work ends.

How long should permits be kept, and how often should the system be audited?

HSG250 says permits, certificates and risk assessments should be kept at site by the issuing authority for at least 30 days after the work is complete, then archived for a set period. Site management should monitor permits in use, the system should be audited regularly by competent people, preferably from outside the site, and a review with site and corporate management should take place at least every three years. For US permit-required confined spaces, each cancelled entry permit must be kept for at least one year.

Is CheckFlow free for this template?

14-day free trial, no card required. The Business plan is $10 per user per month after the trial. Full details at checkflow.io/pricing.

Run Every Permit to Work From Request to Hand-Back

Free trial — no credit card required.

14-day free trial, no credit cardFull refund in your first 30 daysUS or EU hosting