HAZOP Study Checklist Template

A HAZOP finds the ways a process can stray from its design intent, but only when the drawings are current, the right people are in the room and every recommendation is followed until it is closed.

Last reviewed: November 2026

Printed from checkflow.io/templates/manufacturing-production/hazop-study-checklist

This free HAZOP study checklist is for process safety engineers, HAZOP facilitators, design and project engineers and operations managers at sites that handle hazardous materials. One run is one hazard and operability study of one process design, change or revalidation, owned by the study leader with a scribe. It sets the scope, design intent and boundaries, divides the process into nodes on the P&IDs, builds the team, freezes and checks the drawings, and runs the sessions node by node with guide words and parameters, recording each deviation’s causes, consequences, safeguards, risk ranking and recommendations. Every recommendation gets an owner and a date, the study sponsor signs off the report, and each action is closed out and checked on the plant. A US, UK or other answer adds the matching OSHA, EPA or COMAH notes, and the revalidation date is set before the study closes.

A HAZOP Studies the Design, Not One Change or One Job

A hazard and operability study (HAZOP) is a team review of a process design. The team divides the process into nodes on the P&IDs and applies guide words such as no, more, less and reverse to each parameter, to find the ways the process could stray from its design intent, what would cause that, what could happen and whether the safeguards are enough. In the US it is one of the methods OSHA’s Process Safety Management standard allows for a process hazard analysis. In Great Britain, COMAH requires a major hazard site to identify its major hazards systematically, and a HAZOP is one way to do it.

This checklist runs one study, node by node, from the scope to close-out. It sits beside other kinds of hazard review, and each answers a different question. A routine walk round the plant is the Safety Inspection Process for a Manufacturing Facility.

This checklist

The study of a design

Asks: for each node and each parameter, how could the process deviate from its design intent, why, what would happen, and are the safeguards enough?

When: for a new design, a significant change to a process, or the revalidation of an earlier study.

Output: the worksheets, a signed report, recommendations with owners and dates, each one closed out, and the revalidation date.

The change

A change to a running process

Asks: is this change reviewed, authorised and recorded, and is everyone ready before start-up?

When: for each change other than a replacement in kind, in the Management of Change (MOC) Checklist. A complex change may call for a study like this one as its hazard review.

Output: an authorised change, updated records and trained people.

Other analyses

Failure modes and single jobs

Asks: how can each component or step fail, and how serious is it? Or what are the hazards of one task?

When: for a product or process component by component, in the FMEA Checklist, and for the steps of one job, in the Job Hazard Analysis (JHA) Checklist.

Output: ranked failure modes and actions, or a safe way to do the job.

What the HAZOP Study Checklist Covers

Nine phases follow one study from the set-up, about five weeks before the first session, to close-out about three months after the last. Tasks before the sessions count back from the first session date, and everything after them counts forward from the last. The last session date must be on or after the first; a one-day study uses the same date for both. A change adds a task to link the study to its change record and a revalidation adds a review of the previous study. A US RMP Program 3 answer adds two analysis tasks in Phase 5 and a UK answer adds the COMAH task in Phase 6. The study sponsor’s sign-off is the gate: Approved with conditions adds a task to meet them, and Not approved shows a rework task and hides Phases 8 and 9.

  1. Phase 1

    Phase 1: Set Up the Study

    6 tasks

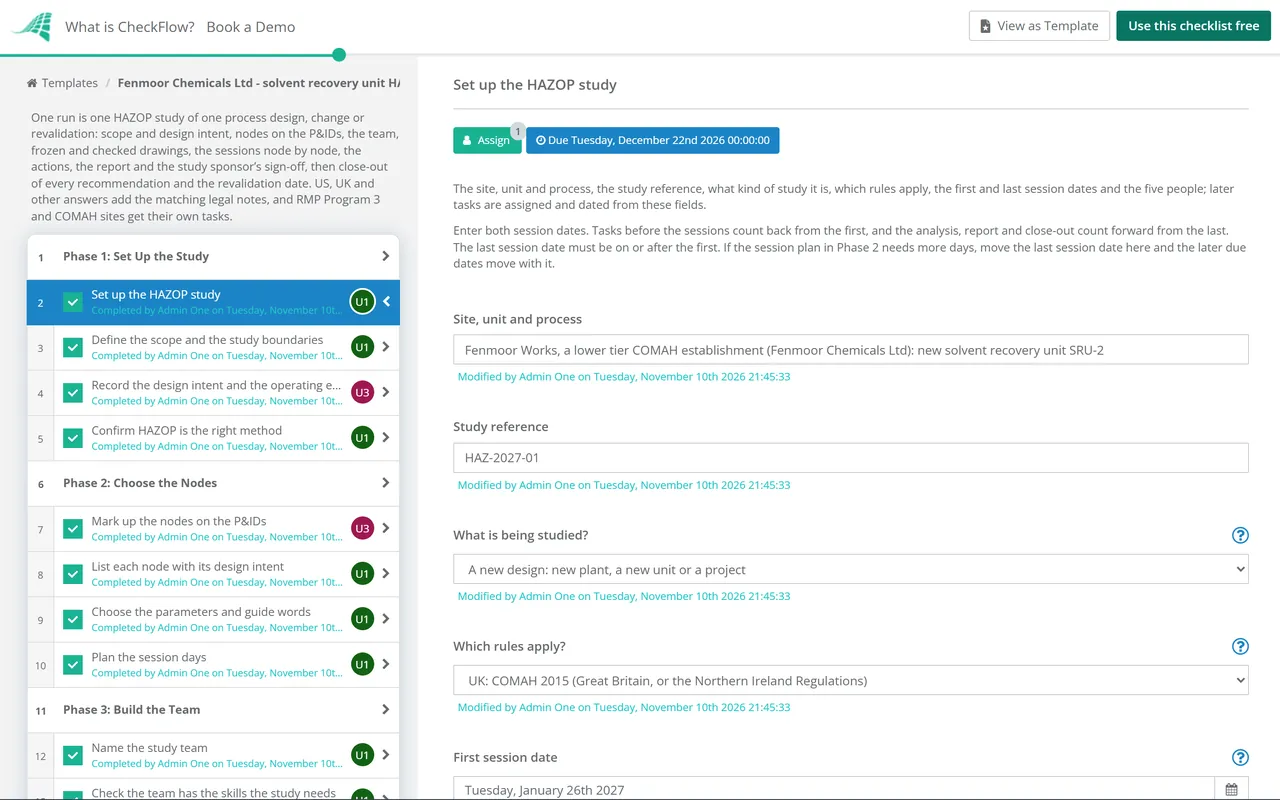
    The study leader sets up the study about five weeks before the first session. The first task names the five people, the kind of study and the rules the site works under, and gives the first and last session dates: tasks before the sessions count back from the first, and everything after them counts forward from the last, in working days.

    • Set up the HAZOP study — the site, unit and process, the study reference, what kind of study it is, which rules apply, the first and last session dates and the five people; later tasks are assigned and dated from these fields
    • Define the scope and the study boundaries — what the study covers and what it leaves out, the battery limits and tie-in points, the connections to other units and utilities, and the operating modes to examine: normal running, start-up, shutdown, maintenance and emergencies
    • Link the study to its change record — the MOC or project reference, what is changing, and where the changed plant meets plant that stays as it is, so that the nodes cover the tie-ins
    • Review the previous study and what has changed since — the last HAZOP report and its date, how each of its recommendations was closed, the changes made to the process since, and the incidents and near misses since; the team checks that the study still matches the current process
    • Record the design intent and the operating envelope — what the process is meant to do, the design basis, the normal operating ranges and the safe limits for flow, pressure, temperature, level and composition, and the materials handled and their hazards
    • Confirm HAZOP is the right method — why a HAZOP suits this process, whether operating steps need a procedure HAZOP, and any later study it will feed, such as a layer of protection analysis
  2. Phase 2

    Phase 2: Choose the Nodes

    4 tasks

    The design lead and the study leader divide the process into nodes on the P&IDs and agree the parameters and guide words. The node list sets how many session days the study needs.

    • Mark up the nodes on the P&IDs — divide the process into sections that each have one design intent, number them in the order of the flow, and mark them on a copy of each P&ID
    • List each node with its design intent — the node number, a short description, the P&IDs it covers and what that section is meant to do; the scribe uses the same numbers on the worksheets
    • Choose the parameters and guide words — the parameters for each node, such as flow, pressure, temperature, level and composition, and the guide words the team will apply to them, such as no, more, less, as well as, part of, reverse and other than; add timing and sequence words for batch steps
    • Plan the session days — how long each node is likely to take, how many hours a day the team will sit, and the dates of each session; if the plan needs more days than the dates on the first task allow, change the last session date there
  3. Phase 3

    Phase 3: Build the Team

    3 tasks

    The team needs the people who designed the process, the people who run and maintain it, someone who knows process safety and a leader who knows the method. The study leader names them, checks the skills and books the sessions.

    • Name the study team — the study leader, the scribe, a design or process engineer, an operations representative who knows this process, maintenance and instrument engineers, a process safety specialist, and anyone else the scope needs, such as a control systems engineer or the equipment supplier
    • Check the team has the skills the study needs — the leader’s HAZOP training and experience, each member’s knowledge of the process, and cover for anyone who cannot attend every session; record any gap and how it is filled
    • Book the sessions and set up the recording — the room or video call, a screen for the drawings, the worksheet template or software, and calendar invitations for every session
  4. Phase 4

    Phase 4: Check & Freeze the Drawings

    6 tasks

    A HAZOP is only as good as the drawings it uses. The design lead checks the drawings against the plant or the latest design, then freezes the revision the team will study; the study leader gathers the safety information, past incidents and the site’s risk matrix, and sends the pre-read.

    • Check the drawings against the plant as built — for existing plant, walk the plant with the drawings and mark every difference; for a new design, confirm each drawing is the latest issued revision; differences are corrected before the drawings are frozen or recorded as a study assumption
    • Freeze the drawings and study documents — the P&IDs and their revisions, the process flow diagram, the heat and material balance, cause and effect charts, relief and alarm data, data sheets and any draft operating procedures, frozen at the revision checked in the previous task with its corrections; nothing in the frozen set changes during the sessions
    • Gather the process safety information — safety data sheets for the materials, reactivity and compatibility data, the technology and design basis, and the equipment information, so the team can understand the hazards
    • Collect past incidents and lessons — incidents and near misses on this process or similar ones, here and elsewhere in the company, and published lessons for the same materials, for the team to use when it judges causes and consequences
    • Agree the risk matrix and ranking rules — use the site’s own risk matrix and say which version; agree how the team ranks severity and likelihood, and which rankings need further analysis; this template does not set the values
    • Brief the team and send the pre-read — the scope, the node list, the frozen drawings, the risk matrix and how the sessions will run, sent a few days before the first session
  5. Phase 5

    Phase 5: Run the HAZOP Sessions

    10 tasks

    The team works through each node in turn. For every parameter and guide word it records the deviation, its causes, what could happen, the safeguards already there, the risk ranking and any recommendation. The scribe keeps the worksheets, and they are read back after the last session.

    • Open the first session — introduce the team, read back the scope, design intent and boundaries, explain the guide words and the risk matrix, and agree the session rules
    • Examine each node with the guide words — apply each guide word to each parameter, decide whether the deviation is credible, and finish one node before moving to the next; a deviation with no credible cause is recorded as considered
    • Record the causes and consequences — for each credible deviation, every cause the team finds and the worst credible consequence if no safeguard worked, to people, the environment and the plant
    • Record the safeguards already in place — alarms, trips, relief devices, interlocks, procedures and other protection in the design or on the plant, and whether each is independent of the cause; protection the design does not yet have is a recommendation, not a safeguard
    • Rank the risk of each deviation — severity and likelihood with the safeguards in place, using the risk matrix agreed in Phase 4, and a flag on each deviation that needs further analysis
    • Raise recommendations and questions — each recommendation numbered and linked to its node and deviation, saying what should change and why; a question the team cannot answer in the room is recorded with who will answer it
    • Cover the RMP additions to the analysis — stationary source siting and the proximity of the public, natural hazards, standby or backup power for the monitoring equipment, and any gaps between the codes the process was built to and their current versions
    • Consider safer technology and alternatives — for a covered process in NAICS code 324 or 325, consider and document inherently safer technology or design, passive measures, active measures and procedural measures, in that order of preference
    • Keep the attendance and session record — who attended each session, the nodes covered each day and any session held without a key discipline, so the record shows who took part
    • Read back the worksheets with the team — the scribe sends the worksheets after the last session and the team confirms they record what was agreed; corrections are made before the actions are assigned
  6. Phase 6

    Phase 6: Agree the Actions

    6 tasks

    After the sessions the study leader closes the open questions, gives every recommendation an owner and a target date, decides where more analysis is needed, tells the people the actions affect, and the study sponsor records any recommendation not adopted as written. These steps come before the sign-off, whatever its outcome.

    • Answer the open questions from the sessions — each question answered by the person named, checked with the team, and either closed or turned into a recommendation
    • Give every recommendation an owner and a target date — the written schedule of what is to be done, by whom and by when, with the priority from the risk ranking; the register here is the one later tasks update
    • Decide which deviations need further analysis — for example a layer of protection analysis, a quantified risk assessment or a safety integrity level assessment, where the ranking or the team’s judgement says the safeguards may not be enough
    • Tell the people the actions affect — operators, maintenance staff and others whose work is in the process and who may be affected by the recommendations or actions, through briefings, shift handovers or toolbox talks
    • Check what the study means for the COMAH documents — whether the findings change the major accident prevention policy, the safety management system’s hazard identification, the safety report of an upper tier site, or need a notification to the competent authority
    • Record any recommendation not adopted as written — each recommendation the study sponsor decides not to adopt as written, with what will be done instead or why it was rejected, the evidence for that decision and who made it; this template asks the sponsor to decide before signing off the action plan
  7. Phase 7

    Phase 7: Report & Sign-Off

    4 tasks

    The study leader writes the report and the team checks it. The study sponsor then signs off the study and its action plan; nothing after the sign-off can be completed until the sponsor completes it.

    • Write the HAZOP report — the scope and boundaries, the team and attendance, the drawings and revisions studied, the method, guide words and risk matrix, the node list, the worksheets, the recommendations with owners and dates, the assumptions and anything left open
    • Send the draft report to the team for comment — each member checks that the report records what was agreed in the sessions; comments are answered and the report updated
    • Rework the study before it is signed off — make the changes the study sponsor asked for, which may mean more sessions, and complete this task; the sponsor then changes the decision on the sign-off task to Approved or Approved with conditions, which hides this task, and completes the sign-off
    • Sign off the HAZOP study — the study sponsor reads the report and the action plan and completes this task with the decision: Approved, Approved with conditions or Not approved
  8. Phase 8

    Phase 8: Issue the Report & Track the Actions

    5 tasks

    Applies only when the study is signed off (Approved or Approved with conditions). Once the study is signed off, the report becomes the record of the study. The revalidation date is set now, and each recommendation is tracked until it is done.

    • Meet the sign-off conditions — do what the study sponsor asked for when approving with conditions, and record how each condition was met
    • Issue the final report and file the study record — the signed report, worksheets, attendance, frozen drawings and action plan filed together where they can be found for the life of the process, and the team told where they are
    • Set the revalidation date — the date the study is next updated and revalidated, entered here so it can be tracked, set from your own procedure and the law that applies
    • Track each recommendation to closure — update the status of each recommendation in the register as it is done, chase anything past its target date, and agree any new date with its owner
    • Update the drawings, safety information and procedures — every drawing, data sheet, operating procedure and piece of process safety information the actions change, updated through the site’s change process
  9. Phase 9

    Phase 9: Close Out the Recommendations

    3 tasks

    Applies only when the study is signed off. Close-out checks that what the team asked for was really done. The study closes when every recommendation is closed or carried into another tracked process.

    • Check on the plant that each closed action was done — walk the plant or review the design to confirm each change, hardware and software included, is in place and does what the team intended
    • Confirm the actions needed before start-up are closed — for a new unit or a change, the actions the team said must be done before start-up are closed or the start-up waits; for a revalidation of running plant, mark this task not applicable
    • Close the study — every recommendation is closed or carried into another tracked process, the register is final and the revalidation date is in the site’s planning system

What OSHA, EPA and COMAH Say About HAZOP Studies

OSHA and EPA require a process hazard analysis and let the employer choose the method, HAZOP among them. COMAH requires major hazards to be identified systematically and leaves the method to the operator, and HSE’s guidance describes the HAZOP stages. Use the table to check your own procedure; it is not legal advice.

TopicUS: OSHA 29 CFR 1910.119US: EPA 40 CFR 68.67 (Program 3)Great Britain: COMAH 2015 and HSE guidance
Who it applies toA process with a listed highly hazardous chemical at or above its Appendix A threshold quantity, or 10,000 lb or more of a Category 1 flammable gas or a flammable liquid with a flashpoint below 100 °F, with exceptions. Not retail facilities, oil or gas well drilling or servicing, or normally unoccupied remote facilities ((a))A covered process not eligible for Program 1 that is in a NAICS code listed in 68.10(l) or is subject to OSHA PSMLower tier and upper tier establishments, where a dangerous substance is present at or above the quantities in Schedule 1 (regulation 3)
Is a HAZOP required?No. HAZOP is one of the methods listed for a process hazard analysis, with what-if, checklist, what-if/checklist, FMEA, fault tree analysis or an appropriate equivalent ((e)(2))No. The same list (68.67(b)); an analysis done for 1910.119(e) is accepted as the initial one (68.67(a))No method is named. The safety management system addresses procedures for systematically identifying major hazards from normal and abnormal operation and assessing their likelihood and severity (Schedule 2, paragraph 2(b))
The teamExpertise in engineering and process operations, at least one employee who knows this process, and one member who knows the method ((e)(4)); employees consulted on the analysis ((c)(2))The same (68.67(d)). For the safer technology analysis, at least one member who works in the process, with the members documented ((c)(9)(iii))Not set in the Regulations. HSE’s guidance: a competent person other than the HAZOP chairman decides what level of HAZOP a modification needs
What the study addressesHazards, previous incidents, engineering and administrative controls, consequences of their failure, facility siting, human factors and a qualitative evaluation of effects on employees ((e)(3))OSHA’s items, plus backup power for monitoring equipment, siting including proximity to the public, natural hazards, safer technology for NAICS 324 and 325, and gaps against current codes ((c))Major hazards from normal and abnormal operation, including subcontracted activities. Upper tier safety report: major accident scenarios from operational, external and natural causes (Schedule 3)
Findings and actionsA system to address findings promptly, resolve recommendations in a timely manner, document the resolution, complete actions as soon as possible to a written schedule, and tell affected employees ((e)(5))The same (68.67(e))HSE’s guidance: where hazards are not eliminated by actions placed during the HAZOP, use hazard analysis to decide whether the risk is acceptable
Before start-upFor new facilities, the pre-startup safety review confirms the analysis was done and its recommendations resolved or implemented ((i)(2)(iii))The same for new stationary sources (68.77(b)(3))HSE’s stage 5: a pre-commissioning check including statutory requirements
RepeatAt least every five years, by a team that meets (e)(4) ((e)(6))At least every five years (68.67(f)); a revalidation done for 1910.119(e) is acceptedNo interval for a HAZOP. The major accident prevention policy, and an upper tier safety report, are reviewed at least every five years (regulations 7(6) and 10(1))
RecordsAnalyses, revalidations and the documented resolution of recommendations kept for the life of the process ((e)(7))The same (68.67(g))Not set for a HAZOP in the Regulations; this template files the study record with the safety management system
Recent changes (read 10 November 2026)No amendment to 1910.119 listed by eCFR in 2026The 2024 rule’s backup power and safer technology provisions apply from 10 May 2027 (68.10(g)). EPA proposed changes to these and to siting and natural hazards on 24 February 2026; still a proposalNo outstanding changes listed on legislation.gov.uk for Schedule 2. Northern Ireland has its own COMAH Regulations 2015 with the same Schedule 2 wording

HSE’s six HAZOP study stages

HSE’s guidance on plant modification lists six stages of a hazard and operability study and says they apply to plant modifications as well as new plant. This checklist is the full HAZOP, stage 3, with the work that leads into it and the close-out that follows.

HSE’s HAZOP study stageWhere it is in this checklist
1. Identify major hazards and check for availability of key hazard dataPhase 1 (design intent) and Phase 4 (process safety information, past incidents)
2. Coarse HAZOP using flowsheet and block diagramAn earlier study at the concept stage; run this checklist for it with its own scope
3. Full HAZOP on frozen P&I diagramPhases 2 to 5, on the drawings checked and frozen in Phase 4
4. Check that all intended actions have been implemented, including hardware and softwarePhases 8 and 9
5. Pre-commissioning check including statutory requirementConfirm the actions needed before start-up are closed (Phase 9)
6. Safety audit after a few months operationOutside this checklist; set it in your own procedure

Read on 10 November 2026: 29 CFR 1910.119, 40 CFR 68.67 and 68.10, with the text on Cornell’s Legal Information Institute and eCFR’s version history; EPA’s proposed rule of 24 February 2026; the COMAH Regulations 2015 and the Northern Ireland Regulations on legislation.gov.uk; HSE’s plant modification guidance and introduction to COMAH; and EPA’s Risk Management Program guidance, chapter 7 (April 2004) for the guide words. IEC 61882:2016, the international application guide for HAZOP studies (edition 2.0, published March 2016), and CCPS’s Guidelines for Hazard Evaluation Procedures (3rd edition, 2008) are paid publications and are named here, not drawn on.

Why Run HAZOP Studies in CheckFlow?

1

No close-out before the sponsor signs

The study leader, scribe, design lead, operations lead and study sponsor are chosen on the first task, and every step is assigned from those fields. The sign-off is assigned to the sponsor alone, and nothing after that approval step can be completed until the sponsor completes it. Not approved shows a rework task and hides the close-out.

2

Only the steps this study needs

A change adds a task to link the study to its change record, and a revalidation adds a review of the previous study. A US, UK or other answer adds the matching notes, RMP Program 3 adds two analysis tasks and a COMAH site adds its own. Rules show and hide each one from the answers given.

3

Every recommendation followed to closure

Due dates count from the first and last session dates, and overdue alerts go to the task’s assignees. The recommendation register sits on the checklist, and the Reports Grid lists every study in progress and the task each one has reached.

CheckFlow does not run the sessions, rank risks or judge safeguards. That stays with your study leader, your team and your site’s risk matrix. It makes sure every study is prepared, held, reported, signed off and closed out in order, by the right people, with the worksheets and drawings attached. CheckFlow’s manufacturing checklist software shows how the same approach runs other plant routines.

Run the change the study supports through the Management of Change (MOC) Checklist, commission a new unit with the Site Acceptance Test (SAT) Checklist, and control the work that installs the actions with the Permit to Work Checklist. For failure modes use the FMEA Checklist, for the hazards of one job the Job Hazard Analysis (JHA) Checklist, and after an incident the Root Cause Analysis Checklist.

AI generator

Didn’t find what you need? Describe it.

Describe the process in a sentence and the AI checklist generator drafts the phases and tasks for you.

Frequently Asked Questions

What is a HAZOP study?

A hazard and operability study is a structured team review of a process design. The process is divided into nodes on the P&IDs, and the team applies guide words such as no, more, less and reverse to parameters such as flow, pressure and temperature to find deviations from the design intent. For each deviation it records the causes, consequences, safeguards and actions needed. EPA’s Risk Management Program guidance describes HAZOP this way, and IEC 61882:2016 is the international application guide.

What should a HAZOP checklist include?

The steps around the sessions as well as the sessions themselves: the scope and design intent, the node list, the team and its skills, frozen drawings checked against the plant, the process safety information, past incidents and the site’s risk matrix, then the worksheets, an owner and a date for every recommendation, the report and sign-off, close-out of each action and the revalidation date. This template holds each of those as a task, assigned and dated from the first task.

What are the HAZOP guide words?

Words the team applies to each process parameter to suggest a deviation. EPA’s Risk Management Program guidance lists No, More, Less, Part of, As well as, Reverse and Other than, with parameters such as flow, pressure, temperature, level, composition, pH, frequency and voltage. No flow, more pressure or reverse flow in a node each becomes a deviation to examine. This template also suggests timing and sequence words, such as early, late, before and after, for batch steps.

Who should be on a HAZOP team?

Under OSHA’s PSM standard, 1910.119(e)(4), the team must have expertise in engineering and process operations, include at least one employee with experience and knowledge specific to the process, and include one member who knows the method. This template adds a scribe, a design lead, an operations lead, maintenance and instrument engineers and a process safety specialist. EPA’s guidance, citing AIChE, says a simple process or a narrow review may be done by as few as three or four people with the right skills.

What is a node in a HAZOP?

A section of the process with one design intent, such as a feed line, a vessel, or a column with its reboiler, marked on the P&IDs. The team examines one node at a time and applies the guide words to its parameters, so that each deviation has a clear meaning: more flow than this section is meant to carry. This template marks up the nodes, lists each one with its design intent and plans the session days from the list.

What goes in a HAZOP worksheet?

One row for each deviation: the node, the parameter and guide word, the deviation, its causes, the consequences if no safeguard worked, the safeguards already in place, the risk ranking from the site’s own matrix, and any recommendation with its number. EPA’s guidance lists the deviation, causes, consequences, safeguards and actions needed as what the team records. This template keeps the worksheets as uploads and the recommendations in a register with owners, dates and status that later tasks update.

Does OSHA require a HAZOP?

No. OSHA’s Process Safety Management standard requires a process hazard analysis for each covered process, and 1910.119(e)(2) lets the employer choose one or more appropriate methods: what-if, checklist, what-if/checklist, HAZOP, failure mode and effects analysis, fault tree analysis, or an appropriate equivalent. EPA requires the same for Risk Management Program 3 processes in 40 CFR 68.67, with added items such as natural hazards and siting. EPA’s guidance, citing AIChE, says HAZOP can be used at any stage in the life of a process.

Is a HAZOP required under COMAH?

COMAH 2015 does not name a method. Schedule 2 requires the safety management system of every lower tier and upper tier establishment to address procedures for systematically identifying major hazards from normal and abnormal operation and assessing their likelihood and severity. HSE’s guidance on plant modification describes six HAZOP study stages, including a full HAZOP on the frozen P&I diagram, and says written procedures should decide what level of HAZOP a modification needs. COMAH 2015 covers Great Britain; Northern Ireland has its own 2015 Regulations.

How often should a HAZOP be revalidated?

Under OSHA PSM, at least every five years after the initial analysis, by a team that meets the same requirements, so that the analysis stays consistent with the current process (1910.119(e)(6)); EPA’s 68.67(f) is the same for Program 3. COMAH 2015 sets no interval for a HAZOP, though it requires the major accident prevention policy, and an upper tier site’s safety report, to be reviewed at least every five years. This template asks for the revalidation date after sign-off.

Is CheckFlow free for this template?

14-day free trial, no card required. The Business plan is $10 per user per month after the trial. Full details at checkflow.io/pricing.

Follow Every HAZOP Recommendation to Closure

Free trial — no credit card required.

14-day free trial, no credit cardFull refund in your first 30 daysUS hosting, EU on request