Usability Testing Checklist Template

Run one moderated or unmoderated usability study from research questions, participants and consent through task scenarios, a pilot and the sessions to severity ratings, fixes in the backlog and a re-test plan. The study approver decides go or no-go after the pilot.

Last reviewed: November 2026

Printed from checkflow.io/templates/product-development-launch/usability-testing-checklist

This free usability testing checklist is for user researchers, product designers and product managers running one usability study, moderated or unmoderated. One run covers one round of testing, planned around the date of the first session. It starts with the research questions and success measures, chooses the method, the participants and how many, and records the lawful basis for participants’ data before the information sheet, consent form and screener go out. The task scenarios, discussion guide or on-screen instructions and the prototype are prepared, and a pilot tests the study itself before the study approver decides go or no-go. The sessions are run and noted, consent and incentives are checked, and the data moves to approved storage. The team sorts the observations into findings, rates the severity of each problem and shares the results, the product owner agrees which problems to fix, and the fixes go into the backlog. It ends with a re-test plan and a deletion date for the research data.

One Study, From Research Questions to the Backlog

A usability study, in this template, is one round of testing with a defined question: a handful of real or likely users try realistic tasks on a prototype or a live product while the team watches what they do, then the problems are rated and the fixes go into the backlog. It is about whether people can use the design, not whether the build meets its requirements and not what people say they want. Nielsen Norman Group sums up the core of a usability test as the facilitator, the tasks and the participant (NN/g: Usability Testing 101).

Earlier work has its own templates. Discovery interviews about a problem before anything is built are part of the Product Ideation & Validation Checklist, and a first prototype test with a few users sits inside the MVP Development Workflow Checklist; use this template when that test needs its own plan, consent and severity ratings. A check of a page against WCAG success criteria is the WCAG 2.2 Accessibility Audit Checklist, which does not replace testing with disabled people.

This template

One usability study

Covers: research questions and success measures, the method and sample size, consent, privacy information and recordings, recruiting, task scenarios and the script, a pilot and a go or no-go, the sessions, analysis and severity ratings, the backlog and a re-test plan.

Asks: can people use this design, and what gets in their way?

Ends with: fixes in the backlog and the next round planned.
Business sign-off

User Acceptance Testing

Covers: business testers running scripted scenarios against agreed acceptance criteria, logging defects and signing off the build.

Asks: does this build do what the business needs, so it can go live? User Acceptance Testing (UAT) Checklist.

Ongoing programme

User Feedback Collection

Covers: surveys, scheduled interviews, support tickets, analytics and session recordings collected all the time, then fed into the road map.

Use it: to hear from users every week; use this template when one question needs a study. User Feedback Collection Checklist.

What the Usability Testing Checklist Covers

Nine phases take one usability study from the research questions to the re-test plan. The first task records the date of the first session, which sets every due date, the people involved, and whether the sessions are moderated in person, moderated remotely or unmoderated, so only that method’s tasks appear. Recording the sessions adds the storage and clip tasks, and disabled participants, children or vulnerable adults and health questions each add their own consent or privacy task. The go or no-go after the pilot halts the checklist until the study approver decides.

  1. Phase 1

    Phase 1: Plan the Study

    5 tasks

    Owned by the researcher. Enter the date of the first session on the first task: the planning counts back from it in working days, and the sessions, analysis and follow-up count forward. Choose the method there too, so the checklist shows only the tasks for a moderated or an unmoderated study.

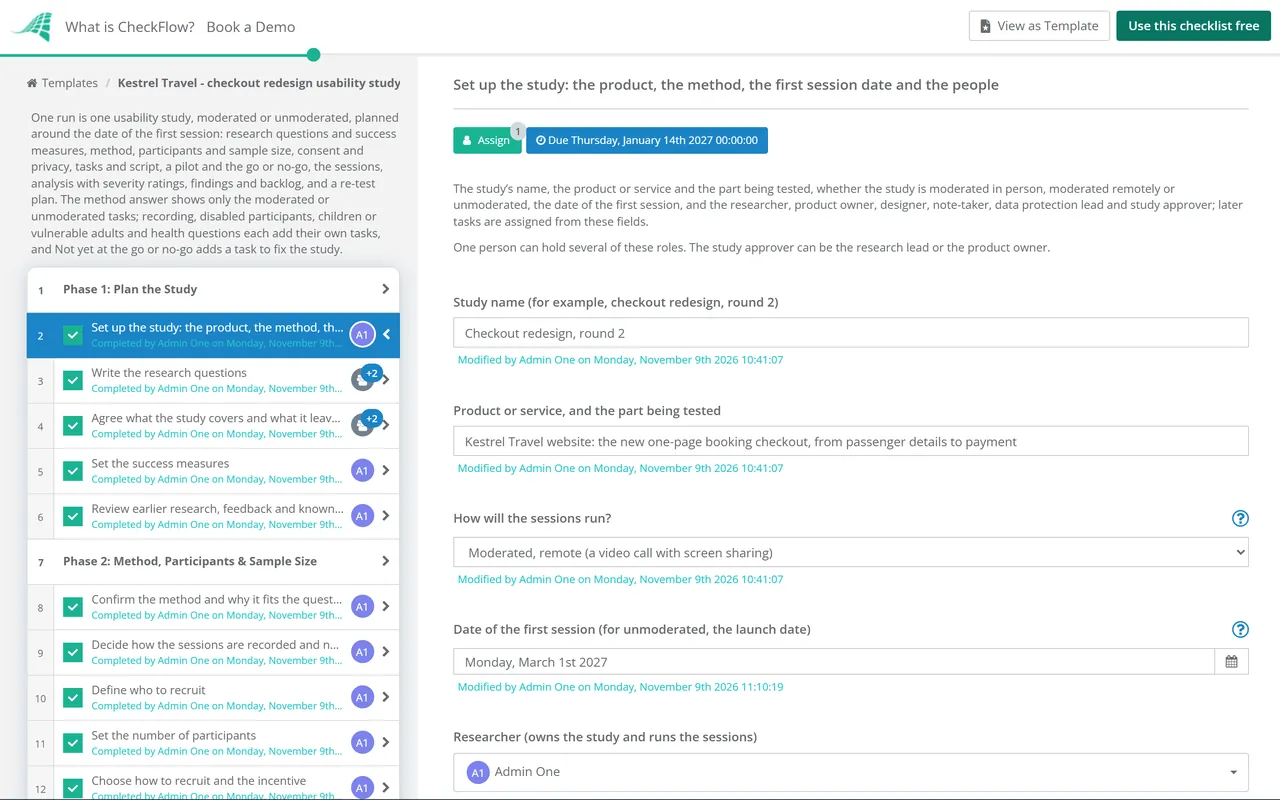
    • Set up the study: the product, the method, the first session date and the people — the study’s name, the product or service and the part being tested, whether the study is moderated in person, moderated remotely or unmoderated, the date of the first session, and the researcher, product owner, designer, note-taker, data protection lead and study approver; later tasks are assigned from these fields
    • Write the research questions — what the team needs to learn from this study, written as questions the sessions can answer, and the decision the answers will feed
    • Agree what the study covers and what it leaves out — the journeys, screens or features in scope, the prototype or build version that will be tested, and anything the team has agreed not to test this time
    • Set the success measures — what counts as success on each task (for example finished without help, finished with help, not finished), any measures you will record, and whether the study looks for problems or measures performance
    • Review earlier research, feedback and known issues — findings from earlier rounds, analytics, support tickets and user feedback, so the study does not spend sessions on problems the team already knows about
  2. Phase 2

    Phase 2: Method, Participants & Sample Size

    6 tasks

    Decide how the study runs, who takes part and how many. The recording answer adds the storage and clip tasks, and the participants answer adds the tasks for disabled participants, children or vulnerable adults and health information.

    • Confirm the method and why it fits the questions — why a moderated or an unmoderated study suits these research questions, and where the sessions take place
    • Decide how the sessions are recorded and noted — whether screens, audio or video are recorded, who takes notes, and how notes are written so they can be matched to a participant number
    • Define who to recruit — the user groups, the experience or situation participants need, the ways they reach the service, and the spread of age, gender, ethnicity, disability and background to aim for
    • Set the number of participants — how many participants in each user group, and how many rounds, with the reason
    • Choose how to recruit and the incentive — a recruitment agency, a participant panel, existing users who have agreed to be contacted, a charity or community group, or colleagues for an internal service, and the incentive for each participant
    • Choose the tools and check the providers’ data terms — the prototype tool, the video call or testing tool, the recording and note-taking tools, and whether each provider’s terms say what participants’ data is used for and when it is deleted
  3. Phase 3

    Phase 3: Consent, Privacy & Recruiting

    9 tasks

    Participants’ contact details, screener answers, notes and recordings are personal data. Record the lawful basis, write the information sheet and the consent form, then recruit, screen and book the participants. Recruiting runs from the screener to about a week before the sessions, so it overlaps Phase 4.

    • Confirm and record the lawful basis for participants’ data — the lawful basis under UK GDPR for using participants’ personal data in this study, why it applies, and whether a data protection impact assessment is needed
    • Confirm the extra condition for health or disability information — the condition under UK GDPR Article 9 that allows the study to use health or disability information, recorded beside the lawful basis, and how little of that information the screener and sessions need
    • Write the information sheet and privacy information — a plain-language sheet that says who is doing the research and why, what happens in the session, whether it is observed and recorded, what data is kept, who it is shared with, how long it is kept, that taking part is voluntary and can be stopped at any time, and how to complain
    • Prepare the consent form, including the recording — the form or script participants agree to, covering taking part, observers, the recording and how the data is used, and how you will keep evidence of each participant’s consent
    • Arrange consent from a parent, guardian or carer — how you will get informed consent from both the participant and a parent, guardian, carer or other responsible adult, and who will be present at the session
    • Write the screener questions — the questions that check each person meets the recruitment criteria, asking only for what you need, and how the answers are kept
    • Recruit and screen the participants — each participant recorded by participant number rather than name, with their group, session time and status, so notes, recordings and consent can be matched without names
    • Arrange access needs and assistive technology — how each participant wants to be contacted, any communication support such as a sign language interpreter, their own assistive technology and devices, materials in the format they need, and help getting to the venue
    • Confirm the sessions and send the information sheet — a time confirmed with each participant, the information sheet and consent form sent in advance in a format they can use, and the calendar shared with the note-taker and observers
  4. Phase 4

    Phase 4: Tasks, Script & Materials

    9 tasks

    This phase runs alongside recruiting in Phase 3, so some of its tasks fall due before recruiting ends. Write the tasks participants will try and the script or on-screen instructions, then prepare the prototype and the room, the call or the testing tool.

    • Write the task scenarios and put them in order — a short, realistic scenario for each task that sets a clear goal without hinting at the answer, the research question each one answers, the order they run in and the length of the session
    • Write the discussion guide and introduction script — the introduction that says who you are, explains the research and reminds the participant about the recording, each task with its instructions, the follow-up questions and a planning checklist for the day
    • Write the on-screen instructions and follow-up questions — instructions that make sense with no one there to explain them, the questions shown after each task and at the end, and an address participants can write to if something does not work
    • Prepare the prototype or build and the test data — a version that will not change during the sessions, accounts or dummy data for participants to use, and a way to reset it between sessions
    • Book an accessible room and the equipment — a lab, meeting room or visit that suits the participants, step-free and accessible, with any interpreter or assistant booked, the devices and recording equipment, and time between sessions
    • Set up the video call and screen sharing — the call link, how the participant shares their screen, how observers join without being seen or heard, and a short test with each participant’s device if they are unsure
    • Build the study in the testing tool — the tasks in order, any screener in the tool, the recording settings, the follow-up questions and the number of completed sessions to collect
    • Brief the note-taker and observers — the note-taking template, where observers watch from, that they stay quiet during tasks, and how they protect participants’ privacy
    • Set up where recordings are stored and who can see them — an approved place for the recordings, named by date, round and participant number, with access limited to the people who need it and no copying or downloading where the technology allows
  5. Phase 5

    Phase 5: Pilot & Go/No-Go

    4 tasks

    A pilot tests the study itself before real participants see it. The go or no-go halts the checklist: the session tasks cannot be completed until the study approver completes it.

    • Run the pilot session — one or two practice sessions with a colleague or a participant, run exactly as planned, checking the task wording, the timing, the consent steps, the recording and the tools
    • Fix the tasks, script and set-up after the pilot — the changes to tasks, wording, timing, tools or consent materials that the pilot showed were needed
    • Put right what stopped the study going ahead — the problems the study approver named, fixed, and the pilot run again if the tasks or tools changed
    • Approve the go or no-go for the sessions — the study approver checks that the pilot went well, the tasks and script are final, the lawful basis, information sheet and consent form are ready, recordings have an approved home, and participants are booked, then decides Go or Not yet
  6. Phase 6

    Phase 6: Run the Sessions

    7 tasks

    Run each session the same way, take notes on what people do and say, and keep consent, incentives and data in order as you go.

    • Launch the unmoderated study — a reminder or invitation with the study link, the study opened to the first few participants, their sessions checked, then opened to the rest
    • Run the moderated sessions — a reminder the day before, a check that consent is in place, the incentive given at the start, the introduction script, each task introduced neutrally with the participant thinking aloud, follow-up questions at the end, and a short debrief with the note-taker after each session
    • Take notes and log observations — for each participant number, what the participant did and said on each task, written as observed rather than interpreted, with the time in the recording where it happened
    • Check each recording and replace sessions that cannot be used — each completed session watched, sessions with technical problems or skipped tasks set aside with the reason, and more participants invited if the round falls short
    • Check consent for every session and act on any withdrawal — a consent record matched to every participant number, and any participant who withdrew has their data deleted
    • Confirm every incentive is paid and thank the participants — each incentive paid or sent, any expenses for disabled participants covered, and a thank-you that says what happens next with the research
    • Move the session data to approved storage — notes, photos, forms and any recordings moved off laptops, phones and recorders to approved storage, paper scanned and shredded, and access limited to the people who need it
  7. Phase 7

    Phase 7: Analysis & Severity Ratings

    3 tasks

    Turn the notes into findings while the sessions are fresh, rate how serious each problem is, and answer each research question.

    • Hold the analysis session and sort the observations — everyone who observed invited, observations written one to a note, sorted into themes such as tasks, screens or user groups, and each theme named
    • Write the findings for each research question — short statements of what was learned, the evidence for each, the success measures for each task, and the answer to each research question, including any question the study could not answer
    • Rate the severity of each problem — each usability problem listed with the tasks and participants it affected and a severity rating, judged on how often it happens, how hard it is to get past and whether it keeps getting in the way
  8. Phase 8

    Phase 8: Findings & Backlog

    5 tasks

    Share what the study found, agree what to fix and in what order, and get the fixes into the backlog with their severity.

    • Write up the findings and recommendations — a short report or playback deck with the research questions, the method and participants, the findings, the problems by severity and the recommendations, using anonymised quotes and screenshots
    • Remove personal data from the clips you share — names, faces where needed, contact details and anything confidential blurred or bleeped in clips and screenshots, and clips that still identify someone shared only with the people who need them
    • Present the findings to the team — a playback to the product team and stakeholders, with time to discuss the problems and a reminder not to share participants’ details outside the session
    • Agree which problems to fix and in what order — the product owner’s decision on each problem: fix now, fix later or not fix, with the reason, starting from the most severe
    • Add the fixes to the backlog — a backlog item for each agreed fix, with the problem, the evidence, the severity and a link to the findings
  9. Phase 9

    Phase 9: Re-test Plan & Close

    3 tasks

    Plan how the fixes will be tested again, record what to change next time, and close the data down: contact details deleted and a deletion date set for everything else.

    • Plan the re-test of the fixes — which fixes need testing again, the method, and the date of the next round, which runs as a new checklist from this template
    • Record what to change in the next study — what worked and what did not in the recruiting, tasks, sessions and analysis, and any change to this checklist
    • Delete contact details and set the deletion date for the research data — participants’ contact details deleted now that the study is over, and a deletion date set for the notes, recordings and consent records in line with your retention policy

Methods, Sample Sizes and Severity Ratings

Moderated or unmoderated: what changes

Drawn from Nielsen Norman Group’s article on moderated and unmoderated remote tests (NN/g: Remote Usability Tests) and the GOV.UK Service Manual (GOV.UK: moderated usability testing). The answer on the first task decides which of these tasks appear.

Moderated, in person Moderated, remote Unmoderated, remote
Who is thereThe facilitator and the participant in the same room, with a note-takerThe facilitator and the participant on a video call at the same timeNo one: the participant works alone in a testing tool on their own schedule
Follow-up questionsAsked in the momentAsked in the momentWritten in advance, the same for every participant
If the participant gets stuckThe facilitator can help them back on trackThe facilitator can help, though tool problems are harder to sort outNo real-time help; give them an address to write to
What this template addsThe discussion guide, an accessible room, the observer briefing and the moderated sessionsThe discussion guide, the video call set-up, the observer briefing and the moderated sessionsOn-screen instructions, the set-up in the testing tool, the launch and a check of each recording

How many participants: what the sources say

The sources give different numbers for different kinds of study, so the sample size task asks you to record which you followed. Read on 9 November 2026 (NN/g 2000, NN/g 2012, GOV.UK).

Source What it says about numbers Applies to
Jakob Nielsen, Why You Only Need to Test with 5 Users (NN/g, 18 March 2000)Test no more than 5 users and run as many small tests as you can afford; 3 to 4 users from each group when testing two groups, and 3 from each when testing three or moreQualitative tests, repeated after each redesign
Jakob Nielsen, How Many Test Users in a Usability Study? (NN/g, 3 June 2012)5 users in a qualitative usability study; at least 20 users in a quantitative studyQualitative and quantitative studies
GOV.UK Service Manual, Plan user research for your service (updated 15 October 2026)Usually between 4 and 8 participants for each round of usability testing; more rounds rather than one big round; hundreds for surveys, A/B testing and benchmarkingUK government services

A severity scale for usability problems

From Jakob Nielsen’s article on severity ratings, which judges each problem on its frequency, its impact and its persistence (NN/g: Severity Ratings for Usability Problems). Use your own team’s scale if it has one.

Rating Jakob Nielsen’s description (paraphrased)
0Not a usability problem at all
1Cosmetic only: fix if there is spare time
2Minor: low priority
3Major: important to fix, high priority
4Usability catastrophe: fix before release

Why Run Usability Studies in CheckFlow?

1

No sessions before the pilot is signed off

The go or no-go after the pilot is assigned to the study approver alone, and the checklist halts there: the session tasks cannot be completed until they complete it. Not yet adds a task before the decision to fix the tasks, the script or the set-up, so the approver can decide again once it is fixed.

2

One session date moves the whole study

Planning counts back from the first session date in working days and the analysis counts forward, so when sessions slip, one change on the first task moves every step. Overdue alerts go to the people assigned, and the Reports Grid lists every study in progress with its answers, while Analytics shows where studies slow down.

3

Consent and data handled every time

The lawful basis, information sheet, consent form, recording storage and deletion date are tasks with owners, not afterthoughts. Answers on the checklist add the steps for recordings, disabled participants, children or vulnerable adults and health information only when the study needs them.

CheckFlow does not record sessions, recruit participants or host prototypes: those stay in your testing, video and design tools. CheckFlow makes sure every study gets the same steps in the same order, with an owner and a due date for each, a recorded go or no-go before the sessions and a record of who did what and when.

Get the design ready with the Design Review & Approval Checklist, check accessibility with the WCAG 2.2 Accessibility Audit Checklist, and follow defects the sessions uncover with the Bug Tracking & Resolution Checklist.

AI generator

Didn’t find what you need? Describe it.

Describe the process in a sentence and the AI checklist generator drafts the phases and tasks for you.

Frequently Asked Questions

What should a usability testing checklist include?

Research questions and success measures, the method and where sessions take place, who to recruit and how many, the lawful basis, information sheet and consent form, the screener and recruiting, task scenarios and a discussion guide or on-screen instructions, the prototype and test data, a pilot, the sessions and notes, analysis with severity ratings, findings shared with the team, fixes added to the backlog, a re-test plan and a deletion date for the data. This template covers each in nine phases.

How many participants do you need for a usability test?

It depends on the kind of study. Jakob Nielsen’s 2000 article recommends no more than 5 users per test and running as many small tests as you can afford (NN/g), and his 2012 article says at least 20 for a quantitative study (NN/g). The GOV.UK Service Manual says you will usually need 4 to 8 participants for each round (GOV.UK). More user groups need more participants.

What is the difference between usability testing and user acceptance testing?

Usability testing watches real or likely users try realistic tasks to find out what gets in their way, on a prototype or a finished product. User acceptance testing has business testers check a finished build against agreed acceptance criteria so it can be signed off for release. Both can find problems, but they answer different questions. The User Acceptance Testing (UAT) Checklist covers the sign-off.

What is the difference between moderated and unmoderated usability testing?

In a moderated test a facilitator is with the participant, in the room or on a call, and can ask follow-up questions or help if they get stuck. In an unmoderated test the participant works alone in a testing tool on their own schedule, with questions written in advance and the same for everyone (NN/g). Unmoderated studies need instructions that stand on their own, so pilot them carefully.

Why run a pilot session before a usability test?

A pilot tests the study itself. Nielsen Norman Group describes running 1 to 2 sessions before the real ones to check the task wording and the time the session needs, so a real participant does not struggle with the study rather than the design (NN/g: Pilot Testing). In this template the study approver decides go or no-go after the pilot, and the sessions wait for that decision.

How do you rate the severity of usability problems?

Jakob Nielsen judges each problem on how often it occurs, how hard it is to overcome and whether it keeps bothering users, and rates it from 0, not a usability problem, to 4, a usability catastrophe to fix before release (NN/g). This template rates each problem in a table with the tasks and participants it affected, then the product owner decides what to fix first.

Do you need consent to record a usability testing session?

GOV.UK says to treat session notes and recordings as personal data (GOV.UK). In the UK that means a lawful basis under UK GDPR, decided and documented before the sessions, and privacy information that says what you record and how long you keep it (ICO). The basis may be consent or another, such as legitimate interests. GOV.UK also asks for participants’ informed consent, including to the recording, with evidence kept (GOV.UK). Elsewhere, follow your own law.

How long should you keep usability testing recordings?

No longer than you need them. The ICO says personal data must not be kept for longer than needed and asks for standard retention periods wherever possible (ICO). The GOV.UK Service Manual suggests 2 or 3 years as reasonable for government user research data, and deleting it sooner if it is no longer needed (GOV.UK). This template sets a deletion date in its last phase.

Is CheckFlow free for this template?

14-day free trial, no card required. The Business plan is $10 per user per month after the trial. Full details at checkflow.io/pricing.

Run Every Usability Study the Same Way

Free trial — no credit card required.

14-day free trial, no credit cardFull refund in your first 30 daysUS hosting, EU on request