
School Trip Planning Checklist Template

The coach was booked before the trip was approved, two consent forms never came back, and nobody at school had the list of who went. A school trip goes well when the plan, the approval and the day itself follow one checklist.

Last reviewed: October 2026

This free school trip planning checklist is for visit leaders, educational visits coordinators and school offices. One run plans one school trip or educational visit, from the proposal about twelve weeks before to the evaluation afterwards. It sets the aims, dates and cost, gathers the venue’s information, plans the staffing and writes a proportionate risk assessment and an emergency plan. The approver, after the governing body or employer where your policy says so, approves the visit before anything is booked or sent to parents. Then come the bookings and payments, the letter, consent and medical information, pupils’ medicines and plans, the briefings, the registers on the day and the evaluation. A residential or overseas visit, an outside organisation, adventurous activities, the transport and pupils with medical needs or SEND each add the tasks they need.

A School Trip Is a Lesson Away From School, Not an Event

A school trip, field trip or educational visit takes pupils out of school to learn: a museum, a field study, a theatre, a residential centre or a visit abroad. The school plans and approves the visit and agrees who supervises the pupils at every stage, including any time an outside organisation takes over, so the planning is about the learning, the people and the risks that matter, in proportion to the visit. A walk to the local library needs little more than the school’s usual procedures. A residential with adventurous activities needs much more.

This checklist plans one visit, from its purpose to the evaluation. A staff away day or team retreat belongs in the Company Offsite Planning Checklist, and a fundraising event such as a school fair or a sponsored walk in the Fundraising Event Planning Checklist.

This checklist

The school trip

For: one class, year group or team of pupils, for a day or longer.

Planned around: the learning aims, approval, consent, pupils’ needs and the risks that matter.

Output: a visit approved, run and evaluated, with a record of who went and anything that happened.


Staff event

A company offsite

For: colleagues, away from their usual place of work for a day or two.

Planned around: goals, attendees’ needs, travel and the agenda.

Output: decisions and actions with owners, in the Company Offsite Planning Checklist.

Fundraising

A fundraising event

For: supporters and the public, raising money for a cause.

Planned around: the goal, the venue, sponsors, promotion and volunteers.

Output: money raised and supporters thanked, in the Fundraising Event Planning Checklist.

What the School Trip Planning Checklist Covers

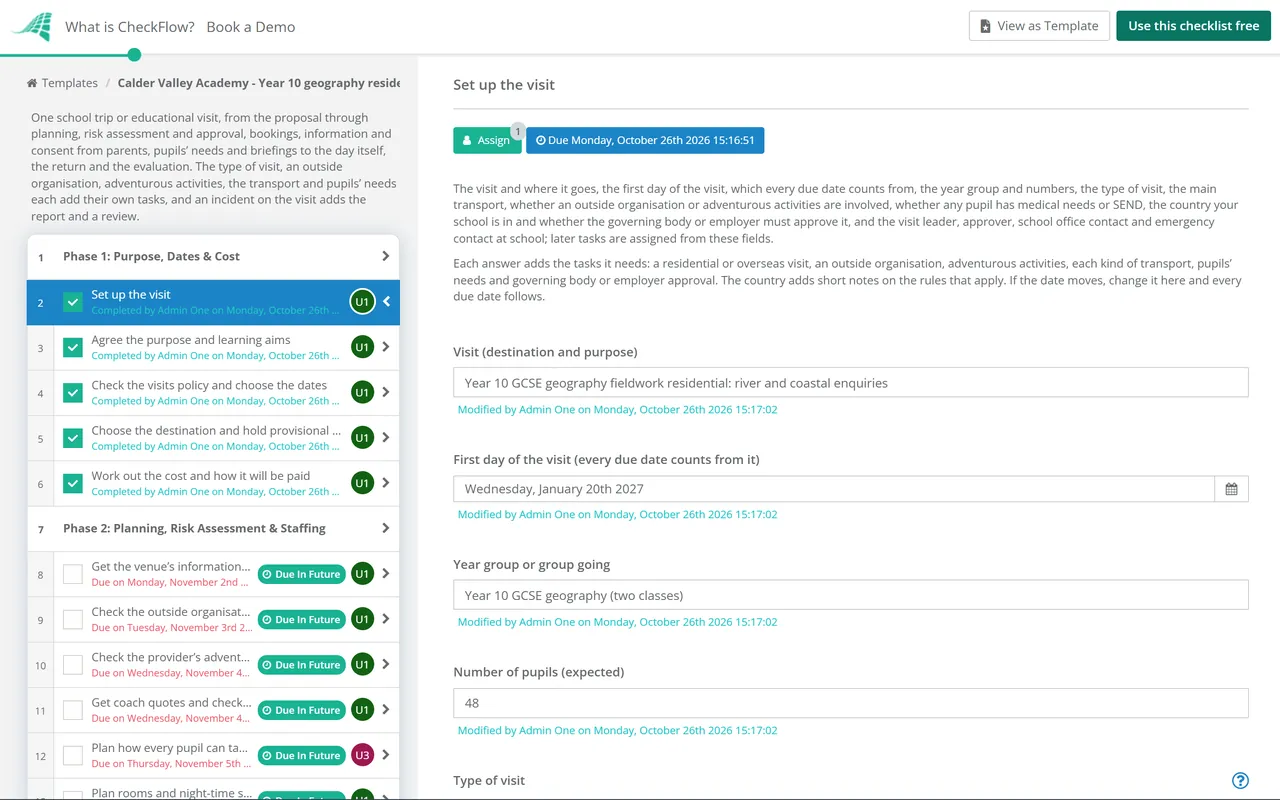
Nine phases take one visit from the proposal about twelve weeks before to the evaluation and follow-up in the weeks after. The first task records the type of visit, the transport, any outside organisation or adventurous activities, whether a pupil going has medical needs or SEND, the country and whether the governing body or employer must approve, and each answer adds the tasks it needs. Nothing after the approver’s decision can be completed until it is recorded.

  1. Phase 1

    Phase 1: Purpose, Dates & Cost

    5 tasks

    Start about twelve weeks before the visit, or earlier for a residential or overseas visit. Answer the questions in the first task before anything else: they decide which tasks appear, and every due date counts from the first day of the visit.

    • Set up the visit — the visit and where it goes, the first day of the visit, which every due date counts from, the year group and numbers, the type of visit, the main transport, whether an outside organisation or adventurous activities are involved, whether any pupil has medical needs or SEND, the country your school is in and whether the governing body or employer must approve it, and the visit leader, approver, school office contact and emergency contact at school; later tasks are assigned from these fields
    • Agree the purpose and learning aims — what pupils should learn or experience, how it links to the curriculum, and how you will judge afterwards whether the visit worked
    • Check the visits policy and choose the dates — the approval route and deadlines your school’s visits policy sets for this type of visit, and dates checked against the school calendar, exams, other trips, religious festivals and the destination’s availability
    • Choose the destination and hold provisional dates — the venue, centre or route, the dates held provisionally without a deposit where possible, and the date each hold expires
    • Work out the cost and how it will be paid — transport, entry, activities, accommodation, insurance and any staff costs, the cost per pupil, whether the school funds it or asks for contributions or charges, and the help available to families who cannot pay
  2. Phase 2

    Phase 2: Planning, Risk Assessment & Staffing

    16 tasks

    Plan the visit in enough detail for the approver to decide. Keep it proportionate: a routine visit needs little beyond the school’s usual procedures, while a residential, overseas or adventurous visit needs more. Each answer in the first task adds the checks it needs.

    • Get the venue’s information and visit it if you can — a pre-visit or the venue’s information pack: access, toilets, first aid, where the group eats and meets, emergency arrangements and the venue’s own risk assessment
    • Check the travel advice and entry requirements — shown for an overseas visit: the FCDO travel advice for the country, passports valid for the whole visit, any visa or travel authorisation, and pupils or staff whose nationality means they need more time or different documents
    • Check the outside organisation — shown when an outside organisation is involved: whether it holds the Learning Outside the Classroom (LOtC) Quality Badge, and if not, its insurance, legal requirements, safety and emergency policies, risk assessments, vehicles, staff competence, safeguarding, accommodation, any sub-contracting and any licence it needs
    • Check the provider’s adventure activities licence or accreditation — shown when an outside provider leads adventurous activities: in Great Britain, a licence from the Adventure Activities Licensing Authority where the activity is in scope, checked on HSE’s register of licence holders; abroad, the LOtC Quality Badge or a similar local accreditation
    • Confirm staff leading adventurous activities are competent — shown when your own staff lead adventurous activities: each leader’s qualifications or experience for the activity and the place, checked against what your employer or its outdoor education adviser requires
    • Get coach quotes and check the company — shown for a hired coach or minibus with a driver: quotes from companies that hold a PSV operator’s licence, seat belts on every seat, the pick-up and return times, and what happens if the vehicle breaks down
    • Check the minibus, its drivers and their licences — shown for a school minibus driven by staff: each driver’s licence entitlement (category D1, or a car licence that meets the conditions for driving a minibus not for hire or reward), any section 19 permit, the insurance, the vehicle’s checks and the drivers’ breaks
    • Plan the route on foot or by public transport — shown for walking or public transport: the route, road crossings, times and tickets, step-free options, and how the group stays together and is counted at stations and stops
    • Plan how every pupil can take part — shown when a pupil going has medical needs or SEND: the adjustments each pupil needs to take part fully and safely, agreed with parents and the pupil, with advice from the relevant healthcare professional, and any extra staff or equipment
    • Plan rooms and night-time supervision — shown for a residential visit: the room plan, staff on duty at night and where they sleep, how pupils reach a member of staff at night, and the rules on phones, curfew and leaving rooms
    • Plan the staffing — the visit leader, a deputy, enough adults for the group and the activities as the risk assessment and your policy decide, a first aider, and staff who know the pupils
    • Plan the adventurous activities in detail — shown for adventurous activities: each activity, where and when, the pupils’ abilities, the weather or water conditions that would stop it, an alternative, and instructors or lifeguards for watersports and swimming
    • Write the risk assessment — the significant risks of this visit, who could be harmed and the precautions, drawing on the venue’s and any provider’s own assessments; for a routine visit, check the school’s standing assessment covers it
    • Agree in writing who is responsible for what — shown when an outside organisation is involved: what the organisation does and what your staff do, and above all when supervision passes to its staff and back
    • Check volunteers and other adults going — any parent helper, volunteer or outside adult checked under your safeguarding policy before the visit, with the checks recorded
    • Write the emergency and communications plan — what happens if a pupil is lost, injured or ill or the group is delayed, the emergency contact at school, when the visit leader checks in, and how parents hear about a late return
  3. Phase 3

    Phase 3: Approval

    4 tasks

    Nothing is booked and no letter goes to parents until the visit is approved. The approver decides, after the governing body or employer where your policy requires it, and nothing after that decision can be completed until it is recorded. Not approved adds a task to close the plan.

    • Send the visit plan for approval — the aims, dates, cost, risk assessment, staffing, emergency plan and the checks made, sent to the approver by the deadline in your policy
    • Get governing body or employer approval — shown when your policy requires it: the visit submitted to the governing body or employer through its own process, and its decision recorded before the approver’s
    • Approver approves the visit — Approved, Approved with conditions or Not approved, based on the aims, the plan, the risk assessment and the staffing; no booking is confirmed and no letter goes to parents until it is recorded
    • Close the plan if the visit is not approved — shown when the approver did not approve the visit: the staff involved and anyone already contacted told, any provisional holds released, the reasons recorded, and the remaining tasks marked not applicable
  4. Phase 4

    Phase 4: Bookings, Transport & Payments

    5 tasks

    Confirm what the approver approved, on the terms you checked. If the visit was approved with conditions, check each condition is met before you confirm a booking. An overseas visit adds the travel insurance.

    • Confirm the venue and activity bookings — each booking confirmed in writing, with the deposit, the date final numbers are due and the cancellation terms
    • Book the transport — the coach, tickets, flights or ferry, or the school minibus, with pick-up and return times confirmed in writing; mark not applicable for a walking visit
    • Arrange travel insurance and check health cover — shown for an overseas visit: a policy that covers every traveller and every planned activity, the emergency assistance number, and each traveller’s UK Global Health Insurance Card (GHIC) where it applies
    • Set up payments and track them — how and by when parents pay or contribute, help for families who cannot pay, and a running record of what has been paid against the budget
    • Arrange cover for staff on the visit — lessons and duties covered for every member of staff going, booked once the visit is approved and agreed with whoever arranges cover
  5. Phase 5

    Phase 5: Information & Consent from Parents

    5 tasks

    Tell parents what the visit is, what it costs and what you need from them, once it is approved. Consent rules depend on the visit and your policy; the country you chose adds a note on what the guidance says.

    • Send the visit letter to parents — the purpose, dates and times, the cost and how to pay or contribute, what is included, what to bring, who to contact and how to withdraw their child, with the consent and information form where needed
    • Collect passport and travel document details — shown for an overseas visit: each traveller’s passport details and expiry, any visa or travel authorisation, and copies kept securely for the visit only
    • Hold an information meeting for parents and pupils — shown for a residential visit: the itinerary, rooms and supervision, the kit list, phones and money, behaviour expectations, medicines and how parents will hear from the group
    • Collect consent, medical information and emergency contacts — written consent where your policy needs it, each pupil’s medical, dietary and access needs and medicines, and two emergency contacts per pupil
    • Confirm the final group list — the pupils going, each with consent and emergency contacts in place where needed, pupils not going and the provision for them at school, and the list shared with the visit leader and the emergency contact at school
  6. Phase 6

    Phase 6: Medical & Additional Needs

    4 tasks

    Every pupil going should be able to take part safely. Check the information you collected, sort out medicines, and update the plans of pupils with medical needs or SEND for this visit.

    • Update each pupil’s individual plan for the visit — shown when a pupil going has medical needs or SEND: each individual healthcare plan or support plan reviewed with parents for the visit, saying what support they need, who gives it and what to do in an emergency
    • Check the medical and dietary information for every pupil going — allergies, asthma, epilepsy, diabetes and other conditions, dietary needs passed to the venue, and any pupil whose information is missing or unclear followed up with parents
    • Arrange medicines and who holds them — written permission for staff to give medicines, each medicine in its original container and in date, inhalers and adrenaline pens kept with the pupil or close at hand, and who holds the rest
    • Pack the first aid kit and confirm the first aider — a first aid kit for each group, any spare medicines agreed with parents, and the first aider for each part of the visit
  7. Phase 7

    Phase 7: Final Checks & Briefings

    5 tasks

    In the last week, confirm the numbers, brief everyone going and leave the emergency contact at school with everything they would need.

    • Confirm numbers and times with the venue, provider and transport — final numbers, dietary needs, arrival and departure times and the contact on the day, by the deadlines in the bookings
    • Brief the staff and helpers — the itinerary, groups and who is responsible for whom, each pupil’s needs, the emergency plan, check-in times and the rule that no unplanned adventurous activity is added on the day
    • Brief the pupils — where they are going and why, groups and buddies, behaviour expectations, what to bring, and what to do if they get lost or feel unwell
    • Check the forecast, travel advice and any changes — the weather and conditions for the planned activities, the FCDO travel advice again for an overseas visit, and any change to the plan agreed with the approver
    • Give the emergency contact at school the visit details — the final list of pupils and adults, phone numbers, medical information, the itinerary, the emergency plan and the check-in times, with a copy carried by the visit leader
  8. Phase 8

    Phase 8: On the Visit & the Return

    6 tasks

    On the day, follow the plan, count often and keep in touch with school. If anything goes wrong, record it on the day; an incident adds the report.

    • Take the register before leaving — every pupil and adult checked against the final list, absences reported to the office, and the list left with the emergency contact at school
    • Keep the emergency contact at school on call — the emergency contact reachable for the whole visit, including overnight, with the visit details, and each check-in logged
    • Run the visit to the plan and count at every move — head counts before and after each journey and activity, the check-ins with school at the agreed times, and the plan changed only if conditions change, with the reason noted
    • Record any incident, accident or near miss — what happened, who was involved, the first aid or treatment given and who was told; recorded on the day
    • Return, take the register and hand pupils over — every pupil counted back, collected or dismissed as the plan says, parents told of any delay, and the emergency contact at school told the group is back
    • Report the incident under your employer’s procedure — shown when there was an incident: the employer’s accident or incident report completed, parents told, and the incident reported to the regulator where the law requires it
  9. Phase 9

    Phase 9: Evaluation & Follow-Up

    5 tasks

    Evaluate the visit while it is fresh, settle the money, keep the record and delete the personal information you no longer need. An incident adds a review of what happened.

    • Review the incident and update the risk assessment — shown when there was an incident: what happened and why, what would have prevented it, the changes to the risk assessment and plans, and any follow-up with the pupil and parents
    • Evaluate the visit against its aims — whether the aims were met, what pupils and staff said, what worked and what to change, and any incidents, accidents or near misses
    • Approver reviews the evaluation — the evaluation, any incident and its follow-up, and whether to run the visit again and what to change
    • Reconcile the costs — every invoice and payment against the budget, refunds, any surplus or shortfall and what happens to it
    • Delete the personal information you no longer need — medical forms, emergency contacts, passport copies and lists deleted or returned under your data retention policy, keeping only what the policy says to keep, such as incident records

What Changes With the Type of Visit

The answers in the first task decide which extra tasks appear. The consent column summarises the Department for Education’s guidance for England, Health and safety on educational visits; your school’s or employer’s policy may ask for more, and other countries have their own rules.

Type of visit Written consent (England) Extra planning What this checklist adds
Routine day visit in school hoursNot needed for most trips that are part of the curriculum, for pupils over nursery age; tell parents about itLittle beyond the school’s usual procedures, which the guidance says cover visits with no more than an everyday level of riskThe core tasks, plus checks for the transport you choose
Day visit outside school hoursUsually neededLeaving and return times, who collects pupils and how parents hear about a delayA note on written consent
Residential visit in the UKUsually needed, as it runs outside normal school hoursRooms, night-time supervision, a meeting for parents, and checks on volunteers who stay overnightRooms and night-time supervision, and an information meeting
Overseas visitUsually needed, as the guidance says trips abroad need a higher level of risk assessmentFCDO travel advice, entry requirements, travel insurance and health coverTravel advice and entry requirements, insurance, passport details, and the meeting for a residential visit
Adventurous activities on any visitUsually needed, as they need a higher level of risk assessmentActivities identified and risk assessed before the visit, a licensed provider where the activity is in scope, and competent leadersLicence or competence checks and a detailed plan for each activity
Nursery-age children on any visitAlways neededAs for the type of visitNothing extra: record consent on the consent task

Why Plan School Trips in CheckFlow?

1

A plan that moves with the visit date

Enter the first day of the visit and every task falls due a set number of working days before or after it, from the aims about twelve weeks out to the evaluation a week after. Working days run Monday to Friday, so school holidays are not skipped. If the date moves, change it once and the whole plan follows. Tasks are assigned from the people named in the first task, and the Tasks Grid shows each of them what is due. The Reports Grid lists every visit the school has planned, with filters and export.

2

Only the tasks this visit needs

A residential visit adds rooms, night-time supervision and a meeting for parents. An overseas visit adds travel advice, insurance and passport details. An outside organisation adds the checks and a written agreement on supervision, adventurous activities add the licence or competence checks, and each kind of transport adds its own. Pupils with medical needs or SEND add their individual plans, and an incident on the day adds the report and a review.

3

Nothing booked before it is approved

The approver records Approved, Approved with conditions or Not approved, after the governing body or employer where your policy says so. That step halts the checklist, so no booking is confirmed and no letter goes to parents until the decision is recorded. See how approvals that halt a checklist work.

CheckFlow does not replace your employer’s visit approval system, book coaches or send letters to parents. It keeps the plan for one visit in one place: who does what and by when, the checks, the approval, the registers and the evaluation, so the next visit starts from this one. The checklist view shows the whole plan to the visit leader and the approver.

Use the Health & Safety Risk Assessment Checklist for the school’s own site risk assessments, the Volunteer Onboarding Checklist for parents and others who help regularly, and the Teacher Onboarding Workflow Checklist to introduce new staff to the school’s visits policy.

AI generator

Didn’t find what you need? Describe it.

Describe the process in a sentence and the AI checklist generator drafts the phases and tasks for you.

Frequently Asked Questions

What should a school trip checklist include?

The purpose and learning aims, the dates and cost, the venue’s information, a risk assessment in proportion to the visit, the staffing, an emergency and communications plan, approval, bookings, a letter to parents and consent where needed, medical information and medicines, briefings, registers on the day, and an evaluation afterwards. This template adds the tasks for residential and overseas visits, outside organisations, adventurous activities, each kind of transport, pupils with medical needs or SEND and an incident on the day.

Do schools need parental consent for every school trip?

Not in England. The Department for Education’s guidance says a school must always get written consent for nursery-age children, but for older pupils written consent is not needed for most trips that are part of the curriculum. It is usually only needed for trips that need a higher level of risk assessment or are outside normal school hours. Schools should still tell parents about trips and give them the chance to withdraw their child. Your own policy may ask for more.

Who approves a school trip?

The route is set by your school’s or employer’s policy. The Department for Education’s guidance for England says schools should appoint an educational visits coordinator, who advises head teachers and governors when they approve trips, and that some trips need the informed approval of the head teacher or governing board. In this template the approver is the educational visits coordinator or head teacher, with a task for governing body or employer approval first when your policy requires it.

Does every school trip need a risk assessment?

Not a separate one. The Department for Education’s guidance says routine visits with no more than an everyday level of risk are covered by the school’s current policies, while trips that are further away, involve certain activities or need specialist staff need a risk assessment and extra planning. HSE’s statement on school trips says the focus should be on real risks, not paperwork. This template asks which level applies and keeps a table for the significant risks.

Does an outdoor activity provider need a licence?

In Great Britain, HSE says anyone who provides caving, climbing, trekking or watersports within the scope of the Adventure Activities Licensing Regulations 2004 to young people under 18, in return for payment, must hold a licence. Climbing walls and ropes courses are exempt, and a school providing activities only to its own pupils needs no licence. The scheme does not extend to Northern Ireland. Abroad, the Department for Education says to use providers with the LOtC Quality Badge or similar local accreditation.

Can a teacher drive the school minibus on a car licence?

Sometimes. Government advice for schools says staff who passed their car test before 1 January 1997 can drive a minibus not used for hire or reward. Those who passed later can if they are over 21, have held a car licence for two years, drive voluntarily, the minibus weighs no more than 3.5 tonnes and they tow no trailer. If driving is part of the job or paid extra, a full D1 licence is needed. The rules apply in the UK only.

Can a school charge parents for a trip?

In England, a school cannot charge for education during school hours, but it can ask for voluntary contributions, as long as parents know there is no obligation and no pupil is left out because their parents cannot or will not pay. If not enough is raised, the visit may have to be cancelled. On a residential visit the school can charge for board and lodging, at no more than the cost, with exemptions for families on certain benefits. Charges need a charging and remissions policy.

How does the checklist handle pupils with medical needs or SEND?

Every pupil’s medical and dietary information and medicines are checked for every visit. When a pupil going has medical needs or SEND, the first task names the SENCo or medical needs lead, and two tasks appear: planning how every pupil can take part, and updating each pupil’s individual plan for the visit. The Department for Education’s statutory guidance for England says schools should support pupils with medical conditions to take part in trips, with adjustments, rather than prevent them.

Can US schools use this template for field trips?

Yes. Choose United States as the country and the template adds short notes that point to your district’s field trip policy and your state’s rules on permission slips, chaperones, transportation, medication and incident reporting. The UK guidance it quotes does not apply in the US, so take advice from your district on what the rules require. The structure, from the aims and approval to the registers and the evaluation, works the same way.

Is CheckFlow free for this template?

14-day free trial, no card required. The Business plan is $10 per user per month after the trial. Full details at checkflow.io/pricing.

Plan Every School Trip From Proposal to Evaluation

Free trial — no credit card required.

14-day free trial, no credit cardFull refund in your first 30 daysUS hosting, EU on request