Construction Site Safety Inspection Checklist Template

A weekly inspection that finds the same missing guardrail three weeks running has not failed to spot it. It has failed to give the fix an owner, a date and a second look.

Last reviewed: October 2026

This free construction site safety inspection checklist is for site managers, health and safety advisers and contractors’ safety leads who inspect a live construction site, usually once a week. One run is one inspection of one site by a competent person. It starts with the last report, its open actions and the statutory inspection records, then walks the site: set-up, welfare and housekeeping, work at height, excavations, plant and lifting, electrical safety and fire, health risks, PPE, permits and emergency arrangements. Every finding gets a priority (stop work now, within 24 hours or within a week), an owner and a due date. The site manager acknowledges the findings before close-out, and the inspector checks each fix on site. Choose Great Britain (CDM 2015) or the United States (OSHA 29 CFR 1926) and the matching legal notes appear, and a stop work finding adds the steps to make the area safe and confirm the fix before work restarts.

An Inspection Checks the Site as It Is This Week

A construction site is a different workplace every week. The scaffold goes up, the trench is backfilled, a new trade arrives and the traffic route moves. A site safety inspection is the regular walk that checks the site as it is today: the edges, the excavations, the plant, the welfare, the fire points and how people are working. It ends with a list of findings, each with a priority, an owner and a date, and it is not finished until each one has been fixed and checked.

It sits between two other kinds of check. The statutory inspections of scaffolds, excavations and lifting equipment are made by their own competent person, on their own timetable, with their own reports; the site inspection checks that they are happening and current. A safety audit looks further back, at the management system: policies, risk assessments, training and how findings are handled. For a finished building, the facility inspection checklist takes over.

Site safety inspection

What this checklist runs

Who: a competent person, often the site manager, a health and safety adviser or the contractor’s safety lead.

Checks: the whole site’s conditions and working practices on the day, and that the statutory inspections are current.

Output: findings with priorities and owners, accepted by the site manager and closed out.
Statutory inspections

Scaffolds, excavations and lifting equipment

Who: the competent person for each scaffold, excavation, crane or lifting accessory.

Checks: one piece of equipment or one place, at the frequency its own rules set.

Output: its own inspection report or examination record, which the site inspection checks is in date.

Safety audit

The safety management system

Who: an internal or external auditor, less often than the site inspection.

Checks: policies, risk assessments, training records, incident handling and whether findings get closed.

Output: an audit report and an improvement plan for the organisation, not for one week’s site.

What the Construction Site Safety Inspection Checklist Covers

Eight phases take one inspection from preparation to close-out. Choose Great Britain or the United States on the first task and the matching legal notes and checks appear. A finding that needs work stopped now adds the steps to stop the work, make the area safe and confirm the fix before work restarts, and nothing in the close-out can be completed until the site manager has acknowledged the findings.

  1. Phase 1

    Phase 1: Prepare the Inspection

    6 tasks

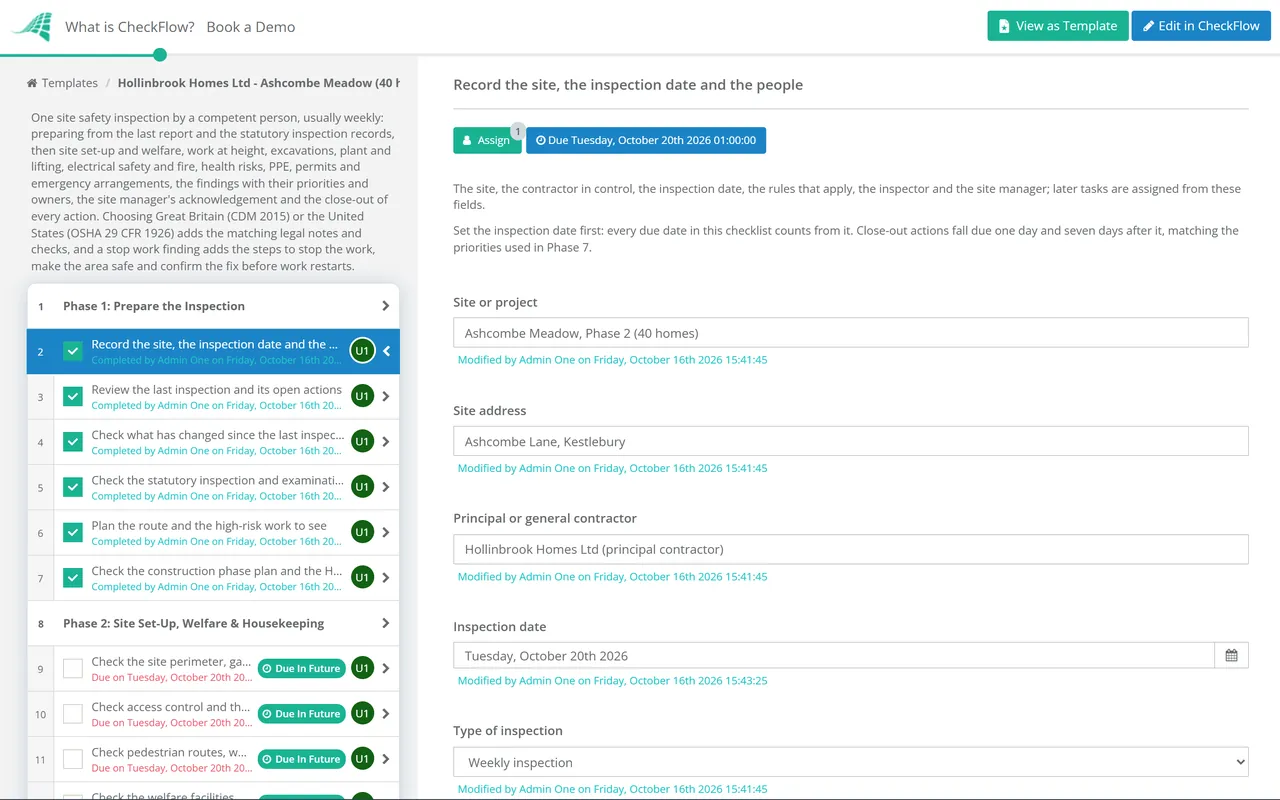
    One run is one inspection of one site by a competent person. Set the inspection date first, because every due date counts from it, and choose the rules that apply so the matching legal notes appear.

    • Record the site, the inspection date and the people — the site, the contractor in control, the inspection date, the rules that apply, the inspector and the site manager; later tasks are assigned from these fields
    • Review the last inspection and its open actions — the previous report, every action still open, and anything overdue or found more than once
    • Check what has changed since the last inspection — the stage of work, new trades and subcontractors, new plant, scaffold changes, new excavations, and any severe weather, accidents or near misses
    • Check the statutory inspection and examination records — scaffold and working platform inspections, excavation inspections, thorough examination reports for lifting equipment, and electrical test records, each current for the equipment in use
    • Plan the route and the high-risk work to see — the areas in use today, the live permits, planned lifts, work at height and excavations, so the walk sees them while they are happening
    • Check the construction phase plan and the HSE notification — shown for Great Britain: the plan covers the work now under way and its site rules, and on a notifiable project the notice to HSE is displayed in the site office where workers can read it
  2. Phase 2

    Phase 2: Site Set-Up, Welfare & Housekeeping

    6 tasks

    Start at the gate and work inwards. These checks cover the whole site, so make them on every inspection, even when the work has not changed.

    • Check the site perimeter, gates and signs — fencing or hoarding intact with no gaps, gates closed or controlled, site rules and warning signs at each entrance, and the public kept clear of the work
    • Check access control and the sign-in record — everyone on site signed in, visitors escorted, nobody working without a site induction, and the site secured out of hours
    • Check pedestrian routes, walkways and lighting — a safe way to every place of work, kept clear, signed and lit, separated from vehicles, with trip hazards removed and safe access to upper floors
    • Check the welfare facilities — toilets, washing with hot and cold or warm running water, soap and towels, drinking water, somewhere to change and dry clothes, and a rest area to sit, eat and boil water, all kept clean
    • Check housekeeping in work areas — waste cleared as the work goes, no materials or cables across routes, no timber with projecting nails left about, and packaging and offcuts bagged or skipped
    • Check material storage, skips and laydown areas — materials stacked stable and level, kept back from edges and excavations, scaffolds not loaded beyond what they can carry, skips not overfilled, and waste removed regularly
  3. Phase 3

    Phase 3: Work at Height

    6 tasks

    Falls are one of the four hazards OSHA’s Construction Focus Four training is built around, with struck-by, caught-in or -between and electrocution. Check every open edge and every scaffold, tower and ladder in use, not only those on your route.

    • Check edge protection at every open edge — floor edges, stairwells, roofs and scaffold platforms with double guardrails and toe boards, or other suitable protection, in place and secure
    • Check holes and openings are covered or guarded — covers fixed in place, strong enough for what may cross them and clearly marked, or the opening protected by a barrier
    • Check each scaffold’s tag and inspection record — every scaffold in use has been inspected by a competent person within the required interval and after any alteration, damage or severe weather, with a current tag and a written record
    • Check scaffold condition and loading — base plates and sole boards, ties and bracing, guardrails, toe boards and brick guards in place, platforms fully boarded, materials spread evenly, and incomplete sections barriered and signed
    • Check ladders and stepladders in use — used only where the risk assessment says a ladder is right for the job, in good condition, on a firm base, secured against slipping and rising far enough above the landing
    • Check mobile towers and MEWPs — towers built to the manufacturer’s instructions on firm, level ground with castors locked, stabilisers fitted where required and guardrails complete; MEWPs used by trained operators with secure guardrails
  4. Phase 4

    Phase 4: Excavations, Plant & Lifting

    7 tasks

    Excavations, vehicles and lifts change hour by hour. Check the ones working now, and that each has the inspection record the rules require.

    • Check each excavation is supported and inspected — sides supported, or battered back to a safe angle, and inspected by a competent person before anyone works in it, with the record on site
    • Check excavation edges, access and nearby loads — barriers to stop people and vehicles falling in, spoil, materials and plant kept back from the edge, a secured ladder or other safe way in and out, and buried services located and marked
    • Check traffic routes and vehicle and pedestrian segregation — planned vehicle routes, barriers between vehicles and people, marked crossing points, separate pedestrian gates beside vehicle gates, and nothing parked or stacked on routes
    • Check reversing and the use of signallers — reversing avoided with a one-way system or turning area where possible and, where it is not, trained signallers working from a safe position, with reversing alarms or cameras working
    • Check plant condition, operators and daily checks — each machine’s daily pre-use check recorded, lights, brakes, alarms and guards working, and every operator trained and competent for the machine they are using
    • Check lifting operations are planned and supervised — each lift planned by a competent person, a supervisor in charge, a trained slinger or signaller, the crane on firm, level ground with outriggers set, and nobody under a suspended load
    • Check lifting equipment examination and inspection records — current reports of thorough examination for cranes, hoists, telehandlers and lifting accessories, and the inspections made between examinations
  5. Phase 5

    Phase 5: Electrical Safety, Fire & Hot Work

    5 tasks

    Leads and tools on a building site face harsh conditions and rough use, so check them where they are being used. Then check the fire points, the flammable stores and any hot work under way.

    • Check the temporary electrical supply — distribution boards closed and protected from damage, cordless or reduced low voltage tools wherever possible, and residual current protection on any mains voltage supply
    • Check cables, leads, portable tools and services — leads run where they will not be damaged or protected in conduit, no damaged plugs or insulation, tools checked by users and regularly inspected and tested, and overhead lines and buried services marked and guarded
    • Check fire points, extinguishers and the alarm — extinguishers in place, in date, easy to reach and signed, and the alarm, or another means of raising it, working and heard across the site
    • Check flammable materials and gas cylinder storage — the smallest practical quantities kept on site, in ventilated, secure stores or an outdoor area away from escape routes and occupied areas, with cylinder valves closed and cylinders returned to the store at the end of the shift
    • Check any hot work under way — a hot work permit where the site requires one, combustibles moved or covered, an extinguisher to hand, a fire watch during and after the work, and hot work stopped well before the site closes
  6. Phase 6

    Phase 6: Health Risks, PPE, Permits & Emergencies

    8 tasks

    Dust, noise and vibration do not show as injuries on the day, so look at how the work is being done. Then check the permits in force and that everyone could get out and get help.

    • Check hazardous substances in use — each one assessed with its safety data sheet to hand, containers labelled and stored safely, contact with wet cement prevented, and any suspected asbestos checked to see whether a licensed contractor is needed
    • Check dust control on cutting, drilling and grinding — water suppression or on-tool extraction in use, the right respiratory protection fitted and worn, and dust cleaned up without dry sweeping
    • Check the written silica exposure control plan — shown for the United States: it describes each silica task and its controls, housekeeping and access restrictions, a competent person makes frequent and regular inspections against it, and it has been reviewed within the year
    • Check noise and vibration controls — quieter methods and plant chosen where possible, hearing protection zones marked and protection worn, people not doing the work kept away, and vibrating tools maintained with use limited
    • Check PPE is worn and in good condition — head protection, high-visibility clothing, safety footwear, gloves and eye protection to the site rules, plus the PPE each task needs, worn properly and replaced when damaged
    • Check the permits in use — each live permit displayed at the work, matching the job being done, with its precautions in place, and finished permits handed back and closed
    • Check emergency routes, the alarm and the assembly point — escape routes clear, signed and lit where needed, leading to a known assembly point, with the emergency procedures posted and known to the people on site
    • Check first aid provision — trained first aiders on site and named on the notice board, kits stocked, the accident book in use, and emergency numbers and the route to hospital posted
  7. Phase 7

    Phase 7: Findings & Stop Work

    6 tasks

    Record every finding before you leave site, with one of three priorities: stop work now, within 24 hours or within a week. A stop work now finding shows three extra tasks to stop the work, make the area safe and tell the people in control.

    • Record each finding with its priority and owner — what was found, where, the priority (stop work now, within 24 hours or within a week), the person who will fix it and the date it is due
    • Stop the affected work and move people clear — shown for a stop work now finding: tell the people exposed what the danger is and move them to a place of safety, and do not let anyone return while the danger remains
    • Make the area safe and keep people out — barriers, covers and signs at the area, and unsafe equipment tagged, locked off or removed so that nobody can use it
    • Tell the site manager and the contractor in control at once — what was found, what has been stopped, who is affected and what has to happen before the work can restart
    • Brief the supervisors on their actions — go through each finding with the supervisor or subcontractor whose work it is before leaving site, and agree the fix and the date
    • Issue the inspection report — the findings, photos, owners and due dates sent to the site manager on the day, with copies to each contractor who has an action
  8. Phase 8

    Phase 8: Acknowledgement & Close-Out

    6 tasks

    The site manager accepts the findings and the actions before close-out starts, and nothing after the acknowledgement can be completed until it is given. The inspector then checks each fix on site before the run is closed.

    • Site manager acknowledges the findings and the actions — accepts each finding, its priority, owner and due date, or records any change and the reason
    • Confirm the stop work item is fixed before work restarts — a competent person checks the fix on site, and the record shows who agreed the restart and when
    • Close the actions due within 24 hours — each one fixed, with a note or photo of the fix, or escalated to the contractor’s management if it cannot be done in time
    • Close the actions due within a week — each one fixed before the next inspection, with a note or photo, and any that cannot be closed given a new date and a reason
    • Verify each fix on site — walk back to every finding, confirm it is fixed and record any that are not as open actions for the next inspection
    • Close the inspection and set the next one — carry every open action into the next inspection, file the report with this run, and set the next inspection date

What Has to Be Inspected, and How Often

A weekly site inspection is good practice rather than a rule with a number on it. Neither CDM 2015 nor 29 CFR 1926.20 sets a frequency for inspecting the site as a whole. What both sets of rules do contain are inspection rules for particular equipment and places, and the site inspection is where you check those rules are being followed. The table shows the main ones from the regulations themselves. It is a summary to plan from, not legal advice.

What Great Britain United States
The site as a wholeNo set frequency. The principal contractor must plan, manage and monitor the construction phase (CDM 2015, reg 13(1)), and HSE’s guidance L153 says standards should be checked regularly because sites change quickly.Frequent and regular inspections of the job sites, materials and equipment by competent persons the employer designates (29 CFR 1926.20(b)(2)).
Scaffolds and working platformsInspected after assembly, and within the previous 7 days for a construction platform with a fall of 2 metres or more, and after exceptional circumstances; a written report the same working period (Work at Height Regulations 2005, reg 12).Inspected for visible defects by a competent person before each work shift and after any occurrence that could affect structural integrity (1926.451(f)(3)).
LaddersA pre-use check by the user before each task and after anything changes (HSE guidance).Inspected by a competent person periodically and after any occurrence that could affect safe use (1926.1053(b)(15)).
ExcavationsWhere supports or battering are provided: at the start of each shift, after any event affecting stability and after any fall of material (CDM 2015, reg 22(4)).Daily before work starts, as needed through the shift, and after every rainstorm or other hazard-increasing occurrence (1926.651(k)(1)).
Lifting equipmentThorough examination at least every 6 months for equipment lifting people and lifting accessories, every 12 months for other equipment, or under an examination scheme, and after assembly at a new site where its safety depends on how it is installed (LOLER 1998, reg 9).Cranes: a visual inspection by a competent person before each shift, and an inspection by a qualified person at least every 12 months (1926.1412(d) and (f)).
Temporary electricsHSE recommends cordless or 110V reduced low voltage tools; on mains voltage, RCDs of no more than 30 mA, tested daily with the test button (HSG150).GFCIs on temporary 120-volt 15 and 20 A outlets, or an assured equipment grounding conductor program with daily visual checks and tests at least every 3 months (1926.404(b)(1)).

Reports and records. In Great Britain, the inspector of a construction working platform from which a person could fall 2 metres or more writes a report before the end of the working period and provides it within 24 hours, and it is kept on site until the work is finished and then at an office for 3 months. An excavation inspector who is not satisfied the work can be done safely tells the person the inspection was for before the end of the shift and gives them a report within 24 hours, and no work is done there until the matter is put right.

Who applies. CDM 2015 applies in Great Britain; Northern Ireland has its own CDM Regulations (2016). Where a state has no OSHA-approved State Plan, federal OSHA covers most private-sector workers; State Plans run their own programs, which must be at least as effective as OSHA’s.

Why Run Site Safety Inspections in CheckFlow?

1

The same inspection every week, on time

Every inspection follows the same eight phases in the same order, whoever walks the site. Set a recurring schedule and the next inspection starts on its day, with due dates counted from its inspection date and the open actions from last week carried in.

2

Findings the site manager has accepted

The site manager is named on the first task, and the acknowledgement is assigned to them alone. Until they record a decision the close-out cannot be completed, so every action has an owner who has agreed to it. A stop work finding adds the steps to stop the work, make the area safe and confirm the fix before restart.

3

Fixes that are checked, not assumed

Actions due within 24 hours and within a week each get a due date and a place for the photo of the fix, and the inspector verifies them on site before the run closes. The Reports Grid shows every inspection across your sites and the task each has reached, updating as tasks are completed.

CheckFlow does not inspect the site or decide what is safe. Those judgements belong to your competent person. It runs the inspection around them, so each one covers the same ground, every finding has an owner and a date, and the record shows who checked what and when.

This template inspects one site on one day. Brief every new arrival with the Construction Site Induction Checklist, plan a high-risk job with the Job Hazard Analysis (JHA) Checklist, control it with the Permit to Work Checklist, and audit the safety system behind it all with the Safety Audit Checklist.

AI generator

Didn’t find what you need? Describe it.

Describe the process in a sentence and the AI checklist generator drafts the phases and tasks for you.

Frequently Asked Questions

How often should a construction site be inspected?

No single frequency is set in law for the site as a whole. In Great Britain, CDM 2015 requires the principal contractor to plan, manage and monitor the construction phase, and HSE’s guidance says standards should be checked regularly because sites change so quickly. In the US, 29 CFR 1926.20(b)(2) requires frequent and regular inspections by competent persons. Particular equipment has its own rules: a construction working platform with a fall of 2 metres or more within every 7 days in Great Britain, and scaffolds before each shift in the US. Inspect again after severe weather, an incident or a major change in the work.

Who should carry out a site safety inspection?

A competent person: someone with the training, knowledge and experience to recognise the hazards of the work and the authority to get them dealt with. OSHA defines a competent person as one who can identify existing and predictable hazards and has authorization to take prompt corrective measures to eliminate them. In practice it is often the site manager, a health and safety adviser or the contractor’s safety lead. The statutory inspections of scaffolds, excavations and lifting equipment need a competent person for that equipment, who may be someone else.

What should a construction site safety inspection checklist include?

The site set-up and welfare, housekeeping and storage, work at height including edge protection, scaffolds, ladders and towers, excavations, traffic routes and plant, lifting operations, temporary electrics, fire precautions and hot work, hazardous substances and dust, noise and vibration, PPE, the permits in use, and emergency and first aid arrangements. It should also check that the statutory inspection records are current, and end with findings that each have a priority, an owner and a due date, followed by a check that each fix was made.

How often do scaffolds need to be inspected?

In Great Britain, the Work at Height Regulations 2005 require a working platform used for construction work, from which a person could fall 2 metres or more, to be inspected after it is assembled and within the previous 7 days before use, and after exceptional circumstances such as damage. The inspector writes a report before the end of the working period. In the US, 1926.451(f)(3) requires a competent person to inspect scaffolds for visible defects before each work shift and after any occurrence that could affect their structural integrity.

What is the difference between a site inspection and a safety audit?

A site inspection looks at physical conditions and working practices on one site on one day: the edges, the trenches, the plant and the welfare. A safety audit examines the management system behind them, such as the policies, risk assessments, training records and how findings are followed up, and is done less often. The two support each other: an audit checks that inspections happen and that their findings get closed. CheckFlow’s Safety Audit Checklist covers the audit.

What should happen when an inspection finds a serious danger?

Stop the work, move people to a safe place and keep them out until the danger is removed. In Great Britain, the Management of Health and Safety at Work Regulations 1999 require procedures that let people stop work and go to a place of safety in serious and imminent danger, and prevent them returning while it remains. Under OSHA’s construction standards, unsafe equipment is tagged or has its controls locked, or is removed, and employees are removed from an excavation that shows signs of collapse. Tell the site manager and the contractor in control at once.

Is CheckFlow free for this template?

14-day free trial, no card required. The Business plan is $10 per user per month after the trial. Full details at checkflow.io/pricing.

Run Every Site Inspection the Same Way, and Close Every Finding

Free trial — no credit card required.

14-day free trial, no credit cardFull refund in your first 30 daysUS or EU hosting