Regression Testing Checklist Template

Most regressions are not missed because nobody tested. They are missed because the suite ran against the wrong build, a red test was waved through as flaky, or nobody checked what the change actually touched.

Last reviewed: October 2026

This free regression testing checklist runs one regression cycle before a release or after a significant change. QA leads, test engineers and development teams use it to decide what to retest and to show that they did. A cycle starts with change impact analysis: list what changed, map it to the areas it touches and rate each area for risk. You then choose the regression scope, Full, Risk-based or Smoke, and only the automated run for that scope appears. The checklist confirms the release candidate, environment and test data match production, runs the automated suite, separates flaky tests from real failures, covers the areas without automation by hand, and logs and retests every defect. Exit criteria are set before testing starts. If they are not met, re-run steps appear before the QA lead records the sign-off, and the cycle ends by adding tests for the defects that got through.

Regression Testing Asks One Question: What Did the Change Break?

Testing a release asks two different questions. Does the new work do what it should? And did the change break anything that used to work? The first is functional and confirmation testing, which the QA Testing Checklist covers from test plan to sign-off. The second is regression testing, and it is the one teams repeat for every release, usually with the least time to spare.

Because it repeats, a regression cycle needs its own short routine: decide the scope from what changed, run the same suites against a build that matches production, and keep the suite honest by quarantining flaky tests and adding a test for every defect that got through. The release decision sits with the Feature Release Process Checklist, and the deploy with the Production Deployment & Rollback Checklist.

New feature testing

Does the new work do what it should?

Covers: test cases written from the specification, functional, edge case and acceptance testing of the change itself.

When: once per feature, as part of the full test lifecycle.

Output: evidence that each requirement was met.
Regression cycle

This checklist: did the change break anything?

Covers: impact analysis, scope, environment parity, automated and manual regression, defects and retest, exit criteria.

When: every release candidate, hotfix or significant change.

Output: a signed-off regression summary and a better suite for next time.

Release and deploy

Should it ship, and how?

Covers: go/no-go, release notes, the deployment strategy, smoke tests in production and rollback.

When: after the QA sign-off.

Output: a release in production with a rollback plan.

What the Regression Testing Checklist Covers

Eight phases take one release candidate from change impact analysis to suite maintenance. The scope chosen in Phase 2 decides which automated run appears in Phase 4, re-run steps appear in Phase 7 when the exit criteria are not met, and the QA sign-off halts the checklist until it is recorded.

  1. Phase 1

    Phase 1: Change Impact Analysis

    5 tasks

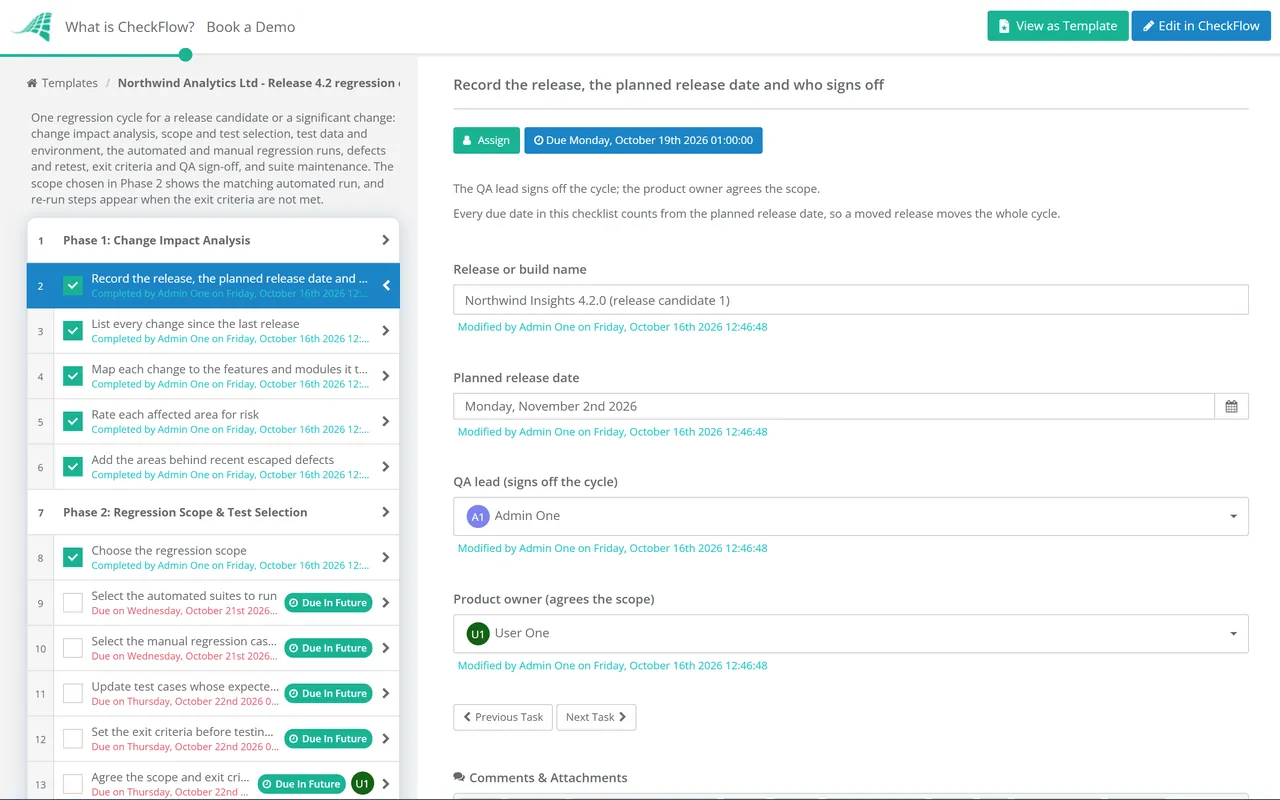
    Regression scope starts from what changed, not from the size of the suite. The release, its planned date and the people who sign off are recorded on the first task.

    • Record the release, the planned release date and who signs off — the QA lead signs off the cycle; the product owner agrees the scope
    • List every change since the last release — merged pull requests, tickets, configuration changes, dependency upgrades and database migrations
    • Map each change to the features and modules it touches — including shared libraries, APIs, background jobs and the data it reads or writes
    • Rate each affected area for risk — how likely it is to break and how much harm a failure would do; sign-in, payments and data integrity rate high
    • Add the areas behind recent escaped defects — bugs found in production since the last cycle show where the suite is thin
  2. Phase 2

    Phase 2: Regression Scope & Test Selection

    6 tasks

    The scope chosen on the first task decides which automated run appears in Phase 4. The product owner agrees the scope and the exit criteria on the last task.

    • Choose the regression scope — Full, Risk-based or Smoke, from the risk ratings and the time left before release
    • Select the automated suites to run — by suite or tag, so the run matches the scope
    • Select the manual regression cases — for affected areas and journeys with no automated coverage
    • Update test cases whose expected result changed on purpose — so an intended change is not logged as a regression
    • Set the exit criteria before testing starts — pass rate, open defects by severity and the journeys that must pass
    • Agree the scope and exit criteria with the product owner — written down, so a late cut is a decision rather than an accident
  3. Phase 3

    Phase 3: Test Data & Environment

    5 tasks

    A regression run only means something if it tests the build that will ship, in an environment and with data that behave like production.

    • Deploy the release candidate to the test environment — the same build that will go to production, identified by its version or build number
    • Check the environment matches production — runtime and database versions, configuration, feature flags and third-party integrations; list any differences
    • Reset the test data to a known state — masked or synthetic data, never raw production personal data
    • Set feature flags as they will be at release — and test both states of any flag due to be switched on soon after
    • Run a build check before the full regression — sign-in and the main transaction; a broken build stops here, not three hours into the run
  4. Phase 4

    Phase 4: Automated Regression Run

    7 tasks

    Only the run for the scope chosen in Phase 2 appears. Every result is recorded against the build under test.

    • Full: run the complete automated regression suite — every suite, on every browser, device or platform in the release’s support matrix
    • Risk-based: run the suites for the affected areas and the critical paths — as selected in Phase 2, plus the suites that cover sign-in and payments
    • Smoke: run the smoke suite on the critical journeys — for hotfixes and low-risk changes only; record why a smaller scope is enough
    • Record the results by suite — passed, failed and skipped, the run time and a link to the CI run
    • Re-run each failure once to separate flaky tests from real failures — a test that passes and fails on the same code is flaky; one that fails every time is a real failure
    • Quarantine flaky tests with an owner and a fix date — out of the gating run but tracked, never just ignored
    • Investigate every consistent failure — product defect, test defect or environment problem; product defects are logged in Phase 6
  5. Phase 5

    Phase 5: Manual Regression

    5 tasks

    Manual regression covers what the suite cannot: areas with no automation, end-to-end journeys and real integrations. In a Smoke cycle, cover the critical journeys and mark the other tasks not applicable.

    • Run the manual cases for areas without automation — following the steps and recording pass or fail for each case
    • Walk the critical user journeys end to end — sign-up, sign-in, the main transaction, billing and data export
    • Check the integrations the release touches — APIs, webhooks, imports and third-party services, with real round trips
    • Check changed screens on the supported browsers and devices — including keyboard use and screen reader labels
    • Run time-boxed exploratory sessions on the highest-risk areas — with notes of what was covered and what was found
  6. Phase 6

    Phase 6: Defects & Retest

    5 tasks

    Every regression is logged against the build it was found in, fixed or deferred by a decision, and retested before it counts as closed.

    • Log each regression with the build and steps to reproduce — expected and actual result, logs or screenshots, and the last build where it passed
    • Triage by severity and decide fix or defer — regressions that meet your blocking threshold stop the release; deferrals are agreed with the product owner
    • Confirm each fix on a new build — retest with the original steps before closing the defect
    • Re-run the regression tests around each fix — a fix in shared code can break something else
    • Track open defects against the exit criteria — open by severity, fixed, deferred and retested
  7. Phase 7

    Phase 7: Exit Criteria & QA Sign-Off

    5 tasks

    Re-run steps appear when the exit criteria are not met. The QA lead records the decision on the last task, and the checklist halts there until they do.

    • Assess the results against the exit criteria — Met or Not met, using the criteria set in Phase 2
    • Agree which failures must be fixed before release — with the product owner and development lead; anything deferred is a named decision
    • Re-run the failed and affected tests on the fixed build — then record whether the exit criteria are now met
    • Write the regression summary — scope, what ran, pass rate, defects by severity, known issues and the risk that remains
    • Record the QA sign-off — Approved, Approved with known issues or Not approved, with the reason
  8. Phase 8

    Phase 8: Results & Suite Maintenance

    6 tasks

    The cycle ends by improving the suite for the next one. Every defect that got past the automated run is a test the suite is missing.

    • Share the summary with the release manager and support — known issues go into the release notes and the support team’s briefing
    • Add automated tests for defects that got through — defects found by hand in this cycle and production bugs from the last release
    • Fix or delete quarantined tests past their fix date — a quarantine list that only grows is a suite nobody trusts
    • Retire tests for removed features and duplicates — so the suite gets faster, not just bigger
    • Record the cycle’s metrics — run time, flaky rate, defects found and defects that escaped, to size the next scope
    • Archive the evidence with the release — CI runs, results, the defect list and the sign-off

Full, Risk-Based or Smoke: Choosing the Regression Scope

Scope is a trade between time and risk. Running everything every time is the safest option and the slowest, and on a large suite it tempts teams to skip runs altogether. Choose the scope from the impact analysis in Phase 1, write the reason down, and widen it when a change turns out to touch shared code you did not expect.

Scope Use it when What runs What you accept
FullMajor releases, framework or platform upgrades, changes to shared code or the data model, or when the impact analysis is uncertainEvery automated suite on the full support matrix, plus the full manual packThe longest cycle; worth it when you cannot say what the change touched
Risk-basedRegular releases where the changes and the areas they touch are knownSuites and manual cases for the affected and high-risk areas, plus the critical paths every timeUntouched, low-risk areas are not retested this cycle
SmokeHotfixes and small, isolated changes under time pressureThe smoke suite on the critical journeys, plus targeted tests around the fixThe most risk; follow it with a wider run in the next cycle

Flaky tests are the quickest way to lose trust in a regression suite. Google defines a flaky test result as a test that shows both a passing and a failing result with the same code. In 2016 it reported that about 1.5% of all its test runs gave a flaky result and that almost 16% of its tests showed some flakiness. At that rate, Google noted, a project with about 1,000 tests would likely see 15 flaky failures on every release run. People start to dismiss red results, and a real regression gets dismissed with them. Martin Fowler recommends moving non-deterministic tests into a quarantine, out of the main pipeline, with a limit on how many tests it holds or how long a test can stay there. Phase 4 follows that pattern: one re-run to classify each failure, then quarantine with an owner and a fix date.

Why Run Regression Testing in CheckFlow?

1

The scope decision is on record

The impact analysis, the risk ratings and the chosen scope sit in the first two phases, with the product owner’s agreement recorded against them. When a regression reaches production, you can see what was tested, what was left out and who agreed to it.

2

Sign-off waits for the evidence

Exit criteria are set before testing starts. If they are not met, the fix and re-run steps appear. The QA lead’s sign-off is an approval step only they can complete, and it halts the checklist, so the follow-up tasks wait until the decision is recorded.

3

Every release runs the same cycle

Start a checklist for each release candidate, or put it on a recurring schedule for a fixed release train. Due dates count back from the planned release date, and the Reports Grid shows which cycles are falling behind before release day.

Due dates count back from the planned release date entered on the first task, so moving the release moves the whole cycle. CheckFlow’s recurring checklist software can open a new cycle on the same day of every sprint.

Regression testing is one part of shipping safely. The QA Testing Checklist covers the full test lifecycle for new work, the Code Review Checklist catches problems before they merge, the Feature Release Process Checklist holds the go/no-go, and the Production Deployment & Rollback Checklist runs the deploy. Defects found during the cycle can be worked through the Bug Tracking & Resolution Checklist.

AI generator

Didn’t find what you need? Describe it.

Describe the process in a sentence and the AI checklist generator drafts the phases and tasks for you.

Frequently Asked Questions

What should a regression testing checklist include?

One regression cycle has eight parts: change impact analysis (what changed and what it touches, rated for risk), the scope and test selection with exit criteria set in advance, an environment and test data that match production, the automated run with flaky tests separated from real failures, manual regression for areas without automation, defect logging and retest, a QA sign-off against the exit criteria, and suite maintenance afterwards. The last part is the one most often skipped: every defect that got through should become a new test.

What is the difference between regression testing and retesting?

Confirmation testing, often called retesting, is done after a defect is fixed to confirm that the failure it caused does not come back. Regression testing checks everything else. The ISTQB glossary defines it as change-related testing to detect whether defects have been introduced or uncovered in unchanged areas of the software. A cycle needs both: Phase 6 confirms each fix with the original steps, then re-runs the tests around it, because a fix in shared code can break something that was working.

How do you decide which tests to include in a regression run?

Start from the change, not from the suite. List what changed since the last release, map each change to the features and modules it touches, including through shared code, and rate each area by how likely it is to break and how much harm a failure would do. Add the areas where defects reached production recently. High-risk areas and the critical user journeys go into every run; lower-risk areas are added as time allows. Write the reason for the scope down so it can be checked if something slips through.

When should you run a full regression instead of a smoke test?

Run a full regression when you cannot say with confidence what a change touched: major releases, framework or platform upgrades, changes to shared libraries or the data model, and the first release after a long gap. A risk-based run suits regular releases where the impact analysis is clear. Keep smoke-only runs for hotfixes and small, isolated changes under time pressure, and follow them with a wider run in the next cycle so the areas you skipped are not skipped twice.

How should flaky tests be handled in regression testing?

Separate them from real failures, then quarantine them. Google defines a flaky result as a test that both passes and fails with the same code, and reported in 2016 that almost 16% of its tests showed some flakiness. Re-run a failing test once: if it passes, it is flaky; if it fails again, treat it as a real failure until it is explained. Martin Fowler recommends moving flaky tests out of the main pipeline into a quarantine with a limit on its size or on how long a test can stay, so each one gets an owner and a fix.

Should regression testing be automated?

Mostly, because the same checks run every release and a manual pack grows with every feature. Automate stable, repeated checks of business rules, APIs and critical journeys. Keep people for what automation does poorly: areas with no automation yet, exploratory testing of the highest-risk changes, visual and usability checks, and real round trips through third-party integrations. Automation needs upkeep too. Retire tests for removed features, fix or delete quarantined tests, and add a test for every defect that got past the suite.

How is this different from the QA testing checklist?

The QA Testing Checklist covers the full test lifecycle for new work: test planning, writing test cases from the specification, setting up environments, every test type, defect management and sign-off. This checklist is the part you repeat for every release candidate: deciding what to retest from what changed, running the regression suites against the build that will ship, and keeping the suite trustworthy. Many teams run the QA testing checklist once per feature and this one once per release.

Is CheckFlow free for this template?

14-day free trial, no card required. The Business plan is $10 per user per month after the trial. Full details at checkflow.io/pricing.

Run Every Regression Cycle the Same Way, Release After Release

Free trial — no credit card required.

14-day free trial, no credit cardFull refund in your first 30 daysUS or EU hosting