
Start the relationship with a seller
Covers: the first consultation, the listing appointment, the client’s paperwork and expectations, and the buyer track if they are buying too.
Run it with: the Real Estate Client Onboarding Checklist.
Last reviewed: October 2026
No Credit Card Required
Taking on a new listing is a short project with fixed rules. Between the valuation and the day the listing goes live, a listing agent or estate agent has to recommend a price, put the fees and terms in writing, check who owns the property and verify their identity, collect the information and certificates buyers are entitled to, produce photos and a description the seller has checked, and get the seller’s approval. This free new listing checklist covers one listing from the valuation appointment to the seller’s first-week report. Two answers on the first task change what appears: where the property is, which brings in the UK agency terms and money laundering checks, the EPC for England and Wales, or the US state disclosure, fair housing and lead-based paint tasks; and how it is owned, which adds the lease or association details. Nothing after the seller’s approval of the listing details and price can be completed until it is recorded.
A new listing sits between two other jobs. Before it, the Real Estate Client Onboarding Checklist onboards the client: its seller track covers the first consultation, the listing appointment and the client paperwork, as one part of a relationship that may also include buying. After it, the Real Estate Transaction Checklist runs the whole file from listing to close, including offers, the contract and completion. This checklist is the listing itself: the work between a seller saying yes and the listing being live, checked and reported on.
It is written for the agent who takes the instruction, with the office behind them: an administrator for photos, portals and the board, a negotiator for viewings, and a branch manager or managing broker who checks the file before the seller signs it off.
Covers: the first consultation, the listing appointment, the client’s paperwork and expectations, and the buyer track if they are buying too.
Run it with: the Real Estate Client Onboarding Checklist.
Covers: the price recommendation, identity and ownership checks, agency terms, property information and certificates, photos and description, the seller’s approval, go-live, viewings and the first-week report.
Run it with: this checklist.
Covers: offers, the buyer’s checks, the contract or memorandum of sale, and progress to completion or closing.
Run it with: the Real Estate Transaction Checklist, and an open house if the seller wants one.
Nine phases take one new listing from the valuation to the seller’s first-week report. Where the property is decides the identity checks, agency terms, certificate and disclosure tasks: England and Wales, Scotland and Northern Ireland, the United States or another country. Nothing after the seller’s approval of the listing details and price can be completed until it is recorded.
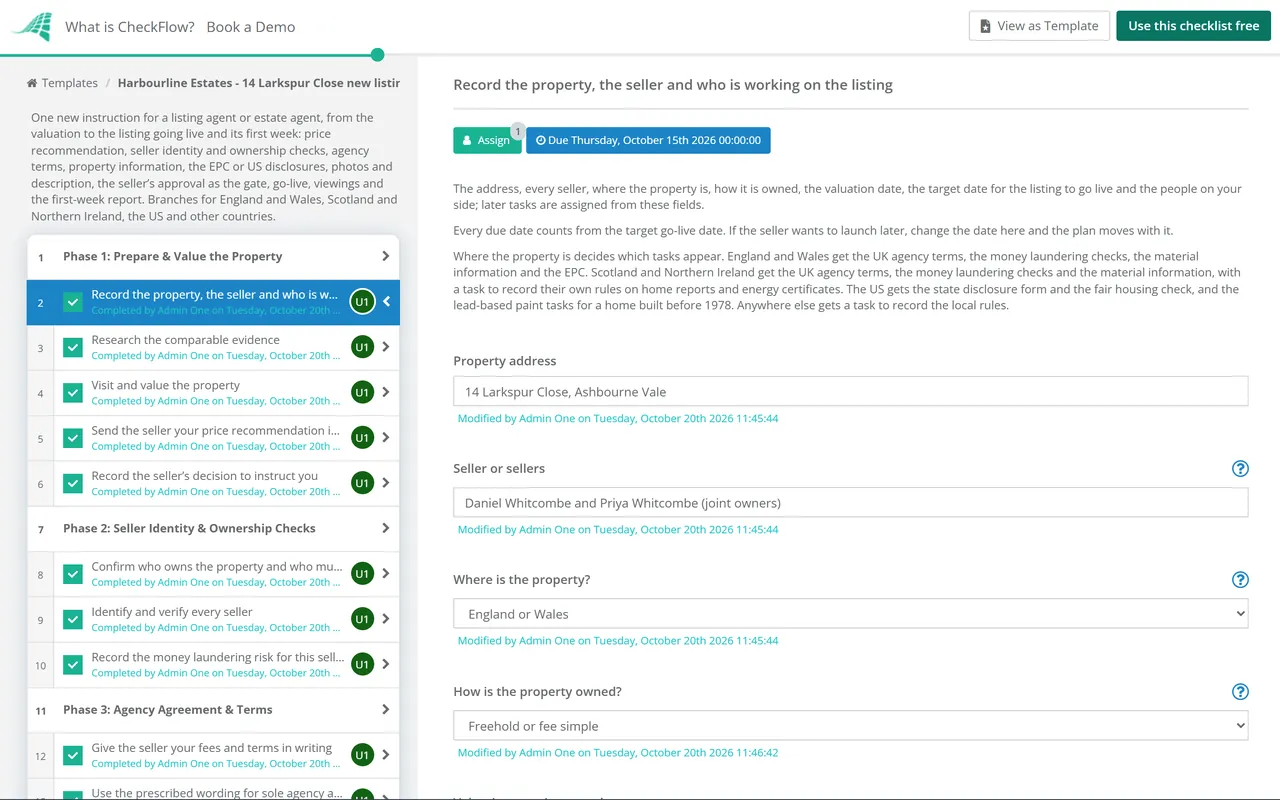
The first task sets every due date from the target go-live date and decides which tasks appear: where the property is, how it is owned and, in the US, whether the home was built before 1978.
Check ownership first, so you know who has to be identified and who has to sign. In the UK the seller’s identity is verified before the business relationship starts, which HMRC says is usually when the property is marketed and no later than when there are contractual liabilities.
The seller needs your fees and terms in writing before they agree to anything. In the UK, section 18 of the Estate Agents Act 1979 requires it. In the US, use the listing agreement your state and brokerage require.
Collect what a buyer needs to know before the listing is written. Where the property is and how it is owned decide which certificate, form and disclosure tasks appear.
Describe the property, not the kind of buyer you want. Every fact in the listing should be one the seller has confirmed or you have checked.
Nothing goes live until the seller has approved the listing details and the asking price. The approval task stops the rest of the checklist until it is done, and a seller who does not approve hides the go-live tasks.
Publish the approved version and check it as a buyer will see it, on every site it appears on.
Book viewings quickly, record every one and pass feedback to the seller as it comes in. Offers go to the transaction file, not here.
Report to the seller after the first full week, using the numbers and buyers’ own words, and agree what happens next.
Most of what a listing agent must do before a property goes on the market comes from a handful of rules. The table lists the ones this template is built on, where they apply and which phase covers them. It is a summary, not legal advice: read the source, and your own regulator’s or brokerage’s guidance, for the detail.
| Rule | Where | What it means for a new listing | Phase |
|---|---|---|---|
| Estate Agents Act 1979, section 18 | UK | Before the seller enters the agreement, tell them in writing when they become liable to pay, the fee or how it is calculated, and any other payments. Without it the agent cannot enforce the contract except by court order. | 3 |
| Estate Agents (Provision of Information) Regulations 1991 | UK | The terms go in writing when communication starts or as soon as reasonably practicable after, before the seller is committed. Services offered to buyers are disclosed. Sole agency, sole selling rights and “ready, willing and able” purchaser are explained in the prescribed wording. | 3 |
| Money Laundering Regulations 2017, regulations 27, 28 and 30 | UK | Identify and verify the seller, any beneficial owner and anyone acting for them, before the business relationship starts. The buyer is checked when their offer is accepted (regulation 4(3)). | 2 |
| Energy Performance of Buildings (England and Wales) Regulations 2012, regulations 6, 7 and 11 | England and Wales | Commission an EPC before marketing and obtain it within seven days (or the next 21, after all reasonable efforts). Give it free to buyers by the time they get written details or view. State the rating in commercial media adverts. | 4 |
| Digital Markets, Competition and Consumers Act 2024, sections 225 to 227 | UK, from 6 April 2025 | Unfair commercial practices, including misleading actions and misleading omissions of material information, are prohibited. It replaced the Consumer Protection from Unfair Trading Regulations 2008. | 4 and 5 |
| 40 CFR 745, subpart F, and 24 CFR 35, subpart A | US, homes built before 1978 | The seller gives the EPA pamphlet, discloses known lead-based paint and hazards with records, and allows a 10-day inspection opportunity before the buyer is bound. The agent tells the seller of these duties and makes sure they are met. Copies are kept for three years. | 4 |
| 24 CFR 100.75 | US | No advert, notice or statement may indicate a preference, limitation or discrimination because of race, colour, religion, sex, disability, familial status or national origin. That includes flyers, signs and where you choose to advertise. | 5 |
| State seller disclosure laws | US | Which form the seller completes, and what it covers, varies by state. | 4 |
| MLS rules | US | Each MLS sets its own rules on when a listing is entered and what it contains. They are the MLS’s rules, not law. | 7 |
Scotland and Northern Ireland. The Estate Agents Act and the Money Laundering Regulations apply across the UK, but the documents a seller needs before marketing are not the same as in England and Wales. Scotland has its own home report, and the energy certificate rules above are for England and Wales. The template adds a task to record what applies before the listing goes live.
Material information in UK listings. A misleading omission includes leaving out information the average buyer needs to take an informed decision, or giving it in a way that is unclear, untimely or unlikely to be seen. The National Trading Standards Estate and Letting Agency Team’s Part A guidance, published in July 2022, named the price, the council tax band (or rates in Northern Ireland) and the tenure as material for every property. Check the team’s current guidance for anything added since.
Identity checks come before the agreement. HMRC’s guidance for estate agency businesses says the business relationship with a seller usually starts when the property is marketed, and no later than when there are contractual liabilities. Verification has to be finished by then. It can be completed while the relationship is being set up only when the risk is low and stopping would interrupt normal business, and HMRC expects that to be rare. That is why Phase 2 comes before the agreement is signed.
Enter the target go-live date on the first task and every due date follows: the checks, terms and certificates count back from it, and viewings and the first-week report count forward. If the seller wants to launch a week later, the checklist moves with them.
Where the property is decides the tasks. England and Wales get the UK agency terms, money laundering checks, material information and EPC. The US gets the state disclosure form and the fair housing check, and the lead-based paint tasks for a home built before 1978. Leasehold and condominium properties add the lease or association details. Conditional logic keeps the rest out of the way.
The branch manager checks the file, then the seller’s decision on the listing details and price is recorded on an approval step that stops the checklist until it is done. If the seller does not approve, the go-live tasks are hidden and a task to agree the next step appears instead.
A branch taking on several listings a week sees each one in the Reports Grid: which are waiting for identity checks, which are waiting for an EPC and which are ready for the seller. See how agencies and brokerages use CheckFlow on the real estate industry page.
The listing is one stage of a sale. The Real Estate Client Onboarding Checklist covers the first meetings with a seller, the Open House Checklist runs an open house once the listing is live, and the Real Estate Transaction Checklist takes over from the first offer to completion or closing.

Open House Checklist

Real Estate Transaction Checklist

Real Estate Client Onboarding Checklist

Purchase and Sales Agreement Process Checklist

Real Estate Agent Onboarding Checklist
Describe the process in a sentence and the AI checklist generator drafts the phases and tasks for you.
The valuation and a written price recommendation, checks on who owns the property and, in the UK, verification of the seller’s identity, the agency agreement with its fees and terms in writing, the property information and any certificate or disclosures, photos, a floor plan and a description the seller has checked, and the seller’s approval of the listing and price. Then the listing goes live, viewings are booked and the seller gets a report after the first week. This template covers all of that for one property.
In the UK, section 18 of the Estate Agents Act 1979 requires the agent to tell the client, before they enter the contract, when they will become liable to pay, the fee or how it is calculated, and any other payments and when they are due. The Estate Agents (Provision of Information) Regulations 1991 require that in writing, before the client is committed, along with any services the agent will offer buyers. Terms such as sole agency and sole selling rights must be explained in the wording the Regulations set out.
Yes, in the UK. Estate agents are covered by the Money Laundering Regulations 2017 and must identify and verify their customer, any beneficial owner and anyone acting for them. HMRC’s guidance says verification must be finished before the business relationship starts, which is usually when the property is marketed and no later than when there are contractual liabilities. If the checks cannot be completed, regulation 31 says the agent must not go ahead and must consider whether a disclosure is needed.
In England and Wales, the Energy Performance of Buildings Regulations 2012 require the seller to commission an EPC before the property is put on the market, and the agent must be satisfied that one has been commissioned before marketing it. The certificate must be obtained within seven days of the property going on the market, or within the following 21 days if that was not possible despite all reasonable efforts. Adverts in commercial media must state the energy rating. Some buildings are exempt.
For homes built before 1978, the seller must give the buyer the EPA pamphlet, disclose any known lead-based paint or hazards and any records, and allow a 10-day inspection opportunity before the buyer is bound, unless it is waived in writing. Under 40 CFR 745.115 the agent must tell the seller about these duties and make sure they are met. The disclosure is attached to the contract with signatures, and the seller and agents keep a copy for at least three years.
The Real Estate Client Onboarding Checklist is about the client: the first consultation, the agreement and the paperwork for a buyer or a seller, through to completion. This checklist is about the listing: the work between the seller instructing you and the property being live, checked and reported on. Many agents run both, onboarding the client once and running this checklist for the listing, then hand over to the Real Estate Transaction Checklist when an offer is accepted.
This template allows about two weeks from the valuation to go-live. That leaves time for the identity checks, the signed agreement, the property information and certificate, photos and a description the seller has checked, and the seller’s approval. The first-week report follows seven days after go-live. Change the offsets once in the template if your office works faster or slower, and every run uses them.
14-day free trial, no card required. The Business plan is $10 per user per month after the trial. Full details at checkflow.io/pricing.
14-day free trial, no credit cardFull refund in your first 30 daysUS hosting, EU on request