
IT Asset Disposal (ITAD) Checklist Template

Disposal fails quietly. A box of laptops leaves the building without a serial list, a drive that would not wipe ends up in the resale pile, and the certificate that arrives weeks later is filed without anyone checking it against what was sent.

IT asset disposal (ITAD) is the point where a laptop, phone, server, storage array or switch leaves your control for good. This free ITAD checklist is for IT operations teams and the security or data protection staff who have to prove that no data left with the hardware. It takes a disposal batch through quarantine and chain of custody, sanitisation matched to each media type under NIST SP 800-88, verification, vendor checks and the final route: reuse, resale, lease return or recycling. It ends with a serial-by-serial match of certificates against what you sent, and an updated asset register.

Use This Template Free See Live Example
No Credit Card Required

Retiring a Service vs Disposing of the Hardware

Three processes touch a device at the end of its life, and they are easy to blur. Server decommissioning retires a service: dependencies, final backup, DNS, monitoring, firewall rules and the change record. What it leaves behind is a box of hardware, and that box is the input to this checklist. IT asset management runs underneath both as the record of what you own, who holds it and what it costs. Disposal is where that record ends, with a date, a route and a certificate reference.

They fail differently. A decommissioning mistake causes an outage; a disposal mistake causes a data breach. Under UK GDPR the security principle and Article 32 apply until the data is gone, and the ICO’s data protection audit framework looks for a log of devices awaiting destruction, management sign-off before disposal, and a named person who checks destruction certificates against what was sent.

Server decommissioning

Retires a service and its configuration

Examples: dependency discovery, scream test, removing DNS records, monitoring and backup jobs.

Trigger: an approved change request.

Output: a closed change and a powered-off server.

Hands off: the hardware, to this checklist.
IT asset disposal

Removes the hardware and the data on it

Examples: custody log, sanitisation, certificates, vendor checks, recycling.

Trigger: an approved disposal batch.

Output: a certificate per device and a closed register record.

Hands off: register updates, to IT asset management.

What the IT Asset Disposal Checklist Covers

Seven phases take a batch from approval to a reconciled certificate. Sanitisation tasks appear only for the media types in the batch, and Phase 6 shows only the routes you selected.

Phase 1

Phase 1: Approve & Scope the Batch

Run one checklist per disposal batch, not per device. The batch list in the first task is the reference for every later check.

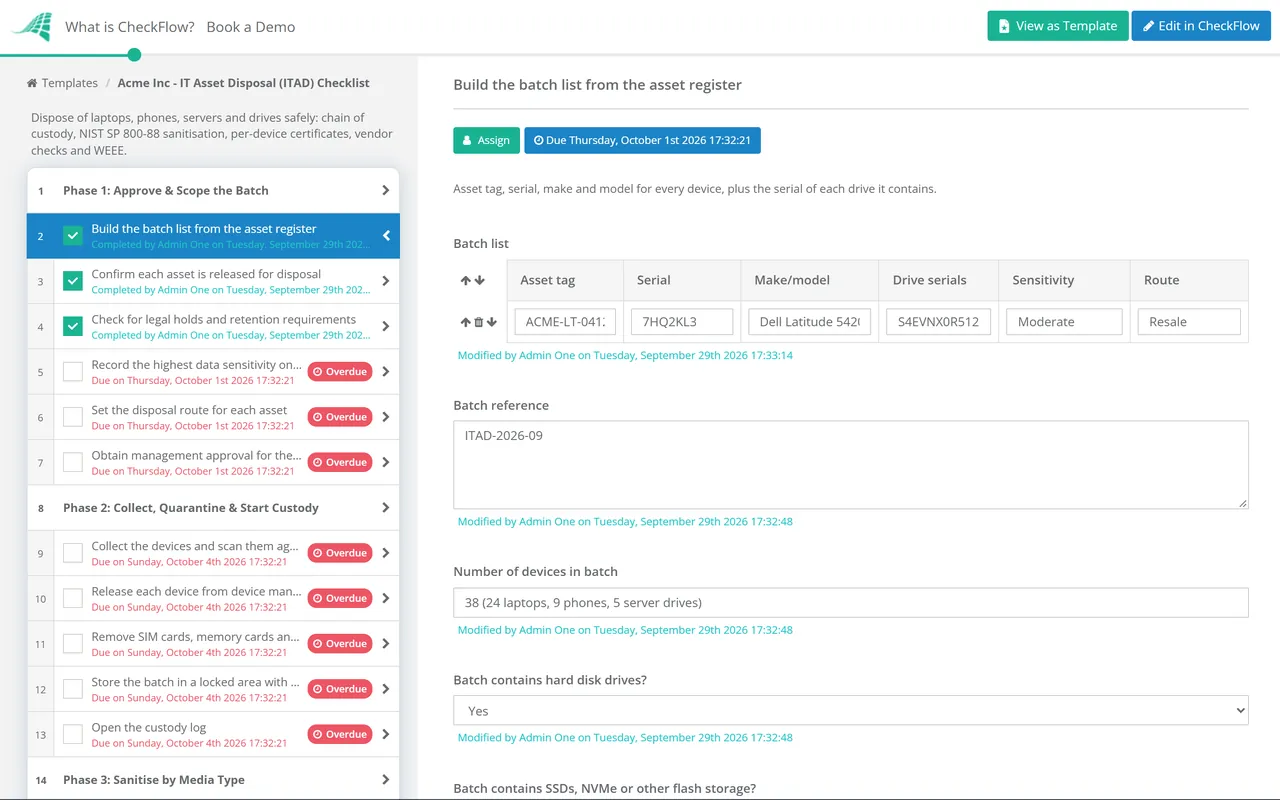
  • Build the batch list from the asset register — asset tag, serial, make and model for every device, plus the serial of each drive it contains
  • Confirm each asset is released for disposal — the owner has signed it off and, for servers, the decommissioning change is closed
  • Check for legal holds and retention requirements — any device under a litigation hold, investigation or retention rule comes out of the batch
  • Record the highest data sensitivity on each device — the data sets the minimum sanitisation method, not the device type
  • Set the disposal route for each asset — internal reuse, resale or donation, lease return, or recycling and destruction
  • Obtain management approval for the batch — record the approver and date before anything leaves quarantine
Phase 2

Phase 2: Collect, Quarantine & Start Custody

  • Collect the devices and scan them against the batch list — anything missing is logged as an exception today, not at reconciliation
  • Release each device from device management and anti-theft locks — a locked phone or laptop cannot be reset, reused or resold
  • Remove SIM cards, memory cards and removable media — and check printers, copiers, firewalls and switches for internal storage
  • Store the batch in a locked area with restricted access — keep an access log for as long as devices wait there
  • Open the custody log — every handover records who released, who received, the date and the device count
Phase 3

Phase 3: Sanitise by Media Type

Each media task is shown only when the batch contains that media type. NIST SP 800-88 Rev. 2 no longer lists techniques per device, so follow IEEE 2883 or your own approved standard for the exact command.

  • Use Purge for any device that will be reused or leave your control — NIST prefers Purge to Clear wherever possible; keep Clear for low-sensitivity media that stays in-house
  • Hard disk drives — overwrite or run the drive’s sanitise command; one pass is enough, and degaussing counts only with a degausser rated for the drive
  • SSDs, NVMe and other flash — run the device’s sanitise command (block erase or cryptographic erase); never rely on overwriting or degaussing
  • Phones, tablets and embedded devices — a factory reset through the device’s own interface counts as Clear; devices that cannot be reset go to Destroy
  • Failed, unreadable or obsolete drives — route straight to Destroy, because a drive that cannot be written to cannot be overwritten
  • Record the method, technique, tool and tool version per device — the certificate cannot be completed without them
Phase 4

Phase 4: Verify, Validate & Certify

  • Check the completion status of every sanitisation run — errors, anomalies or drive health warnings mean the result is not yet accepted
  • Inspect the remnants of destroyed media — and record the equipment used and the particle size achieved
  • Accept or reject each device — a rejected device is sanitised again with a different technique or escalated to Destroy
  • Complete a certificate of sanitisation for each device — manufacturer, model, serial, media type, method, technique, tool, verification method, and the checker’s name, title, date and signature
  • Sample drive contents only if your policy requires it — Rev. 2 says full or representative sampling is not needed otherwise
Phase 5

Phase 5: ITAD Vendor Checks & Handover

The first three tasks appear only when the vendor is new or its annual review is due. Otherwise the checklist goes straight to handover.

  • Confirm the vendor’s certification in the issuing body’s directory — R2v3 or e-Stewards, the expiry date, and whether the scope covers data sanitisation
  • Check the waste carrier is registered — search the public register yourself rather than accepting a copy of a certificate
  • Review the contract — security measures, data protection terms, disclosure of downstream vendors and your right to audit
  • Seal and hand over the batch against the manifest — both parties count, sign and record the seal numbers
  • Complete the waste transfer note or hazardous waste consignment note — in England and Wales keep them for two and three years respectively
Phase 6

Phase 6: Reuse, Resale, Lease Return or Recycling

Each task is shown only when at least one asset in the batch is on that route, based on the routes set in Phase 1.

  • Lease return — check the lease’s return conditions, Purge rather than Destroy so the kit can go back, and file the lessor’s receipt
  • Resale or donation — record the buyer or recipient and the proceeds or value, and remove asset tags and company markings
  • Recycling — obtain the vendor’s recycling report by serial number and a certificate of destruction for media destroyed off-site
  • Check who pays for treatment under WEEE — kit bought after 13 August 2005 is the producer’s cost unless you agreed otherwise; older kit you are replacing can go back to the new kit’s producer if you ask
  • Internal reuse — hand the device to the service desk for reimaging to the standard build and record the new assignment
Phase 7

Phase 7: Reconcile & Close the Batch

Assign the first task to someone who did not handle the devices.

  • Match every certificate to the batch list, serial by serial — a certificate that says “42 laptops” is not evidence for 42 specific laptops
  • Treat any unmatched serial as a potential data breach — open an incident and follow your breach assessment procedure
  • Update the asset register — status, disposal date, route and certificate reference for every asset
  • Stop support, warranty and insurance cover — disposed assets should stop costing money
  • File the evidence and sign off the batch — certificates, custody log and transfer notes stay attached to the checklist

Clear, Purge or Destroy: Matching Method to Media

NIST SP 800-88 Rev. 2, published in September 2025, supersedes the 2014 Rev. 1 but keeps its three methods: Clear, Purge and Destroy. What changed is everything around them. The device-by-device technique tables are gone in favour of IEEE 2883 or an organisation-approved standard, multi-pass overwriting is described as unnecessary, degaussing is narrowed, and a validation decision now follows every sanitisation. Use the table as a starting point for your own standard.

Media Reuse, resale or lease return Not reused Watch for
Hard disk drivesPurge with the drive’s sanitise command; Clear by overwrite only for low-sensitivity internal reuseDestroyDegaussing needs a degausser matched to the drive and never counts as Destroy
SSDs and NVMe drivesPurge by block erase or cryptographic eraseDestroyOverwriting misses spare and over-provisioned cells; degaussing does nothing to flash
Self-encrypting drivesPurge by cryptographic eraseDestroyOnly as strong as the drive’s encryption and key handling, which Rev. 2 sets conditions for
Phones, tablets, printers, network kitClear by factory reset through the device interfaceDestroyRelease management and anti-theft locks first, and remove cards
Failed or obsolete drivesNot suitableDestroyRev. 2 advises against shredding or pulverising for anything above the lowest data categories

For the vendor, two certifications matter most. R2v3, run by SERI, covers the recycler and its downstream vendors; for data work, look for a facility certified to Appendix B, which SERI describes as enhanced data destruction with tracking to serial-number level. e-Stewards, run by the Basel Action Network, requires compliance with the Basel Convention on cross-border shipments of hazardous waste and uses NAID AAA certification for data security. Check either certificate in the issuing body’s directory and read its scope.

In the UK, the WEEE Regulations 2013 and the waste duty of care reach business users as well as producers: store waste equipment safely, use a registered carrier and complete a waste transfer note when it leaves your site. Across the EU, Article 13 of the WEEE Directive 2012/19/EU sets the same financing split: producers pay for business equipment placed on the market after 13 August 2005, and users pay for older equipment unless it is being replaced.

Why Run IT Asset Disposal in CheckFlow?

1

The batch list travels with the work

A table inside the first task holds every asset tag, serial and route. Sanitisation, certification and reconciliation all work against that table, with the vendor’s certificates attached alongside.

2

Steps change with the media and the route

Yes/no fields in Phase 1 record which media types and routes the batch includes. Conditional logic hides the SSD steps for a batch of phones and the lease-return steps when nothing is leased.

3

Approved vendors kept as a data set

Keep approved ITAD vendors in a data set with certification, scope and expiry dates. Choosing the vendor fills them into Phase 5, and the activity trail records who handled each batch.

Most laptops and phones reach this checklist through a leaver. CheckFlow’s IT offboarding software covers access removal and device recovery, so each device arrives in quarantine with a named previous user.

Servers and storage arrive from the Server Decommissioning Checklist, which retires the service, takes the final backup and releases the hardware. For an ISMS, this checklist is the evidence for ISO/IEC 27001:2022 Annex A 7.14, secure disposal or re-use of equipment.

Frequently Asked Questions

What is IT asset disposal (ITAD)?

+

ITAD is the controlled process for retiring physical IT equipment: laptops, phones, servers, storage and network devices. It covers securing the equipment, sanitising or destroying its data, documenting that with certificates, and then reusing, reselling, returning or recycling the hardware. It has to prove two things: no data left with the device, and the device was handled lawfully.

What is the difference between Clear, Purge and Destroy?

+

They are the three sanitisation methods in NIST SP 800-88. Clear uses the device’s normal interface, such as an overwrite or a factory reset, and protects against simple recovery. Purge uses techniques such as a drive’s sanitise command or cryptographic erase, so recovery is infeasible even in a laboratory, and the device can usually still be used. Destroy achieves the same outcome by physically destroying the media. NIST recommends Purge over Clear wherever it is possible, and notes that Destroy is often the simplest option when the media will not be reused.

Is NIST SP 800-88 Rev. 1 still current?

+

No. Rev. 2 was published in September 2025 and supersedes Rev. 1 from 2014. The biggest practical change is that Rev. 2 no longer tells you which technique to use for each device type. It asks organisations to run a media sanitisation programme and to follow IEEE 2883, NSA specifications or their own approved standard for techniques.

Do SSDs have to be physically destroyed?

+

Not necessarily. A working SSD can be purged with the drive’s own sanitise command, using block erase or cryptographic erase, and then reused or resold. Hard-disk habits do not work: overwriting leaves data in spare cells the host cannot address, and degaussing has no effect on flash. Destroy an SSD that has failed or will not complete a sanitise command.

What should a certificate of data destruction include?

+

One record per device, not a batch total. NIST’s sample certificate lists manufacturer, model, serial number, media type, sanitisation method and technique, tool and version, verification method, and the verifier’s name, title, date and signature. Ask your vendor for that shape, then match every serial to what you sent.

What is the difference between R2v3 and e-Stewards?

+

Both certify electronics recyclers and ITAD providers. R2v3 is run by SERI; its core requirements cover the facility and its downstream vendors, and optional appendices add specialisms such as data sanitisation (Appendix B), test and repair (Appendix C) and materials recovery (Appendix E). e-Stewards is run by the Basel Action Network, requires compliance with the Basel Convention on hazardous waste shipments and uses NAID AAA certification for data security. Either works if the certificate is current and its scope covers the work you are sending.

Is CheckFlow free for this template?

+

14-day free trial, no card required. The Business plan is $10 per user per month after the trial. Full details at checkflow.io/pricing.

Every Serial Accounted For, From Quarantine to Certificate

Free trial — no credit card required.