Server Decommissioning Checklist Template

Switching a server off takes a minute. The hard part is finding everything that still depends on it beforehand, and removing every trace of it afterwards: the DNS record, the firewall rule, the service account and the backup job that will otherwise fail every night for a year.

This free server decommissioning checklist retires a server or the service on it without surprising anyone who still relies on it. It is written for infrastructure and operations teams, MSPs retiring servers for clients and anyone running a data centre exit or cloud migration. It walks through dependency discovery, change approval and notice, the final backup, a staged shutdown with a scream test, removal from every system that references the server and a platform-specific teardown for physical, virtual or cloud. It ends with a retired record in the CMDB, costs that have actually stopped and, for physical hardware, a documented hand-off to your IT asset disposal process.

Use This Template Free See Live Example
No Credit Card Required

Powered Off Is Not the Same as Decommissioned

A half-finished decommission is worse than none, because it looks finished. The server is gone, so nobody checks the things that pointed at it. A DNS name left pointing at a deleted cloud resource can be claimed by someone else: Microsoft calls these dangling DNS records, warns that they enable subdomain takeover, and recommends making DNS removal a required check when a service is decommissioned. A firewall rule left open for the old IP address applies to whatever is given that address next. A service account nobody uses is a credential nobody rotates.

The other failure is going too early. The CMDB rarely lists every consumer. The month-end report, the partner’s file transfer and the script with a hard-coded IP address show up only when they break. That is why the checklist finds dependencies from traffic, not just from records, and stages the shutdown so it can be reversed.

Server decommissioning

Retiring the service and the server

Covers: dependencies, approval, data retention, shutdown, cleanup across every connected system.

Owned by: the infrastructure team, under a change record.

Ends: with a retired CI and, for physical kit, hardware handed to ITAD.
IT asset disposal

Disposing of the hardware

Covers: chain of custody, media sanitisation, certificates, vendor checks, resale or recycling.

Owned by: IT asset management, often with an ITAD vendor.

Runs in: the IT Asset Disposal Checklist, which picks up where this one stops.

What the Server Decommissioning Checklist Covers

Seven phases, from finding out who still depends on the server to closing the record. The teardown tasks change with the platform you select, and a failed scream test sends the checklist back to discovery.

Phase 1

Phase 1: Scope & Dependency Discovery

Treat the CMDB as the starting point, not the answer. Most surprises in a decommission come from consumers nobody recorded.

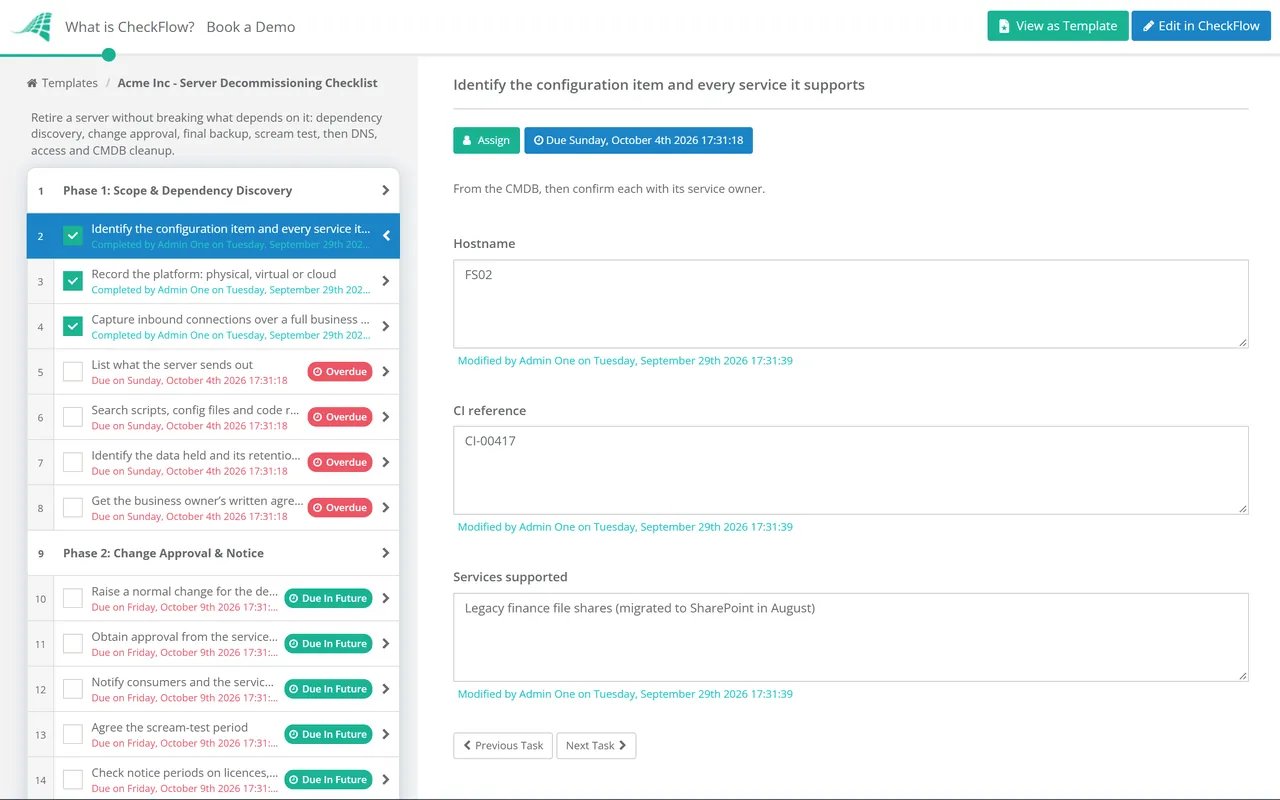
  • Identify the configuration item and every service it supports — from the CMDB, then confirm each with its service owner
  • Record the platform: physical, virtual or cloud — the answer sets which teardown tasks appear in Phase 6
  • Capture inbound connections over a full business cycle — firewall, load balancer and flow logs across at least one month-end
  • List what the server sends out — scheduled jobs, file transfers, emailed reports and API calls to other systems
  • Search scripts, config files and code repositories for the hostname and IP — hard-coded references never appear in the CMDB
  • Identify the data held and its retention requirement — records schedule, contract terms and any legal hold
  • Get the business owner’s written agreement that the server can go — recorded on the checklist, not in an email thread
Phase 2

Phase 2: Change Approval & Notice

  • Raise a normal change for the decommission — include the rollback plan and how long the rollback option stays open
  • Obtain approval from the service owner and the change authority — both names and dates on the record
  • Notify consumers and the service desk — give the disable date, the power-off date and who to call if something stops working
  • Agree the scream-test period — long enough to include a month-end if the server touches finance or reporting
  • Check notice periods on licences, support and hosting contracts — so nothing renews after the server has gone
Phase 3

Phase 3: Data Migration & Final Backup

  • Migrate any data or function still in use — the new owner confirms it works before this server is touched
  • Take a final full backup and test a restore from it — after the disks are gone, a bad backup cannot be fixed
  • Set retention on the final backup from the records schedule — label it with the change reference so it is not expired by normal rotation
  • Export logs and records needed for audit or legal hold — shown only when the server holds data under retention or hold
  • Record where every dataset went and who owns it now — the question an auditor asks two years later
Phase 4

Phase 4: Staged Shutdown & Scream Test

Nothing is deleted in this phase. Every step is reversible within minutes.

  • Drain the server from load balancer pools and stop its scheduled jobs — traffic stops before anything is switched off
  • Stop the application services or disconnect the network — quicker to reverse than a power-off if a hidden consumer appears
  • Power the server off and leave it off for the agreed period — log every complaint against the change record
  • Power the server back on and log the dependency — shown only when a dependency surfaces; the checklist returns to Phase 1
  • Owner confirms no impact at the end of the period — the go decision for permanent removal
Phase 5

Phase 5: Remove Every Reference

  • Delete the server’s DNS records, including CNAMEs and reverse lookups — before the IP address or cloud resource is released
  • Remove firewall, NAT and load balancer rules for its addresses — a rule left behind applies to whoever gets the address next
  • Remove it from monitoring, alerting and vulnerability scanning scopes — alerts for a dead host teach people to ignore alerts
  • Delete its backup jobs and release the agent licence — the retained final backup is kept separately
  • Disable the computer account and any service accounts only it used — revoke its certificates and delete its secrets from the vault
  • Remove it from patch, configuration management and remote access tools — and release the IP reservation
Phase 6

Phase 6: Platform Teardown

Tasks are shown for the platform chosen in Phase 1. Physical servers end with a hand-off to ITAD; sanitisation happens there, not here.

  • Virtual only: delete the VM, its virtual disks and every snapshot — and remove it from affinity rules and replication jobs
  • Cloud only: terminate the instance, then delete surviving volumes and snapshots — on AWS, volumes set to persist keep incurring charges
  • Cloud only: release static IPs and delete its security groups, roles and keys — a disassociated Elastic IP is still billed until released
  • Physical only: power down, uncable and remove the server from the rack — update the rack diagram, patching record and PDU allocation
  • Physical only: disconnect the BMC and asset-tag the hardware — remove it from the management network; the tag links the box to its record
  • Physical only: hand the hardware to the ITAD process with the asset record — chain of custody starts at this signature
Phase 7

Phase 7: Close the Record

  • Set the CMDB configuration item to retired rather than deleting it — its history and relationships still matter for audits and old incidents
  • Update the asset register and cancel licences and support contracts — record the ITAD reference for physical hardware
  • Archive the server’s runbooks and diagrams, marked as retired — so nobody follows them for a server that no longer exists
  • Check the next month’s bill and licence report — a forgotten volume, IP address or support renewal shows up here
  • Attach the evidence, close the change and record the owner’s sign-off — the decommission is complete

What Gets Left Behind, and What It Costs You

Every item in Phase 5 and Phase 6 is there because it outlives the server when nobody removes it. The table is a useful prompt when you adapt the template: if your environment has another system that references servers, add it.

Left behind What happens Removed in
DNS records, especially CNAMEs to cloud resourcesDangling records can be taken over and used to serve content under your domainPhase 5
Firewall and NAT rulesAccess intended for the old server is granted to the next device given its addressPhase 5
Service accounts, certificates and secretsValid credentials with no owner and no rotationPhase 5
Monitoring checks and backup jobsDaily failures that train the team to ignore real onesPhase 5
Cloud volumes, snapshots and static IPsCharges continue after the instance is terminatedPhase 6
Licences and support contractsRenewals paid for a server that no longer existsPhases 2 and 7
An active CI in the CMDBIncident responders and auditors chasing a server that is gonePhase 7

In ITIL 4 terms, the decommission is authorised through the change enablement practice, and the CI’s status change is part of service configuration management. Teams working to ISO/IEC 27001:2022 will find the completed checklist supports Annex A 5.9 (inventory of information and other associated assets) and 8.10 (information deletion). Control 7.14, secure disposal or re-use of equipment, applies to the hardware after the hand-off, which is why that work sits in the disposal process rather than here.

The cleanest decommissions start at build time. A server built with an owner, a CMDB record and deliberate cloud volume settings is far easier to retire, which is why the server setup checklist captures all three on day one.

Why Run Server Decommissions in CheckFlow?

1

The scream test runs to a date

Dynamic due dates set the end of the scream test from the day the server was powered off, so the go decision lands on the right day without anyone counting. If a dependency surfaces, one answer shows the restore task and sends the work back to discovery instead of on to deletion.

2

Cleanup goes to the teams that own it

DNS, firewall, identity, backup and monitoring usually belong to different people. Assign each cleanup task to the group that owns the system, and record each deleted DNS record or firewall rule in a table inside the task, so nobody has to ask whether it was done.

3

Proof that it is really gone

The owner’s agreement, the restore test, the ITAD hand-off and the final bill check are attached to the tasks they prove, with who completed each and when. When an auditor asks what happened to a server, you open one checklist instead of searching three ticket systems.

A decommission is a change like any other, and often a riskier one because its dependencies are the least documented. CheckFlow’s change management checklist software shows how approvals, rollback plans and post-implementation reviews run across every change, and the IT Change Management Checklist gives you the RFC-to-review process this template runs under.

Physical hardware leaves this checklist at the hand-off. The IT Asset Disposal Checklist covers sanitisation, certificates and the ITAD vendor, and the Backup Verification & Restore Test Checklist is the routine that keeps restore tests, like the one in Phase 3, from being the first in a year.

Frequently Asked Questions

What is server decommissioning?

+

Server decommissioning is the controlled retirement of a server and the services it runs. It covers finding what depends on the server, getting approval, preserving the data that must be kept, shutting down in stages, removing the server from every system that references it and updating the CMDB. For physical servers it ends by handing the hardware to the IT asset disposal process, which handles data sanitisation and recycling or resale.

What is a scream test, and how long should it last?

+

A scream test is a deliberate, reversible shutdown to find out whether anyone still depends on a server: you turn it off and wait to see who complains. It catches consumers that dependency discovery missed. There is no standard length. Set it from what the server does: long enough for every scheduled job it runs to have run at least once, including a month-end if it touches finance, payroll or reporting, and a quarter-end for anything used in quarterly processes. Never delete data during the test.

How long should you keep the final backup of a decommissioned server?

+

As long as the longest retention requirement on the data it held, which comes from your records retention schedule, contracts and any legal hold, not from the backup system’s default rotation. Keep the final backup outside normal rotation, labelled with the change reference, and test a restore before the server goes. When the retention period ends, delete it deliberately and record that you did.

Should a decommissioned server be deleted from the CMDB?

+

No. Change its status to retired or decommissioned and keep the record. Past incidents, changes and audit evidence refer to that configuration item, and deleting it breaks those links. A retired status also stops the server appearing in active service maps and reports, which is what most people want when they ask to delete it.

What is the difference between decommissioning and IT asset disposal?

+

Decommissioning retires the service: it removes the server from use and from every system that references it. IT asset disposal deals with the physical equipment afterwards: chain of custody, sanitising or destroying the storage media, certificates of destruction and choosing a reputable ITAD vendor. Virtual and cloud servers need only decommissioning. Physical servers need both, with a signed hand-off between the two.

Is CheckFlow free for this template?

+

14-day free trial, no card required. The Business plan is $10 per user per month after the trial. Full details at checkflow.io/pricing.

Retire Servers Without Leaving Anything Behind

Free trial — no credit card required.