
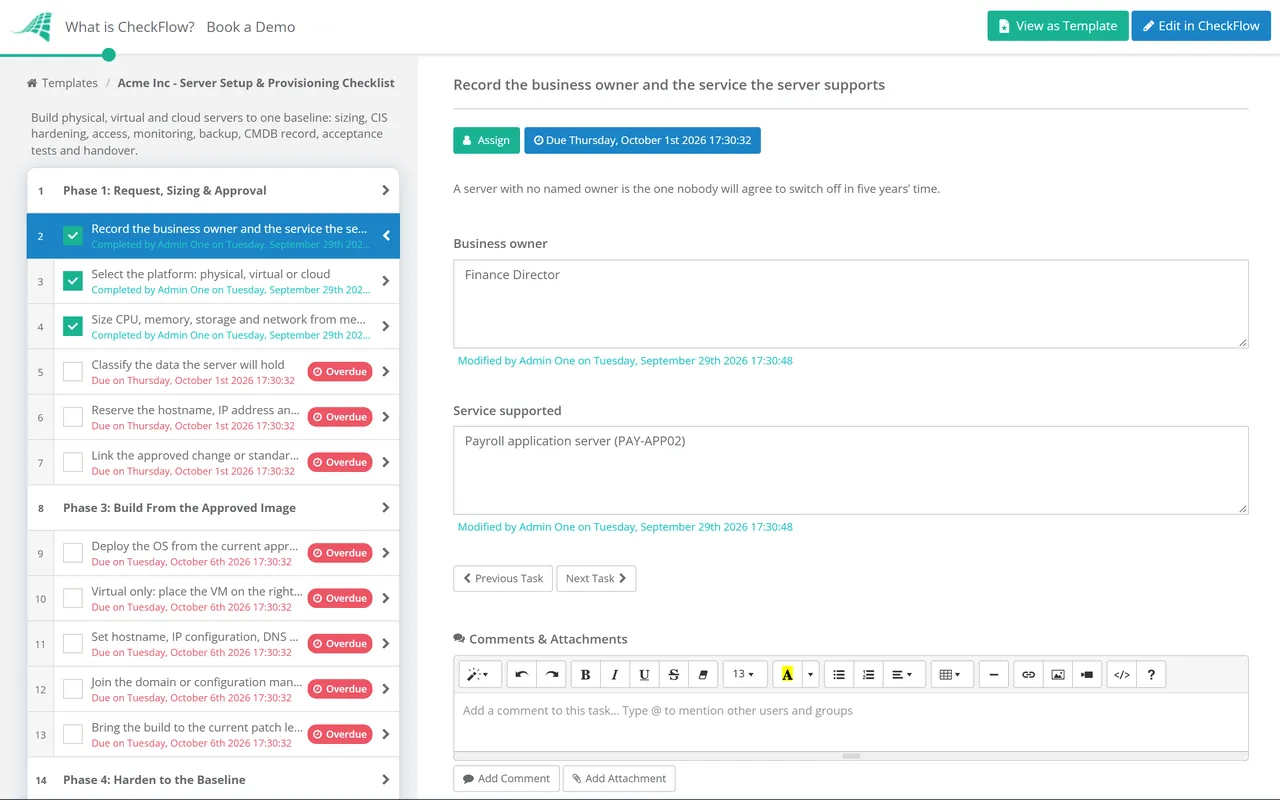
This checklist
Runs: once per server, from request to acceptance.
Owned by: the build engineer, with sign-off from operations.
Output: a baselined server, a CMDB record and a build file.
No Credit Card Required
This free server setup checklist takes a new server from the request to the moment operations accepts it. It works for physical, virtual and cloud builds from one template: you answer one question about the platform and the checklist shows the rack, firmware and management-controller tasks only for physical hardware, and the placement and volume tasks only for virtual machines and cloud instances. Infrastructure engineers, MSP technicians and platform teams use it to build from the approved image, harden against a written baseline, wire the server into access control, logging, monitoring and backup, register it and prove it works. The result is a server that matches your standard and a build record with the evidence attached, signed off by the person who will support it.
Most teams already have a build standard, spread across a wiki page, an image pipeline and one engineer’s memory. The problem is the steps that sit outside the image: reserving the IP address, adding the server to the backup policy, creating the monitoring checks, recording the configuration item, handing over the recovery key. Those are done by hand, by different teams, and they are the steps that get skipped on a Friday afternoon build.
A provisioning checklist closes that gap. It does not replace your image or your automation. It checks that every step the automation does not cover was done, by whom, and with what result. It also marks a clear end point: provisioning finishes when operations accepts the server.
Runs: once per server, from request to acceptance.
Owned by: the build engineer, with sign-off from operations.
Output: a baselined server, a CMDB record and a build file.
Runs: alongside provisioning, often as a standard change for a repeatable build.
Owned by: the change authority.
Output: approval, a schedule and a closed change.
Runs: daily, weekly and monthly for the life of the server.
Owned by: the operations or infrastructure support team.
Output: health checks, patch cycles and capacity reviews.
Seven phases take a server from request to accepted. The physical install phase, and the virtual and cloud placement tasks, appear only for the platform you select.
The platform answer in this phase drives the rest of the checklist. Choose physical, virtual or cloud before anything else is assigned.
Shown only when the platform is physical. Virtual and cloud builds go straight to Phase 3.
Assigned to the operations lead, not the engineer who built the server. The server is not live until someone who will support it has accepted it.
The goal is the same on every platform. The work to get there differs, and one checklist that hides what does not apply is easier to keep current than three documents that drift apart.
| Step | Physical | Virtual | Cloud |
|---|---|---|---|
| Placement | Rack, U position, dual power feeds | Cluster, datastore, anti-affinity rules | Account, region, network, subnet |
| Below the OS | BIOS, RAID and NIC firmware; BMC hardening | Handled at the host layer | Handled by the provider |
| Image | Deployed over the network or from media | Cloned from the approved template | Launched from the approved machine image |
| Storage | RAID layout and disk health | Virtual disks on the right tier | Encrypted volumes and their delete-on-termination flag |
| Hardware monitoring | Sensors via the BMC | Host-level, owned by the virtualisation team | Provider health events |
| Asset record | Serial number, warranty and support contract | CI only | CI plus tags for owner and cost centre |
Management controllers deserve the attention Phase 2 gives them. CISA and the NSA issued joint guidance in 2023 on hardening baseboard management controllers. It recommends changing default credentials, keeping BMC firmware up to date and separating BMC traffic from the production network, because a BMC works independently of the operating system and stays reachable even when the server is off.
In the cloud, the storage row matters at both ends of a server’s life. On AWS, whether an EBS volume is deleted with its instance depends on its delete-on-termination setting, and the default differs between root and data volumes and between the console and the CLI. Volumes that survive keep costing money. Setting the flag on purpose at build time makes the server decommissioning checklist shorter and cheaper years later.
If you run an information security management system against ISO/IEC 27001:2022, a completed build record is evidence for several Annex A controls: 5.9 (inventory of information and other associated assets), 8.9 (configuration management), 8.13 (information backup), 8.15 (logging) and 8.16 (monitoring activities).
The platform question in Phase 1 uses conditional logic to show the rack and firmware phase only for physical servers, and the placement and volume tasks only for virtual machines or cloud instances. Engineers see only the steps that apply, and you maintain one build standard instead of three.
A build crosses the network, security, backup and operations teams. Assign each task to the group that owns it, capture the hostname, IP and image version in form fields, and attach the scan report and acceptance results to the task they prove. The activity trail shows who did what and when.
Start a build checklist from a service desk request through the REST API, webhooks or Zapier, so request and build record are linked. A data set of approved images and VLANs keeps choices consistent, and template versioning applies a revised standard to the next build.
A checklist says what must be done. A runbook says exactly how, down to the commands. Our IT runbook template guide explains how to write the build runbook that Phase 7 hands to operations, and how to keep it current once the server changes. Every build should also run under a change record: the IT Change Management Checklist covers that side.
Once operations accepts the server, provisioning is over. The Server Maintenance Checklist covers the daily, weekly and monthly care that follows, and the Patch Management Checklist runs the monthly patch cycle the new server has just joined.
Server Maintenance Checklist
Patch Management Checklist
IT Capacity Planning Checklist
IT Change Management Checklist
Server Decommissioning Checklist
Describe the process in a sentence and the AI checklist generator drafts the phases and tasks for you.
It should cover the whole path from request to handover: the owner and sizing, the build from an approved image, hardening against a written baseline, administrative access, logging, monitoring, backup enrolment, registration in the CMDB, acceptance testing and a named handover to operations. Physical servers add racking, cabling, firmware and management-controller hardening. The steps most often missed sit outside the image, so give them their own tasks.
A hardening baseline is the written set of security settings every server of a given type must meet: disabled services, password and lockout policy, audit settings, firewall defaults and so on. Many organisations start from the CIS Benchmarks, which are free consensus-based configuration guides for operating systems and other products. The CIS Level 1 profile is intended to be implemented without much performance impact, while Level 2 is a defence-in-depth profile for environments where security is paramount. Whatever you choose, record any deviation and the reason for it.
From an approved image or template wherever you can. An image makes the operating system layer identical every time and moves most hardening work into the image pipeline, where it is tested once. The image still needs an owner and a review cycle, because a stale image ships every missing patch to every new server. The checklist covers what an image cannot: IP reservation, backup enrolment, CMDB registration and acceptance.
When it has passed acceptance and operations has accepted it. A sensible minimum is a clean reboot, a successful application smoke test with the service owner, a completed first backup with a file restored from it, logs arriving centrally, monitoring showing green and a scan with no findings above your agreed severity. A server that is running but not handed over is still a project, and nobody is on call for it.
There is no racking, cabling or firmware work, because the provider owns everything below the virtual machine. The extra work moves to placement and governance: the right account and subnet, encrypted volumes, security groups, owner and cost-centre tags, and a deliberate choice about what happens to storage when the instance is deleted. Everything from hardening to handover stays the same.
14-day free trial, no card required. The Business plan is $10 per user per month after the trial. Full details at checkflow.io/pricing.
14-day free trial, no credit cardFull refund in your first 30 daysUS or EU hosting